Sunday, November 27, 2022

Enabling Nested Virtualization on Hyper-V

To enable nested virtualization on Microsoft Hyper-V; run the following command from Powershell on your Hyper-V host.  

 Set-VMProcessor -VMName syspass -ExposeVirtualizationExtensions $true


If you try running the command while the System is running you will get an error.


When the command is successful; you will be able to run a virtual server on your Hyper-V Host.  You need to run this command on the VM on the host if you are wanting to run Hyper-V nested; KVM or docker on a virtual machine running on the host.

Thursday, September 29, 2022

Information about Meraki Licensing

 When renewing your Cisco Meraki Licensing, it should be done within a few weeks.  I have gotten conflicting information from the sellers and the technical support at Meraki.  According to the Meraki support rep, the license is active from the date of the invoice.


Hello Trevor,

As a reminder, the license key is active from date of invoice complete which was xx/xx/2022. When the license is added to the organization it will have a license start date from xx/xx/2022. If the license is added as a renewal today, the co-termination date would be xxx xx, 2025 (the organization will absorb the current remaining 88 days). I would suggest to add the license as soon as possible.

You may always contact your Meraki Account Manager if you had any questions or concerns about your licensing or order; **** ****@cisco.com

Thank you again, 

Cisco Meraki Support


So if you apply the license where can you find your keys?  Well that can be found in the change log.  When you apply your license you can restore your old license by clicking on the undo arrow at the far right (shown below highlighted in yellow).


You will get a popup with a key you can add to update your license.  If however you miss or close the popup without getting your key you can get the key from the change log.  The key is labelled as an unclaimed license.


You will want to select the latest generated value as shown below


This is an ongoing issue here is a link to a reddit thread where someone had a similar issue.

Monday, September 26, 2022

RDP Periodically Freezes in Windows 10 and Windows Server

I work with windows a lot and have found I had been having connection issues with Remote Desktop on most of my Windows Servers and some Windows 10 Machines.  After some research I found that Windows Server version 1809 (2022) and Windows 10 versions 1806 - 21H2, I have had issues with Remote Desktop freezing.  I would have several stints where the RDP client froze on my workstation or computer I am remoting in from.  This wasn't the only computer that was having an issue.  Another user which also had remote desktop on a workstation (for specific reasons) had also been intermittingly been having the same issue.  I also found that in some instances AV also causing some issues.

https://docs.microsoft.com/en-us/answers/questions/664026/2022-rds-session-freezing-randomly.html

https://blog.techinline.com/2021/01/08/remote-desktop-keeps-freezing-windows-10/

After some testing; I found a way to mostly stop the disconnection and freezing from the Remote Desktop Client and Server by Disabling UDP and using only TCP.  To do this we are going to add a registry key and modify a group policy setting.  Let's do the registry key entry first.

On your remote desktop client open and type in the following in cmd promt or powershell as administrator

reg add “HKLM\software\policies\microsoft\windows nt\Terminal Services\Client” /v fClientDisableUDP /d 1 /t REG_DWORD


Now group policy.


Run gpedit.msc. then Navigate to Computer Configuration > Administrative templates > Windows components > Remote Desktop Services > Remote Desktop Connection client.

Enable the Turn off UDP on client setting.

Now that takes care of the remote desktop client.  On the Remote Desktop server on the machine you are wanting to connect to go to:

Computer Configuration > Administrative templates > Windows components > Remote Desktop Services > Remote Desktop Session Host.

Select Transport Type -> USE ONLY TCP


Thursday, September 15, 2022

Issues connecting to DFS shares from a computer

The issue is an odd one.  A single computer connected to a domain lost it's connection to two DFS file shares.  The file shares are wide open for all domain users with nothing that would cause a restriction connecting to the share.  The share shows up in the user's share list but gives a permissions alert when clicked on and displays as 0 bytes or as nothing at all.

Issue: An active directory connected workstation (laptop) won't connect to DFS file shares.  The two network shares in question have read/write and execute privileges' granted to everyone in the organization.  Out of 8 file shares two of them say that domain users do not have permission to access them; and these are shares where everyone has access.


The shares that they should have access to show a 0KB size and they do not have permissions to access the resource but are clearly a member of the security group to get access to the shared resource.

After trying several of the typical ways to fix the issue such as:

  • removing the system from the active directory
  • a disk check and file system scan
  • logging in as a separate user
  • logging into another system with the user where the issue exists.
After several attempts to get it fixed using typical tools; I looked outside the box; the event viewer was not showing anything helpful for troubleshooting so  I disabled offline files to see if I could access the network shares. After doing this it appears I was able to.

Resolution:

The resolution is a little odd I think it was caused by a corrupt DFS Cache which needs to be removed using local computer group policy.  Local computer group policy processing order can be found here.  To summarize the processing order can be seen below.

  1. Local
  2. Site
  3. Domain
  4. OU

Removing the computer from the domain and removing the computer from the active directory was not enough to reset the offline DFS Cache.  I had to enable the prevention of the Offline File use to get the issue fixed.

On the local computer

open gpedit.msc

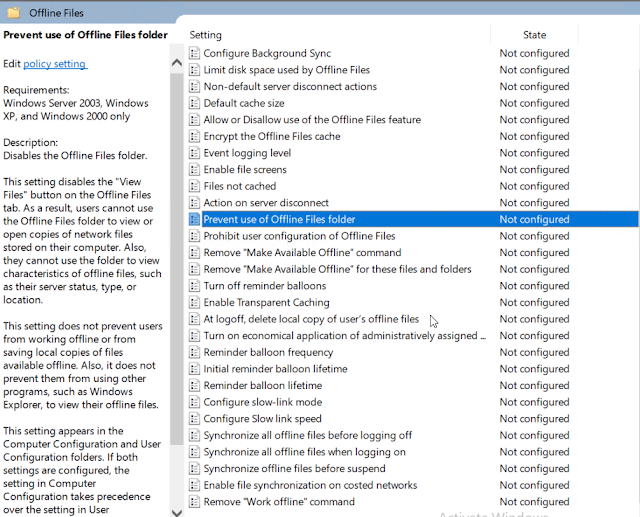
go to local computer policy -> Computer Configuration -> Network -> Offline Files -> Prevent use of Offline Files Folder

Enable Prevent use of Offline Files folder


Remove the computer from the Active directory, and login as a local user.  Remove any unused users form the System Properties -> Advanced -> User Profiles -> Local User Profiles


Once that was done, I tried to connect to the DFS share from the workgroup computer; using domain credentials and the DFS shares started showing correctly.  Then when I reconnected the system to the domain, all users could access all the DFS shares properly.  After verifying that the share showed up properly; I then set the Prevent use of Offline Files folder to "Not Configured".  Then I verified that the network drives still showed properly and were accessible which they were. It was an odd issue which did not affect the user but a specific machine's connection with specific shares regardless of the user logged in.


Tuesday, August 09, 2022

Hyper-V VM Backup using Powershell (VM-Export)


One of the many things I've been working on is an automated script to do VM backups.  I've been doing a lot of work automating processes with PowerShell recently so I thought I would just sit down and finish hammering out this little script I was working on.

This PowerShell script exports Hyper-V VM's to a directory; and sends an email notification when the export completes or if there is an error.  I am not 100% there with the backup as there are still a few bugs like sending an email when the entire script finished but I am confident enough of this working that I am going to pass this along for anyone to use if they wish.


##########BACKUP VM SCRIPT##########
#Set Variables for count, date and VM's you want to backup
$BackupNum = 0;
$TimeStart = Get-Date;
#Set the names of the computers you want to backup
$ComputerNameArray = '$VM1','$VM2','$VM3','$VM4','$VM5','$VM6','$VM7','$VM8','$VM9';
#Get the Number of Computers you want to backup
$BackupTotal = ($ComputerNameArray.count -1);
#Set the Path to save the backups
$SavePath = "$PATH TO FOLDER";

#Run the backup while the backup number is less then the backup total
while($BackupNum -le $BackupTotal){
#Set the first computer to be backed up
$ComputerName = $ComputerNameArray[$BackupNum];

#Check to see if there are previous backups
if (Test-Path -Path $SavePath\$ComputerName) {
#if the computer name is not blank remove the previous backup
if ($ComputerName -ne ""){
Remove-Item -Path "$SavePath\$ComputerName" -Force -Recurse
}
}

#Get the start time of the backup
$TimeStart = Get-Date;

#Export Backup
$ExportJob = Export-VM -Name $ComputerName -Path $SavePath;

#After the export runs get the time finished and send an email notification
$TimeFinished = Get-Date;
Send-MailMessage -From '$MAILFROM' -To '$EMAIL' -Subject "VM Backup for $ComputerName was Successful" -Body "The VM $ComputerName was successfully backed up. It started at $TimeStart and Finished at $TimeFinished" -smtpserver '$SMTP_SERVER'
#Auto Increment the export so we can get the next computer name
$BackupNum++
}

#While the jobstate is running or not started; get the progress
while( $ExportJob.State -eq "Running" -or $ExportJob.State -eq "NotStarted"){ 
$progress = $ExportJob.Progress.PercentComplete;
Write-Output ("[Export] " + $($ExportJob.Progress.PercentComplete) + "% complete"); 

#If the backup state is not Completed and errors out
if($ExportJob.State -ne "Completed") { 
#Get the time finished
$TimeFinished = Get-Date;
#Send an email that the export did not finish
Send-MailMessage -From '$MAILFROM' -To '$MAILTO' -Subject "Backup For $ComputerName Failed at $progress % complete" -smtpserver '$SMTPSERVER'
Write-Error ("Export Job did not complete: " +$ExportJob.State);
throw $ExportJob.Error;
}
##########END SCRIPT###########

Resources

Tuesday, August 02, 2022

Resetting Papercut's com port with ITC 5400 Coinop


Over the last few months I've been having an issue with a papercut print release system.  What had been happening is over a few days of running the papercut software would no longer read the coin op.  (This is happening even with rebooting the system).  Now a major caveat here is the print release system is running on a machine with VPRO which automatically removes the use of one com port typically Com 3.  Before you start your com port for Vpro should be something else so I've set the com port for VPro to COM 14.  

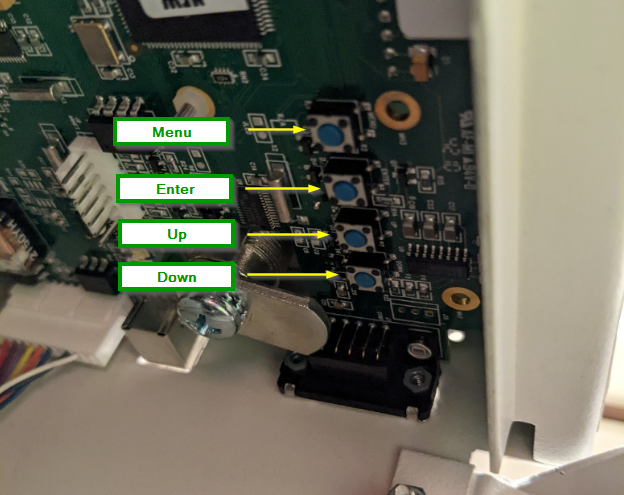
Inside the door of the coinop is a circuit board with 4 buttons: menu, enter, up, down.


To begin to modify the settings on the coinop you need to unlock the back of the coinop and run the machine in bypass mode.

Step 1 - Unlock the device, and leave the back open


Step 2 - Put the machine in bypass mode


Step 3 - Pressing the menu button go to Print Setup Mode


Step 4 - Go to Print Type


Step 5 - using the up or down button go to print protocol 1


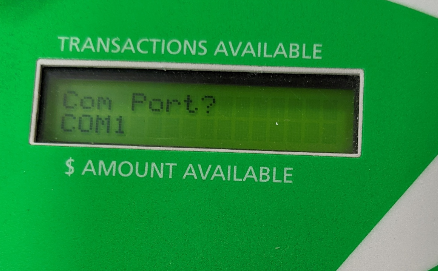
Step 6 - Setup the com port


Step 7 - You get an option of COM1 or USB select Com 1


Step 8 - you will then be asked if you want to disable relay print.  Select No.


Step 9 - Reboot the coinop.  Once rebooted so long as the com cable on the computer is set to COM1 then you should be getting coin info from the Coinop.


Wednesday, July 13, 2022

Using Powershell to send an email alert when a file type is found

A while back I had the privilege of working with a brilliant dev; Andrew Nesbit in helping sort out some processes for the Horizon ILS and how it would work with the Metro Library Card System (melibraries.ca).  I helped him with some of the Horizon work with how the different library systems work together more specifically SirsiDynix Symphony, polaris and Horizon.  

One issue that came out that I never got around to fixing till now was the creation of the .FAIL file that is generated if the server has a problem or there is some sort of incompatibility between library systems, such as pin, city name, password length, etc.  There is also an issue with the service stopping without notice; which also creates a .FAIL file as shown below.

Metro FAIL file.  Dead Process


Metro FAIL file.  FAILED User


So I decided to finally write a powershell script to send me an alert when this happens.  So it looks in the directory where the Me Server saves it's logs; and I have powershell checking that directory as shown below.  The script uses powershell to check for a .FAIL file in the log directory and then sends a send-mail message.  I know that this is depreciated and I will have to update this sooner then later; but it will work for the purpose I need for now.

Tuesday, June 28, 2022

How to get the SQL Express Offline Installer

When working in a test environment you don't exactly want something to have internet access; so you need to be able to download files in an offline setting.  I had this need when I was working on a SQL numbering issue where SQL server added 1000 to the item count.  Not particularly helpful and annoying to fix.  The SQL version I was working with was 12 (or 2014) for those at home keeping track by year.  At any rate I needed to fix this 1000 item count but part of the issue was that the count is a primary key.

To get the offline install of SQL Server in this case we are going to use Express 2019, we need to go to https://www.microsoft.com/en-ca/sql-server/sql-server-downloads

https://www.microsoft.com/en-ca/sql-server/sql-server-downloads

When you download the Express download you will get a Application download called SQL2019-SSEI-Expr.  


Run the application.  When the application runs you get three options.  Basic, Custom and Download media which we are going to do.


When you select download media you get a few more options.  For the purposes of what I want I am selecting Express Advanced.


After pressing download; it will download to the directory where you have specified it to download.  In my case C:\Users\Trevor Tye\Downloads


Here I have it in my download directory.


Tuesday, June 07, 2022

How to find the Windows Product Key using Powershell


I have had the need recently to get the product keys from some new windows laptops.  Now automated ticketing systems such as Lansweeper and Solarwinds can scan for these keys and there are 
free tools to save these keys to txt files such as MagicJellyBean Keyfinder.  However what I eventually want this to do is put the data into a Microsoft 365 or google workspaces spreadsheet. This is because I have to inventory some non-domain connected systems and there is not ticketing/inventory system on the network.

So I made a powershell script which will eventually save the information to a Microsoft or Google Workspaces spreadsheet but for now just saves it to a text file.  I have some work to do on the CD Key detection in powershell to remove the vbscript as the powershell script doesn't seem to find the right key.  I am using a vbscript from 
techspot that finds and saves the CD Key properly.  After the VBScript has been exicuted the powershell script finds they other key entries and adds them to the outputted file.  Windows has a couple different places where you can find different product keys such as the OEM key from vendors such as Dell, Lenovo, etc; and the BackupProductKeyDefault in the registry.  To find the OEM Key you can find your key using this powershell command.

wmic path SoftwareLicensingService get OA3xOriginalProductKey 
or 
powershell "(Get-WmiObject -query 'select * from SoftwareLicensingService').OA3xOriginalProductKey"

To find the backup Windows Key in the registry it is located using the regedit path below.

HKLM:\SOFTWARE\Microsoft\Windows NT\CurrentVersion\SoftwareProtectionPlatform BackupProductKeyDefault

The way I have the scripts working together is I have a bat file which runs the powershell script.  The first thing the powershell script does is runs the CDKey.vbs script.  Then the powershell script appends the rest of the key data to the text file generated by CDKey.vbs.  You can see the code for the 3 scripts below.

CDKey.vbs

Option Explicit
Dim objshell,path,DigitalID, Result
Set objshell = CreateObject("WScript.Shell")
'Set registry key path
Path = "HKLM\SOFTWARE\Microsoft\Windows NT\CurrentVersion\"
'Registry key value
DigitalID = objshell.RegRead(Path & "DigitalProductId")
Dim ProductName,ProductID,ProductKey,ProductData
'Get ProductName, ProductID, ProductKey
ProductName = "Product Name: " & objshell.RegRead(Path & "ProductName")
ProductID = "Product ID: " & objshell.RegRead(Path & "ProductID")
ProductKey = "Installed Key: " & ConvertToKey(DigitalID)
ProductData = ProductName & vbNewLine & ProductID & vbNewLine & ProductKey
'Save Data to a file
Save ProductData
'Convert binary to chars
Function ConvertToKey(Key)
Const KeyOffset = 52
Dim isWin8, Maps, i, j, Current, KeyOutput, Last, keypart1, insert
'Check if OS is Windows 8
isWin8 = (Key(66) \ 6) And 1
Key(66) = (Key(66) And &HF7) Or ((isWin8 And 2) * 4)
i = 24
Maps = "BCDFGHJKMPQRTVWXY2346789"
Do
Current= 0
j = 14
Do
Current = Current* 256
Current = Key(j + KeyOffset) + Current
Key(j + KeyOffset) = (Current \ 24)
Current=Current Mod 24
j = j -1
Loop While j >= 0
i = i -1
KeyOutput = Mid(Maps,Current+ 1, 1) & KeyOutput
Last = Current
Loop While i >= 0

If (isWin8 = 1) Then
keypart1 = Mid(KeyOutput, 2, Last)
insert = "N"
KeyOutput = Replace(KeyOutput, keypart1, keypart1 & insert, 2, 1, 0)
If Last = 0 Then KeyOutput = insert & KeyOutput
End If
ConvertToKey = Mid(KeyOutput, 1, 5) & "-" & Mid(KeyOutput, 6, 5) & "-" & Mid(KeyOutput, 11, 5) & "-" & Mid(KeyOutput, 16, 5) & "-" & Mid(KeyOutput, 21, 5)
End Function
'Save data to a file
Function Save(Data)
Dim fso, fName, txt,objshell,UserName
Set objshell = CreateObject("wscript.shell")
fName = ".\ProductKey.txt"
Set fso = CreateObject("Scripting.FileSystemObject")
Set txt = fso.CreateTextFile(fName)
txt.Writeline Data
txt.Close
End Function
This is run from the powershell script; which I have listed below. Then the powershell script finds the reset of the keys I want to find such as the OEM Key and the registry BackupProductKeyDefault then appends it to the text file.

Get-ProductKey.ps1

start-process -FilePath "CDKey.vbs" -Wait -Passthru 
$SLS = wmic path SoftwareLicensingService get OA3xOriginalProductKey
$RLS = Get-ItemPropertyValue 'HKLM:\SOFTWARE\Microsoft\Windows NT\CurrentVersion\SoftwareProtectionPlatform' -Name BackupProductKeyDefault
$SLSKey = $SLS.Split(" ",[System.StringSplitOptions]::RemoveEmptyEntries)
$DPID = Get-ItemPropertyValue 'HKLM\SOFTWARE\Microsoft\Windows NT\CurrentVersion\DefaultProductKey2' -Name DigitalProductId
$EditionID = Get-ItemPropertyValue 'HKLM\SOFTWARE\Microsoft\Windows NT\CurrentVersion\DefaultProductKey2' -Name EditionId

function ConvertTo-ProductKey {
param (
[parameter(Mandatory = $True, Position = 0)]
$Registry,
[parameter()]
[Switch]$x64
)
begin {
$map = "BCDFGHJKMPQRTVWXY2346789"
}
process {
$ProductKey = ""
$prodkey = $Registry[0x34 .. 0x42]
for ($i = 24; $i -ge 0; $i--) {
$r = 0
for ($j = 14; $j -ge 0; $j--) {
$r = ($r * 256) -bxor $prodkey[$j]
$prodkey[$j] = [math]::Floor([double]($r/24))
$r = $r % 24
}
$ProductKey = $map[$r] + $ProductKey
if (($i % 5) -eq 0 -and $i -ne 0) {
$ProductKey = "-" + $ProductKey
}
}
$ProductKey
}
}

$x = Get-ItemProperty 'HKLM:\SOFTWARE\Microsoft\Windows NT\CurrentVersion' -name DigitalProductId
$key = ConvertTo-ProductKey $x.DigitalProductId

$prodKey = "Windows Backup Product Key Default: $RLS `nOEM Software Licensing Service Key: $SLSKey `nDigital Product ID Windows Key: $key"

Add-Content .\ProductKey.txt $prodKey
The powershell script is run from a bat file which sets the Powershell script bypass for running the powershell script.

RunProdKey.bat
@ECHO OFF
Powershell.exe -executionpolicy remotesigned -File  ./Get-ProductKey.ps1
 

The resulting file output looks like this


It has worked well on the half dozen machines I tried it on and I will update this post once I get the Microsoft 365 and Google Workspaces integration working.  I have the 3 files running from a directory you can place anywhere on the machine you are wanting to inventory.  In this case I have it in a folder called "Find Product Key" which is on my desktop.  If you download the zipped files listed below all you have to do is run the "RunProdKey.bat" file and it will put the generated file in the same folder and it is called ProductKey.txt


Wednesday, May 18, 2022

How to download old versions of Mac OS X

I have a 27" sandybridge iMac; which is a perfectly capable machine; I could load and run the latest version of Windows, Linux just fine.  Apple however has decided to drop support for these machines; they are more then 10 years old but for 99% of what they are used for it is fine; I don't really see why apple hasn't included these in their code base besides wanting people to buy new vendor locked in hardware.  I digress; things are what they are.

On a computer with a browser you will want to copy the links and paste them in your URL bar.  It is highly recommended to be using some sort of mac for this.  The OS will download as InstallMacOSX.dmg or MacOS.dmg  I personally rename it to the version I have downloaded and adjust my script for making the USB boot disk.  I was the kind of guy to buy EVERY release of OS X and I do have from OS 9 to Snow Leopard (my favorite version).

The following links below require the apple apps store to download the DMG images for Mac OS 10.  The OS images affected are Mac OS High Sierra to Big Sur require the safari browser to accesses the Apple App Store on MacOS.  Safari finds the old installers in the App Store and allows you to download them. After you download the installer from the App Store, the installer opens automatically.

  • macOS Big Sur can upgrade Catalina, Mojave, High Sierra, Sierra, El Capitan, Yosemite, Mavericks
  • macOS Catalina can upgrade Mojave, High Sierra, Sierra, El Capitan, Yosemite, Mavericks
  • macOS Mojave can upgrade High Sierra, Sierra, El Capitan, Yosemite, Mavericks, Mountain Lion
  • macOS High Sierra can upgrade Sierra, El Capitan, Yosemite, Mavericks, Mountain Lion

Pre-High Sierra can be downloaded on any computer but you have to copy and paste the full link which I have below the bulleted version.  


The older installers allows other browsers to download them as a disk image named InstallOS.dmg or InstallMacOSX.dmg respectively. On a Mac the Open the disk image, then open the .pkg installer inside the disk image. It installs an app named Install [Version Name]. Open that app from your Applications folder to begin installing the operating system.


You can also get this info from Apple's Website here https://support.apple.com/en-us/HT211683

Powershell Script To Download and Convert Images to JPG

The following powershell script is for downloading and converting images from PNG and TIFF format to JPG.  The CSV file looks something like this.


The script is pretty simple, download files then convert them from TIF to PNG then to JPG


Here is the script

#This script downloads all the images converts them to JPG files for a website.

#first import the CSV File

$CSVFILE = Import-CSV -Path downloadImgs.csv

#Get the length of the url

$CSVFILE | ForEach-Object {$_.'Image'.length}

#Get the length of the url

$CSVFILE | ForEach-Object {$img = $_.'Image'.substring($_.'Image'.length, 5)}

#Get the file Ext

$CSVFILE | ForEach-Object {$_.'Image'.Substring(($_.'Image'.length-9), 4) }


#Save Image File List Replace the website URL with the URL you want to point to.  You can use this for having a list of items downloaded or if your importing them in a bulk process

$CSVFILE | ForEach-Object { "https://yourwebsite.com/images/$location"+,-join ($_.'Image')+,".jpg"} | Out-File imageURLs.txt


#Download Image and rename the image to the Name in the CSV file

$CSVFILE | ForEach-Object { Invoke-WebRequest -Uri $_.'Image' -OutFile (-join ($_.'Name'+, $_.'Image'.Substring(($_.'Image'.length-9), 4))) }


#Download if just a JPG image hosted on a website.  Name it by Name value and add jpg extension.

$CSVFILE | ForEach-Object { Invoke-WebRequest -Uri $_.'Image' -OutFile (-join ($_.'Name'+,".jpg")) }


  function ConvertTIF-To-PNG

{

    [cmdletbinding()]

    param([Parameter(Mandatory=$true, ValueFromPipeline = $true)] $Path)


    process{

        if ($Path -is [string])

        { $Path = get-childitem $Path }


        $Path | foreach {

            $image = [System.Drawing.Image]::FromFile($($_.FullName));

            $FilePath = [IO.Path]::ChangeExtension($_.FullName, '.png');

            $image.Save($FilePath, [System.Drawing.Imaging.ImageFormat]::PNG);

            $image.Dispose();

        }

    }

 }

 #Use function:

 #Cd to directory w/ TIF files

 cd .\

 #Run ConvertTIF-To-JPG function

 Get-ChildItem *.tif | ConvertTIF-To-PNG

 #Remove TIF Files once converted

 Remove-Item * -Include *.tif


#once all the tiff files are converted convert PNG to JPG

  function ConvertTo-Jpg

{

    [cmdletbinding()]

    param([Parameter(Mandatory=$true, ValueFromPipeline = $true)] $Path)


    process{

        if ($Path -is [string])

        { $Path = get-childitem $Path }

        $Path | foreach {

            $image = [System.Drawing.Image]::FromFile($($_.FullName));

            $FilePath = [IO.Path]::ChangeExtension($_.FullName, '.jpg');

            $image.Save($FilePath, [System.Drawing.Imaging.ImageFormat]::JPEG);

            $image.Dispose();

        }

    }

 }

 #Use function:

 #Cd to directory w/ png files

 cd .\


 #Run ConvertTo-JPG function

 Get-ChildItem *.png | ConvertTo-JPG

 #REMOVE PNG FILES

 Remove-Item * -Include *.png

How to fix CURL call imporitng an RSS feed on a site blocking CURL calls

There is a 3rd party service provider that my organization uses called bibliocommons.  They have these nice book carousels.  However the car...