Showing posts with label powershell. Show all posts

Tuesday, March 31, 2026

A powershell script to update rustdesk in action 1

For maintaining remote access for our IT systems we use a mix of action1 and rustdesk.  Though action1 has a very good remote web interface it can be slow at times.  I've setup a rustdesk server for additional security.  Below is a powershell script that I created.  

The script creates a folder for downloading rustdesk from github; and if it isn't there create it, download and install.  There is a else where if it is installed, uninstall rustdesk then create the install directory and install the latest version.


$Folder = 'c:\#NAMEOFFOLDER'

"Test to see if folder [$Folder]  exists"

if (Test-Path -Path $Folder) {

Remove-Item -Recurse -Force c:\#NAMEOFFOLDER\*.*

Remove-Item 'c:\#NAMEOFFOLDER'

Get-CimInstance -ClassName win32_product | Where-Object Name -Match "RustDesk" | 

    ForEach-Object -Process { 

        Invoke-CimMethod -InputObject $_ -Name Uninstall 

                            }

New-Item -Path "c:\" -Name "#NAMEOFFOLDER" -ItemType "directory"

Invoke-WebRequest https://github.com/rustdesk/rustdesk/releases/download/1.4.6/rustdesk-1.4.6-x86_64.msi -OutFile c:\saplit\rustdesk-1.4.0-x86_64.msi

$pkg = "c:\#NAMEOFFOLDER\rustdesk-1.4.0-x86_64.msi";

Start-Process msiexec "/i $pkg /norestart /qn" -Wait;

##Start-Process msiexec "/i $pkg /qn" -Wait;

##Start-Process msiexec "/i $pkg /norestart /qn" -Wait;

Start-Sleep -Seconds 30

Remove-Item -Recurse -Force c:\#NAMEOFFOLDER\*.*

Remove-Item 'c:\#NAMEOFFOLDER'


} else {

#uninstall rustdesk

Get-CimInstance -ClassName win32_product | Where-Object Name -Match "RustDesk" | 

    ForEach-Object -Process { 

        Invoke-CimMethod -InputObject $_ -Name Uninstall 

                            }

New-Item -Path "c:\" -Name "#NAMEOFFOLDER" -ItemType "directory"

Invoke-WebRequest https://github.com/rustdesk/rustdesk/releases/download/1.4.6/rustdesk-1.4.6-x86_64.msi -OutFile c:\saplit\rustdesk-1.4.0-x86_64.msi

$pkg = "c:\#NAMEOFFOLDER\rustdesk-1.4.0-x86_64.msi";

Start-Process msiexec "/i $pkg /norestart /qn" -Wait;

##Start-Process msiexec "/i $pkg /qn" -Wait;

##Start-Process msiexec "/i $pkg /norestart /qn" -Wait;

Start-Sleep -Seconds 30

Remove-Item -Recurse -Force c:\#NAMEOFFOLDER\*.*

Remove-Item 'c:\#NAMEOFFOLDER'

}

Thursday, February 20, 2025

Using Powershell in Action1 to update RustDesk

Using Powershell in Action1 to update RustDesk

This script can be used to install and update RustDesk using Action1.  Action1 is a wonderful cloud based patch management system, though I can create an on prem solution for deploying RustDesk, it was decided that we needed to be able to deploy updates for the software to users at home as well for remote support options as RustDesk is more responsive and faster than Action1.  This can be run as a custom script created and saved in the script library in action1 


or it can be run directly on the endpoint if it is a script you don't need to run over again which can be found near the actions column in action 1.


Below is the powershell script for updating/installing RustDesk.  If you have your own rustdesk server this WILL keep your settings when updating.

##START COPY

$Folder = 'c:\itTemp'

$URL = 'https://github.com/rustdesk/rustdesk/releases/download/1.3.7/rustdesk-1.3.7-x86_64.msi'

##"Test to see if folder [$Folder]  exists"

if (Test-Path -Path $Folder) {

##If it exsists remove it

Remove-Item 'c:\itTemp' -Force

##Is RustDesk Installed?  If it is uninstall it.

Get-CimInstance -ClassName win32_product | Where-Object Name -Match "RustDesk" | 

    ForEach-Object -Process { 

        Invoke-CimMethod -InputObject $_ -Name Uninstall 

                            }

##Create a temporary folder, download the latest version of RustDesk and install it

New-Item -Path "c:\" -Name "itTemp" -ItemType "directory"

Invoke-WebRequest https://github.com/rustdesk/rustdesk/releases/download/1.3.7/rustdesk-1.3.7-x86_64.msi -OutFile c:\itTemp\rustdesk-1.3.7-x86_64.msi

$pkg = "c:\itTemp\rustdesk-1.3.7-x86_64.msi";

Start-Process msiexec "/i $pkg /norestart /qn" -Wait;

##Wait 30 seconds before removing the directory

Start-Sleep -Seconds 30

##Clean up garbage

Remove-Item -Recurse -Force c:\itTemp\*.*

Remove-Item 'c:\itTemp' -Force

} else {

##If the itTemp folder doesn't exsits remove rustdesk 

Get-CimInstance -ClassName win32_product | Where-Object Name -Match "RustDesk" | 

    ForEach-Object -Process { 

        Invoke-CimMethod -InputObject $_ -Name Uninstall 

                            }

##Create a temporary folder, download the latest version of RustDesk and install it                            

New-Item -Path "c:\" -Name "itTemp" -ItemType "directory"

Invoke-WebRequest https://github.com/rustdesk/rustdesk/releases/download/1.3.7/rustdesk-1.3.7-x86_64.msi -OutFile c:\itTemp\rustdesk-1.3.7-x86_64.msi

$pkg = "c:\itTemp\rustdesk-1.3.7-x86_64.msi";

Start-Process msiexec "/i $pkg /norestart /qn" -Wait;

##Wait 30 seconds before removing the directory

Start-Sleep -Seconds 30

##Clean up garbage

Remove-Item -Recurse -Force c:\itTemp\*.*

Remove-Item 'c:\itTemp'

}

##END COPY

Monday, July 31, 2023

Using powershell to get the status a a machine using Faronics Deep Freeze


I work with a few organizations that use Steady State software and most of them use Faronics Deep Freeze.  Deep freeze works pretty well for the use case which is securing publicly available computers. So not keeping any passwords, resetting software etc.  However one problem hat has come up with using the software is when doing updates you have "un-freeze" the computer, and even with deepfreeze cloud (at least my experience has been) there is a delay in the system updating if a machine is frozen or thawed.  In some cases taking up to 30 minutes; however that was some time ago and Faronics may have improved that.  However due budget cuts at a few of the organizations I work with they are just using Deep Freeze on Prem with no cloud service.  The only notification you get as to the status of deep freeze is a little bear head on the task bar.


The Bear head with out the X means the system is Frozen (steady stated)  The bear with the X means the system is unfrozen and changes can be made to the system.

There has been more then one occasion that a system has been worked on and left in a un-frozen state after the work has been updated.  So to remedy this problem I created this powershell script 

Freezestatus.ps1

#Get the latest deep freeze log

$event = Get-WinEvent -LogName Application | Where-Object {$_.ProviderName -Match 'Deep Freeze'} | select -first 1

#write the status to an xml file

$event.ToXML() | Out-File -FilePath C:\comptools\status.xml

#wait 3 seconds before you get the item status

Start-Sleep -s 3

#Load the XML file

[XML]$xmlfile = Get-Content C:\comptools\status.xml

#Check the value of the XML file see if it is "Thawed"  If it is send an alert to the IT Department

if ($xmlfile.Event.EventData.Data -eq 'Thawed'){

#Put any alert/code you want to use here in this example I have a window popup; I would recommend sending an email or updating some sort of dashboard with the system status.

Add-Type -AssemblyName PresentationFramework

[System.Windows.MessageBox]::Show('Thawed')

}

Monday, April 24, 2023

Using PowerShell to send scheduled emails based on a php generated xml file

Laptop Lending Locker
D-Tech International has some vey nice equipment, and it works pretty well.  When these were purchased they were to send out the following email notices.

  1. When a laptop is borrowed with the date and time that it is due back
  2. an email notice 15 minutes before it is due
  3. an email notice if it is overdue
  4. an email notice when it is returned
Unfortunately not all the emails worked.  The 15 minute notice and the overdue notice were not working properly.  Email notices were sent when the laptop was taken out and when it was returned but not at the 15 minutes before it is due or when it is overdue.  Since the system is using a SirsiDynix ILS system it has a server called Horizon Web Services; which is more/less an API connector for the ILS Database.  

A php script generates a XML file which we will use to generate scheduled tasks for each laptop that is borrowed.  Those tasks will run at specific times to send notices out to the user that borrowed it.  The notice times obviously need to be flexible and only generate and send a notice for the laptop that is due within the operating hours of the location.

To do all this we are going to use powershell.  Below is how the XML file is generated and structured.

XML File

<notices>
<laptopCirc>
<displayName>Name</displayName>
<barcode>2222200xxxxxxx</barcode>
<emailAddress>email@domain.com</emailAddress>
<checkOutTime>2023-04-24T10:21:00-06:00</checkOutTime>
<timeDue>2023-04-24T14:21:00-06:00</timeDue>
<laptopName>Laptop 2</laptopName>
</laptopCirc>
</notices>


The Process:


The emails for the borrowing and the returning of the laptops work great.  However because this is something I can code and control the following notices will be generated.
  • 15 minute pre-due notice
  • Notice that the laptop is due
  • 15 minute overdue notice
  • 15 minute pre-closing notice
  • Laptop not returned the next day notice

There will be 11 different files.  A powershell script with a bat file for executing the powershell script as to not change the default powershell security model on the system.  Below is a sample of the scripts for generating the task scheduler and email notices.

The Scripts:


Obviously because of the locked down security model we are going to use task scheduler to run bat files to execute our powershell scripts.  Our bat file must contain the $Path that goes to our powershell file.  Below is a sample file.


The Bat Files:


@ECHO OFF
Powershell.exe -executionpolicy remotesigned -File  $PATH\LaptopsDue.ps1

Powershell Files:


Generate Notices (Sample) - This is the biggest and most complex file; as this is the one that makes and removes our scheduled tasks.  Below is a sample of the script which will be provided at the end of the post.

#update the generated xml file from the php script (status.xml)
$WebResponse = Invoke-WebRequest "$URL/generate.php" -UseBasicParsing
$WebResponse

#URL to get the laptops data
$url = "$URL/status.xml"

#store the laptop xml file
$filename = "$PATH\status.xml"

$webClient = new-object System.Net.WebClient
$webClient.DownloadFile( $url, $filename )

#load the xml file we downloaded
[xml]$xml = get-content "$PATH\status.xml"

#check and see if there are any checked out laptops
#if there are laptops checked out laptops
if ($xml.notices.laptopCirc -ne $null){
    Write-Output "there are checked out laptops"
}else{
#if there are no checked out laptops
    Write-Output "There are NO check out laptops"
    exit
}
#Write-Output $xml.notices.laptopCirc

#here is where we sort the xml file
$xml.notices.laptopCirc | ForEach-Object {
###
#Conversions for date and time for creating tasks
###
$DueTime = [datetime]::ParseExact($_.timeDue.substring(0, 19), 'yyyy-MM-ddTHH:mm:ss', $null)
$PreTime = [datetime]::ParseExact($_.timeDue.substring(0, 19), 'yyyy-MM-ddTHH:mm:ss', $null)
$OverTime = [datetime]::ParseExact($_.timeDue.substring(0, 19), 'yyyy-MM-ddTHH:mm:ss', $null)

#Create Timestamps
$PreTS = $PreTime.AddSeconds(-900).ToString('MM/dd/yyyy HH:mm:ss')
$OverTS = $OverTime.AddSeconds(+900).ToString('MM/dd/yyyy HH:mm:ss')
$DueTS = $DueTime.AddSeconds(+0).ToString('MM/dd/yyyy HH:mm:ss')

#get current Date & Time
$nowTime = (Get-Date).ToString('MM/dd/yyyy HH:mm:ss').substring(11,5)
$nowDate = (Get-Date).ToString('MM/dd/yyyy HH:mm:ss').substring(0,8)
$nowTS = Get-Date -Format yyyy-MM-ddTHH:mm:ss


###TIME CHECK###
$whatDay = (get-date).DayOfWeek
if ($whatDay -match 'Monday|Tuesday|Wednesday|Thursday' -and $nowTime -gt "10:00" -and $nowTime -lt "20:45"){
 Write-Output "Today is "+ $DayOfTheWeek
###Notices for Monday - Thursday
###NOTICES###
#Pre-Over Due Notice
$taskName = $_.laptopName+"_PreOverDue"
if(Get-ScheduledTask $taskName -ErrorAction Ignore) { 
Write-Output "Task Found" 
} else { 
$actions = (New-ScheduledTaskAction -Execute '$Path\LaptopPreDue.bat' -WorkingDirectory '$PATH')
$trigger = New-ScheduledTaskTrigger -Once -At $PreTime.substring(11, 5)
$principal = New-ScheduledTaskPrincipal -UserId '$user' -RunLevel Highest 
$settings = New-ScheduledTaskSettingsSet -RunOnlyIfNetworkAvailable -WakeToRun
$task = New-ScheduledTask -Action $actions -Principal $principal -Trigger $trigger -Settings $settings
#taskname
$taskName = $_.laptopName+"_PreOverDue"
Register-ScheduledTask $taskName -InputObject $task
}


    [PSCustomObject]@{
   
    'displayName'   = $_.displayName
    'barcode'       = $_.barcode
    'emailAddress'  = $_.emailAddress
    'checkOutTime'  = $_.checkOutTime
    'timeDue'       = $_.timeDue
    'laptopName'    = $_.laptopName


###

#        'id'        = $_.id
#        'name'      = $_.name
#        'status'    = $_.status
#        'checkout'  = $_.checkout
#        'due'       = $_.due
#        'email'     = $_.email

}


}


Item Due Email Notice (SAMPLE)


#URL to get the laptops data
$url = "$URL/status.xml"

#store the laptop xml file
$filename = "$PATH\status.xml"

$webClient = new-object System.Net.WebClient
$webClient.DownloadFile( $url, $filename )

#load the xml file we downloaded
[xml]$xml = get-content "status.xml"

#here is where we sort the xml file
$xml.notices.laptopCirc | ForEach-Object {

#Conversions for date and time for creating tasks
$TimeDueTS = [datetime]::ParseExact($_.timeDue.substring(0, 19), 'yyyy-MM-ddTHH:mm:ss', $null)


#Timestamps
#$CurrentTimeStamp 
#add time to time due if required
$DueTime = $Due_Conversion.AddSeconds(+0).ToString('MM/dd/yyyy HH:mm:ss')


#get current time
$CurrentTime = (Get-Date).ToString('MM/dd/yyyy HH:mm:ss')
$CurrentTimeStamp = Get-Date -Format yyyy-MM-ddTHH:mm:ss


$removeTask = $_.laptopName+"_Due"
$isDue = $DueTime.substring(11, 5)

#Send an email if the laptop is due
if ($CurrentTime -match $DueTime){
#send an email if the current time matches the time due.  Remove the task once the email is sent
#Write-output $_.laptopName $_.emailAddress
$emailBody = "Hello "+$_.displayName+",
Your laptop is now overdue and needs to be returned to the locker. If you need help with saving your document or the return process, please ask Staff. 

Laptops are loaned for a maximum of 4 hours"
$emailSubject = "Please return "+$_.laptopName+" to the locker"
$emailSubject
Send-MailMessage -Encoding UTF8 -From '$FROM ADDRESS' -To $_.emailAddress -Subject $emailSubject -Body $emailBody -smtpserver '$SMTPSERVER'
Unregister-ScheduledTask -TaskName $removeTask -Confirm:$false
}


    [PSCustomObject]@{
   
    'displayName'   = $_.displayName
    'barcode'       = $_.barcode
    'emailAddress'  = $_.emailAddress
    'checkOutTime'  = $_.checkOutTime
    'timeDue'       = $_.timeDue
    'laptopName'    = $_.laptopName


}
}

I have a scheduled task that runs every 5 minutes checking to see if a laptop is checked out; if it is it creates the notices; if not then it exits the script.  If there is a notice already made it skips creating it again.  It works really well.


Friday, January 06, 2023

How to fix Lenovo Laptop Dock Monitor Blinking/Flickering

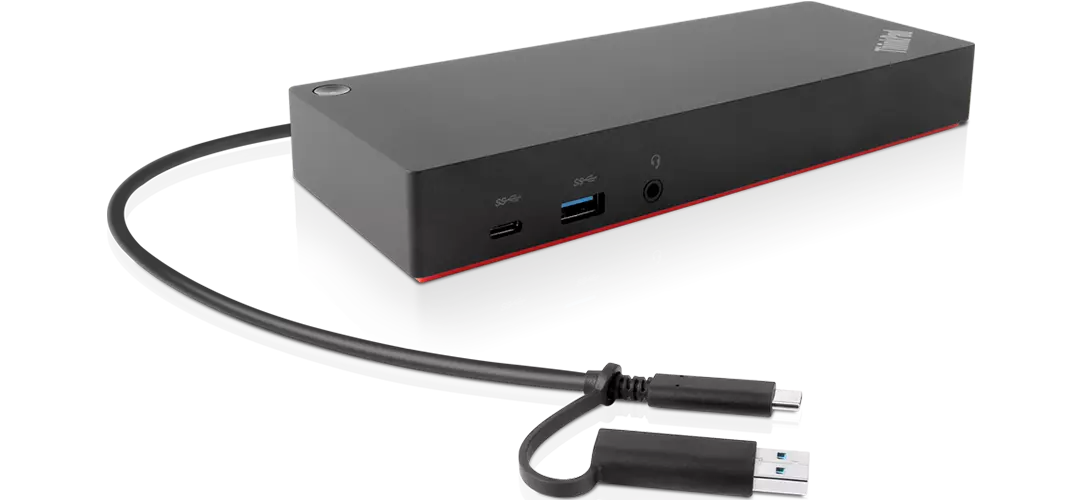
The organization I work for uses Lenovo Thinkpads and we purchased Lenovo USB C docks for those laptops and on the two of the new Gen 11 Intel laptops and on the Gen 8 Intel laptop using three separate Lenovo ThinkPad USB C Docks specifically the Type 40A9 and Type 40AY.  The laptops when docked and started from a cold boot or a reboot have an issue showing the screen on the monitors connected with DisplayPort.  I don't have HDMI monitors so I can't use HDMI.  

This seems to be a well known issue with Lenovo laptops and Lenovo USB C Docks you can reference the sources below.  This issue has been going on for about 6 months and I have tried all the fixes listed below during the 6 months applying the fixes as soon as they were available. 

Sources

https://pcsupport.lenovo.com/ca/en/solutions/ht514019-external-monitor-flickering-when-connected-to-dock-using-dp-or-hdmi-thinkpad

https://forums.lenovo.com/t5/ThinkBook-Notebooks/Thinkbook-15-G2-ITL-Flickering-Dual-Screens-with-ThinkPad-USB-C-Dock-Gen-2/m-p/5081214

https://forums.lenovo.com/t5/Displays-Options-and-Accessories/ThinkPad-USB-C-Dock-40A9-External-Display-flickering-issue/m-p/4233887

https://support.lenovo.com/ca/en/solutions/ht507541

The screens are either not showing (just black after about 1 to 3 minutes) or the screen is distorted with running horizontal lines showing only on one screen with screen jitter.


In fact the issue has persisted; with some staff using the devices becoming upset that this issue has not been fixed.  I can't say I blame them, we have been using Lenovo laptops and docks for 8 years and just within the last 6 months this has become an issue that hasn't been resolved.  At least until today with a work around using powershell.  Troubleshooting this issue nothing really came up in the event viewer; I caught an issue with the UCM-USCI ACPI Device not responding and given a error 43 but the dock had not stopped working with the exception of the displays.  At least according to the computer management console.  


View in device manager


Code 43 given randomly

I had noticed Network, sound, keyboard, webcams, mouse all continued to work when the monitors did the "blinking" issue.


Lenovo L15 Gen2 blinking issue on Type: 40AY Dock

For what ever reason when the monitor "Blinks" stops working and stay black until you either unplug the dock and plug it back in or you disable and re-enable the Intel display driver.

So my solution (after making sure everything was as up-to-date as possible with the latest Lenovo fixes) was the following.

Two Scripts.  A bat file and a powershell file.

The bat file allows the running of the powershell script.

---------BAT FILE----------

@ECHO OFF
Powershell.exe -executionpolicy remotesigned -File  ./dock-disable-enable.ps1

--------------------------------

-------Powershell File-------

Get-PnpDevice -FriendlyName 'Intel(R) Iris(R) Xe Graphics' | Disable-PnpDevice -Confirm:$false
Start-Sleep -Seconds 10
Get-PnpDevice -FriendlyName 'Intel(R) Iris(R) Xe Graphics' | Enable-PnpDevice -Confirm:$false

-----------------------------------

Using Task Scheduler, On a user login; I have a script that runs after a 30 second wait to run; However once it runs the script disables the Intel Driver and re-enables it after 10 seconds.  


This has stopped staff from having to unplug and re-plug in their laptops into the docking stations; and are much more happy with going to get a coffee when they login then come back then having to unplug and re-plug in their laptop dock.


Sunday, November 27, 2022

Enabling Nested Virtualization on Hyper-V

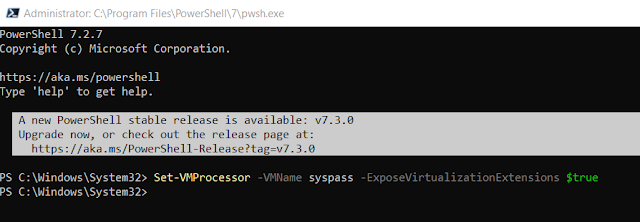
To enable nested virtualization on Microsoft Hyper-V; run the following command from Powershell on your Hyper-V host.  

 Set-VMProcessor -VMName syspass -ExposeVirtualizationExtensions $true


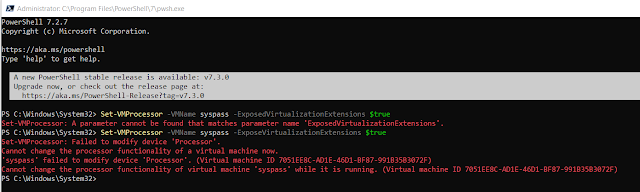
If you try running the command while the System is running you will get an error.


When the command is successful; you will be able to run a virtual server on your Hyper-V Host.  You need to run this command on the VM on the host if you are wanting to run Hyper-V nested; KVM or docker on a virtual machine running on the host.

Tuesday, August 09, 2022

Hyper-V VM Backup using Powershell (VM-Export)


One of the many things I've been working on is an automated script to do VM backups.  I've been doing a lot of work automating processes with PowerShell recently so I thought I would just sit down and finish hammering out this little script I was working on.

This PowerShell script exports Hyper-V VM's to a directory; and sends an email notification when the export completes or if there is an error.  I am not 100% there with the backup as there are still a few bugs like sending an email when the entire script finished but I am confident enough of this working that I am going to pass this along for anyone to use if they wish.


##########BACKUP VM SCRIPT##########
#Set Variables for count, date and VM's you want to backup
$BackupNum = 0;
$TimeStart = Get-Date;
#Set the names of the computers you want to backup
$ComputerNameArray = '$VM1','$VM2','$VM3','$VM4','$VM5','$VM6','$VM7','$VM8','$VM9';
#Get the Number of Computers you want to backup
$BackupTotal = ($ComputerNameArray.count -1);
#Set the Path to save the backups
$SavePath = "$PATH TO FOLDER";

#Run the backup while the backup number is less then the backup total
while($BackupNum -le $BackupTotal){
#Set the first computer to be backed up
$ComputerName = $ComputerNameArray[$BackupNum];

#Check to see if there are previous backups
if (Test-Path -Path $SavePath\$ComputerName) {
#if the computer name is not blank remove the previous backup
if ($ComputerName -ne ""){
Remove-Item -Path "$SavePath\$ComputerName" -Force -Recurse
}
}

#Get the start time of the backup
$TimeStart = Get-Date;

#Export Backup
$ExportJob = Export-VM -Name $ComputerName -Path $SavePath;

#After the export runs get the time finished and send an email notification
$TimeFinished = Get-Date;
Send-MailMessage -From '$MAILFROM' -To '$EMAIL' -Subject "VM Backup for $ComputerName was Successful" -Body "The VM $ComputerName was successfully backed up. It started at $TimeStart and Finished at $TimeFinished" -smtpserver '$SMTP_SERVER'
#Auto Increment the export so we can get the next computer name
$BackupNum++
}

#While the jobstate is running or not started; get the progress
while( $ExportJob.State -eq "Running" -or $ExportJob.State -eq "NotStarted"){ 
$progress = $ExportJob.Progress.PercentComplete;
Write-Output ("[Export] " + $($ExportJob.Progress.PercentComplete) + "% complete"); 

#If the backup state is not Completed and errors out
if($ExportJob.State -ne "Completed") { 
#Get the time finished
$TimeFinished = Get-Date;
#Send an email that the export did not finish
Send-MailMessage -From '$MAILFROM' -To '$MAILTO' -Subject "Backup For $ComputerName Failed at $progress % complete" -smtpserver '$SMTPSERVER'
Write-Error ("Export Job did not complete: " +$ExportJob.State);
throw $ExportJob.Error;
}
##########END SCRIPT###########

Resources

Wednesday, July 13, 2022

Using Powershell to send an email alert when a file type is found

A while back I had the privilege of working with a brilliant dev; Andrew Nesbit in helping sort out some processes for the Horizon ILS and how it would work with the Metro Library Card System (melibraries.ca).  I helped him with some of the Horizon work with how the different library systems work together more specifically SirsiDynix Symphony, polaris and Horizon.  

One issue that came out that I never got around to fixing till now was the creation of the .FAIL file that is generated if the server has a problem or there is some sort of incompatibility between library systems, such as pin, city name, password length, etc.  There is also an issue with the service stopping without notice; which also creates a .FAIL file as shown below.

Metro FAIL file.  Dead Process


Metro FAIL file.  FAILED User


So I decided to finally write a powershell script to send me an alert when this happens.  So it looks in the directory where the Me Server saves it's logs; and I have powershell checking that directory as shown below.  The script uses powershell to check for a .FAIL file in the log directory and then sends a send-mail message.  I know that this is depreciated and I will have to update this sooner then later; but it will work for the purpose I need for now.

Wednesday, May 18, 2022

Powershell Script To Download and Convert Images to JPG

The following powershell script is for downloading and converting images from PNG and TIFF format to JPG.  The CSV file looks something like this.


The script is pretty simple, download files then convert them from TIF to PNG then to JPG


Here is the script

#This script downloads all the images converts them to JPG files for a website.

#first import the CSV File

$CSVFILE = Import-CSV -Path downloadImgs.csv

#Get the length of the url

$CSVFILE | ForEach-Object {$_.'Image'.length}

#Get the length of the url

$CSVFILE | ForEach-Object {$img = $_.'Image'.substring($_.'Image'.length, 5)}

#Get the file Ext

$CSVFILE | ForEach-Object {$_.'Image'.Substring(($_.'Image'.length-9), 4) }


#Save Image File List Replace the website URL with the URL you want to point to.  You can use this for having a list of items downloaded or if your importing them in a bulk process

$CSVFILE | ForEach-Object { "https://yourwebsite.com/images/$location"+,-join ($_.'Image')+,".jpg"} | Out-File imageURLs.txt


#Download Image and rename the image to the Name in the CSV file

$CSVFILE | ForEach-Object { Invoke-WebRequest -Uri $_.'Image' -OutFile (-join ($_.'Name'+, $_.'Image'.Substring(($_.'Image'.length-9), 4))) }


#Download if just a JPG image hosted on a website.  Name it by Name value and add jpg extension.

$CSVFILE | ForEach-Object { Invoke-WebRequest -Uri $_.'Image' -OutFile (-join ($_.'Name'+,".jpg")) }


  function ConvertTIF-To-PNG

{

    [cmdletbinding()]

    param([Parameter(Mandatory=$true, ValueFromPipeline = $true)] $Path)


    process{

        if ($Path -is [string])

        { $Path = get-childitem $Path }


        $Path | foreach {

            $image = [System.Drawing.Image]::FromFile($($_.FullName));

            $FilePath = [IO.Path]::ChangeExtension($_.FullName, '.png');

            $image.Save($FilePath, [System.Drawing.Imaging.ImageFormat]::PNG);

            $image.Dispose();

        }

    }

 }

 #Use function:

 #Cd to directory w/ TIF files

 cd .\

 #Run ConvertTIF-To-JPG function

 Get-ChildItem *.tif | ConvertTIF-To-PNG

 #Remove TIF Files once converted

 Remove-Item * -Include *.tif


#once all the tiff files are converted convert PNG to JPG

  function ConvertTo-Jpg

{

    [cmdletbinding()]

    param([Parameter(Mandatory=$true, ValueFromPipeline = $true)] $Path)


    process{

        if ($Path -is [string])

        { $Path = get-childitem $Path }

        $Path | foreach {

            $image = [System.Drawing.Image]::FromFile($($_.FullName));

            $FilePath = [IO.Path]::ChangeExtension($_.FullName, '.jpg');

            $image.Save($FilePath, [System.Drawing.Imaging.ImageFormat]::JPEG);

            $image.Dispose();

        }

    }

 }

 #Use function:

 #Cd to directory w/ png files

 cd .\


 #Run ConvertTo-JPG function

 Get-ChildItem *.png | ConvertTo-JPG

 #REMOVE PNG FILES

 Remove-Item * -Include *.png

Friday, May 29, 2020

Setting up storage spaces virtual disk with a two disk parity using powershell

On Server 2019 I came across an issue setting up a storage spaces virtual disk in the Server Manager GUI.  You can view the issue and resolution on my YouTube channel https://www.youtube.com/watch?v=l1UEUi3twOg or continue reading the post.  I have an Intel Socket 2011 Board with a Intel E-2620v1 Xeon.  This motherboard has 6 sata ports, and I added in  a Silicon Image 3132 1x PCI-E card (2 ports) for some additional storage ports for a total of 8.  I have a single OS drive, a "scratch/temp" drive, and the rest of the disks I wanted to setup as a single storage disk for setting up and testing VMs.

So in my server manager you can see the 6 disks I am going to use., 2 of them are detected on a raid bus (Si3132 controller) the other 4 are detected as SATA.


Creating the Storage Pool works just fine.


Tasks -> New Storage Pool -> Give it a name and description


Select the disks you want to use


Once you confirm your settings, create your storage pool


Then open up the create a virtual disk wizard


Select the storage pool, in this case DATA


The new virtual disk wizard will then run, give your virtual disk a name


Specify enclosure resiliency (if applicable - in this case it isn't.)


Select your storage layout


Select your provisioning type (in this case fixed)


Define the size of the virtual disk


Create the virtual disk.


At this point creating the virtual disk will fail.  It should have setup the disk as a 6 disk parity with a single drive redundancy, this is how the wizard has been setup requiring a minimum of 7 disks for a 2 disk parity.


So at this point I switched to powershell, to create the storage spaces virtual disk.  I deleted the storage pool, even though it wasn't necessary; but I like starting clean, it helps keeps any issues down to a minimum.

If you haven't already install the latest version of powershell from github.  https://github.com/PowerShell/PowerShell

To make sure I can add all me disks to the storagespaces pool, I ran the following command.

PS C:\Users\Administrator> Get-PhysicalDisk -CanPool $True


Then I put these disks into a variable called $pd and created storage pool called DATA.
PS C:\Users\Administrator> $pd = (Get-PhysicalDisk -CanPool $True)
PS C:\Users\Administrator> New-StoragePool -PhysicalDisks $pd -StorageSubSystemFriendlyName "Windows Storage*" -FriendlyName "DATA"


Now that the storage pool is created we can create or virtual disk.

PS C:\Users\Administrator> New-VirtualDisk -StoragePoolFriendlyName "DATA" -FriendlyName "DATA" -Size 1000GB -ProvisioningType Fixed -ResiliencySettingName "Parity" -PhysicalDiskRedundancy 2


With the virtual disk made we can go into computer management and online the disk, initialize, format and set it up how ever we like.  After running the powershell commands if you want to see things in server manager you may have to do a physical refresh to have it all show up in the dashboard.


Wednesday, October 17, 2018

Installing powershell 6.1 on openSUSE Leap and Tumbleweed

Installing powershell on openSUSE Leap and Tumbleweed is relatively straight forward with the exception of a few issues. 

1) adding the repository doesn't work though their command line that they have issued on their powershell instructions

2) They neglected the instructions for adding OpenSSL 1 which is required

If you go to the Powershell Repository on github there are a set of instructions to install powershell on openSUSE and we are going to follow them and I will add the deviation points so you can get powershell running on openSUSE.  The link for the original Microsoft instructions are https://docs.microsoft.com/en-us/powershell/scripting/setup/installing-powershell-core-on-linux?view=powershell-6

You can view a 12 Minute video of the procedure on my youtube channel. https://www.youtube.com/watch?v=8yzDH0v99Us

Open a Terminal Window and Copy and Paste the following

# Register the Microsoft signature key
sudo rpm --import https://packages.microsoft.com/keys/microsoft.asc

Now we want to add the repository to our openSUSE system.  Open Yast and Open Software Repositories.


Select Add


Select Specify URL


Name and Add the Repository URL listed below

# Add the Microsoft Repository
https://packages.microsoft.com/rhel/7/prod/


You will get a warning about the Repository not being digitally signed.  If you want to use powershell I would add the Repo.


Once complete go to your terminal and run a zypper update

# Update the list of products
sudo zypper update

Then in the terminal in stall powershell using the command below.

# Install PowerShell
sudo zypper install powershell


You will get the error below

Problem: nothing provides libcurl needed by powershell-6.1.0-1.rhel.7.x86_64

 Solution 1: do not install powershell-6.1.0-1.rhel.7.x86_64

 Solution 2: break powershell-6.1.0-1.rhel.7.x86_64 by ignoring some of its dependencies

Select Option 2.

Once the install is down in Terminal you can start powershell but you will get an error about libssl that no usable version is found like the image below.

# Start PowerShell

pwsh


To fix that we go back to YAST and we need to go to Addon Products -> software manager and do a search for libssl


You will want to add libopenssl1_0_0 and libopenssl1_0_0-32bit


Once the install is done you can now run powershell!  You will know this by the

PS \Home\$USER (in this case administrator)


Removing Show Recent History and Recently Open Documents from Windows Explorer

How to remove the Recent History and Recently Open Documents from Windows Explorer Using the Registry Editor Press the Windows Key + R, type...