Thursday, June 29, 2017

Microsoft Hyper-V Integration Services Error 1603

In Hyper-V if you try do an upgrade of Integration services and you get error 1603 or says that it is successful in updating but Hyper-V is still saying that your integration services are out of data here is what you do.
Hyper-V Integration Services Requires and Upgrade and will not Upgrade

Error Code on Server 2003

First you need to remove Hyper-V integration services from the VM, yes this could break stuff so have a backup or have your settings for your network adapter, etc.


Once removed you will need to restart your system


Once your rebooted re-install Integration Services


Integration services may come up with a few errors while installing if you experience this it is best to continue and ignore the errors and fix the drivers after the fact once you get your network card reinstalled.


Once you have restarted and Windows has auto detected your Hyper-V integration services you will be up-to-date and ready to continue running.


Wednesday, June 21, 2017

Setting Up Fog Project On Hyper-V and using PFSense

This post is how to setup the FOG Cloning Project on Hyper-V.  This post is going to show you how to setup Fog On Ubuntu 16.04, on a Hyper-V host and how to redirect the TFTP for saving images and set the pxe boot settings in PFSense so the client machines can boot off the virtualized FOG Server.  The FOG server will also be setup with 2 Hard disks.  One for the OS and Fog Project which will include an apache webserver and mysql database the other a larger virtual drive where we will store the images that you will be saving and using to restore (clone) the other client machines.  This is how we are going to configure our setup.


  • DHCP/DNS: Will be handled by PFSENSE
  • Hyper-V: Will run Fog, handle the backups etc.
  • Fog:  2 Disk VM 80GB for OS and 500GB for Storage.
    Will run the fog services and TFTP Server.


The first thing we're going to do is go through some settings we need to setup PFSense so we don't need to setup a DHCP and DNS server on our virtualized fog.  Were going to let PFSense handle that because if we want to add another PFSense firewall and enable carp, this would give us a failover for our DHCP and DNS Server if we were to lose one of the firewalls.  These settings are for a multi-network setup with different VLANs.  If you're going to set this up on a single SMB network there will be some modification involved (which I will document later)

PFSENSE Settings

For PFSENSE we really just need to modify some settings in the DHCP Server.  The FOG server is going to take care of the network booting and the TFTP server as we stated earlier but we need PFSENSE to point to the FOG Server.  Besides the IP range, mask and gateway the settings we are going to set are the TFTP and Network Booting.  Make sure your DNS is set to your PFSENSE Firewall first.  We set the TFTP server to the IP address of our FOG Server (192.168.1.4) and we enable netbooting with the FOG IP address again.  We make the Default BIOS file name "undionly.kpxe"


That is all that is required for configuring PFSENSE


Configuring Ubuntu 16.04 Server in Hyper-V

For running A fog Server on Hyper-V we are going to use a Gen1 Hyper-V Guest.  We have the network were going to use FOG on VLAN 9.  I have a network LAGG setup it the network adapter shows up as a team, the settings setup though will be very similar if your using a LAGG or not.  


So we create our vlan in the Intel driver in this case vlan9.


Then we create our virtual switch in the virtual switch manager.  This is a tagged VLAN.


Here are our virtual machine settings for our FOG Server.


As you can see we have our Integration Services Enabled, 2 VHDX Files 1 80GB the other 500GB and we are using a the standard network adapter.  I have the FOG Server configured with non-dynamic Disks for better though put performance, 8GB of non-dynamic ram and 2 virtual processors.

Configure The FOG Server

For FOG I am going to be using 16.04 LTS, I am going to be installing a GUI with it so once all that is setup and configured.  The only thing installed on the server version of Ubuntu is the OS and the GUI.  You may want to double check your settings and ensure you remove the unattended-upgrades packages as there have been issues with fog.

Now we want to automount our "images" drive (our send vhdx) so when you do updates and reboot we don't have to remount the drive.  We edit the fstab file sudo vi /etc/fstab

Shown in the image below we add our 500GB vhdx is /dev/sdb1 and below we have what we are mounting the drive as.

/dev/sdb1         /images     ext4     defaults         0         1

Now you may need to play with permissions depending on what your needs are, if your looking for quick and dirty you can go with 777 but you should never go with 777.


The FOG installer will do the rest and it can be downloaded at https://fogproject.org/


Enabling the Hyper-V Integration Services for Linux Distributions that Ship with LIS Drivers and Services Already Installed

First we edit the "modules" file located in /etc/initramfs-tools using this command: 

sudo vi /etc/initramfs-tools/modules

and enter the following lines: 
hv_vmbus 
hv_storvsc 
hv_blkvsc 
hv_netvsc

Save and exit the file.  Run sudo update-initramfs –u then reboot the virtual machine.

Once the guest virtual machine is rebooted, the LIS drivers and services will be registered in the system.

You can verifying Hyper-V Linux Integration Services by running the following command

lsmod or lsmod | grep hv

The above command should list the Hyper-V LIS drivers and services. You'll need to look for hid_hyperv, hv_netvsc, hv_utils, hv_storvsc and hv_vmbus for the successful activation of LIS


Now we install Fog.

It is recommended that you move the extracted fog file to the /opt directory and execute the installer from there.  You can read more about Installing FOG from the project Wiki and I have done a tutorial on how to install Fog Server on my YouTube page.

So we download and fog and extract it.  The current version of Fog Project as of this writing is 1.4.3.  I renamed the folder from fog_1.4.3 to fog after extracting moved the fog folder to the opt directory by sudo mv fog /opt

then cd /fog/bin and sudo ./installfog.sh


The FOG installer will get and setup all required packages.  By default it leaves mysql with no password so I would suggest securing it by installing it before, or after and modifying the fog setting in the fog settings file located in your fog install directory in this case /opt/fog/.fogsettings.


FOG INSTALLER
This is a Ubuntu virtual machine running on Hyper-V so we select choice 2 and we want a Normal Server Install.  I want my IP to be 192.168.1.4 so in PFSENSE you can statically assign the IP before hand or you can do it after but it is best to have what you want planned out before hand.


Now unless your using multiple interfaces you want to keep your default interface in this case eth0.


Then we get asked again if we want FOG to handle DHCP and DNS and since PFSENSE is handling this we say no to both.  Then we get asked for internationalization and for this I selected no.


Fog then goes and get all required packages and installs them.


Here we get asked about the MySQL password and for the purposes of this post it is blank but as will all things you should secure it with a password.


Once all the installs for the database are done, we need to open the browser and verify the schema is up to date, otherwise this can cause us problems and it is easier to reinstall then to try fix the problem.


After updating the Schema, we can finish our install


Updating MySQL Schema in the browser before continuing the fog install.

Here is the screen after the setup is complete.


Remember the default username is fog and the password is password and you should change the GUI login at minimum.


Now that we have this all setup we can start imaging.  I pulled an image from a client machine and I got 4.35GB/min transfer rate on a 1 gig lan connection.  As you can see to pull an image took 10 minutes and to push one took about 20 minutes.


The progress also shows up in the tasks menu in the web based GUI with all the same information as shown below.


Fog Image Capture (Pull)

FOG Image Deploy (Push)

Tuesday, June 13, 2017

How to replace a failing drive in FreeNAS

This is a short step by step how to for replacing a failing or failed disk in FreeNAS.  You can watch the video by clicking this link https://youtu.be/iqOoSMfc4zA.  I highly recommend that if you have or are building a FreeNAS box that you label the side of your case or your disk with what the connections are on the case or on the drive and have either a printed sheet or digital sheet for you to reference serial numbers etc.  You will find it much easier if you have to replace drives or expand your disk space.

Example:

FreeNAS Backup Server (for veeam)
Storage Set NAME: Veeam 

RAIDZ-1 1TB (1 disk redundancy)
ada8WD-WCASY7587960
ada79QM0L71W
ada6WD-WMAYP0063026
ada5WD-WMASY4174721

RAIDZ-1 500TB (1 disk redundancy)
ada4Z1D6XQFP
ada3Z1D6XZVF
ada2W381A8JK
ada1Z1D6XZWS

Cache
stripe
ada0 (L2ARC) SN: 00000000120809072D13

If you note the image on the bottom the right hand corner of the image as a little status light with the text underneath it saying critical.

FreeNAS Home/STATUS Page
Status notification on the top right.  Looks like a light.

Pressing on the light will let you know what FreeNAS is complaining about in this case we have a drive (ada7) with unreadable sectors

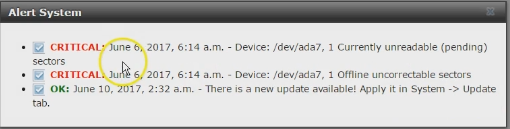
FreeNAS alert - Drive ADA7 has unreadable sectors


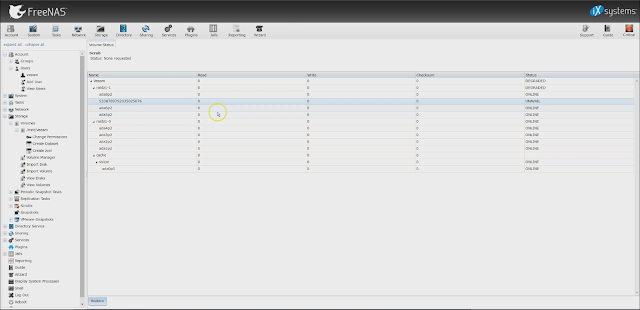
Go to Storage -> Volumes -> Select the top most Volume and on the bottom press the Volume Status Button.

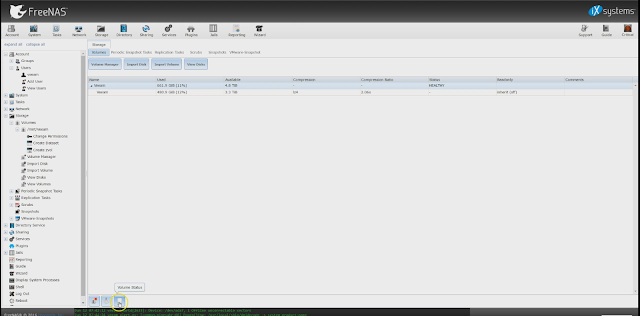
Press the Volume Status on the Bottom after selecting the top most volume
Select the drive ADA7 from the list of drives.  In this case we have what is two ZRAID1 vDevs which gives us a 1 disk redundancy out of the 4 drives much like a RAID5.  Select the failed or failing drive and press the offline button.

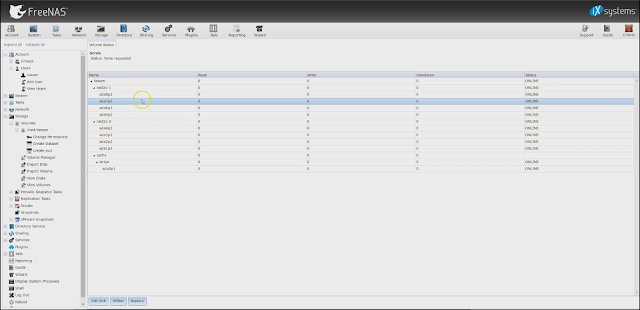
Select the failing drive and offline the drive
We know from our documentation that ada7 is serial number 9Qm0L71W.  If you don't have the serial number you can find it by going Storage -> View Disks.  Once the disk has been taken offline shutdown and replace the disk.

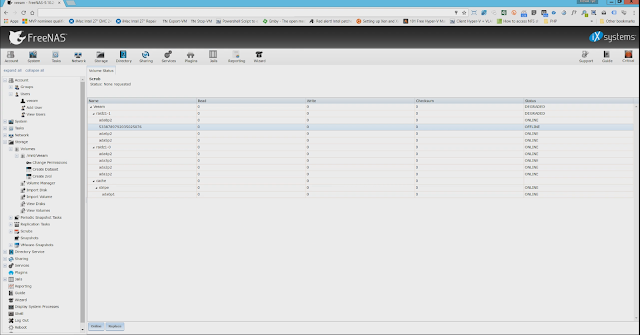
What an offline drive looks like
When replacing the drive it is best practice to format the drive before you put the disk into the NAS.  You can format the drive when you put it in the NAS but it is easier and faster to do it ahead of time.

Once the new drive is in the NAS, log back in and go back to Volume Status.
Storage -> Select the Top Most Volume Name in this case Veeam -> Press the Button Volume Status.  Then select the offline drive and press the replace button.

When the disk is replace you no longer get the online button as you see in the image before this one.
When you hit the replace button you will see a screen like this.  If you are replacing multiple drives at once be careful with which node your replace with which disk as you may mix them up which is why we have the disk location (ada) and serial number which we reference in our documentation.

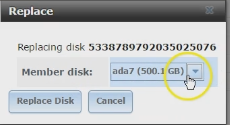
Replace offline disk with new disk
It will take a few minutes for the drive to be replaced and then it will be a few hours to about a day to get your data resilvered.  It depends on the size of the drive and how much DATA you have.


Thursday, June 08, 2017

How to fix Hyper-V Error 0x80070015 Event ID 32558

I was helping troubleshoot a Hyper-V failover cluster on Windows Server 2016.  What had happened is they upgraded their NAS and when restoring the virtual machines they were having an issue with a Win10 VM, and the Hyper-V Manager was not responding so they deleted the virtual machine manually.  They deleted the VM data disk and the config file but Hyper-V manager was insisting the VM was there and the virtual machine manager was checking for the deleted VM every minute as you can see in the log file below.


Hyper-V VMMS Event ID 32558


Failed to load Hyper-V State Error 0x80070015
Failed to load Hyper-V State VMMS Error 0x80070015 Event ID 32558

Googling the error 0x80070015 or the Event ID 32558 did not reveal anything that stood out.  Restarting the server did not resolve the issue either;  however this seemed very similar to a veeam replication issue I had where veeam was losing the machine ID and the resolution I had was to restart the Virtual Machine Manager.  Now when you restart the virtual machine manager your VM's will be unmanageable but will continue to run until you restart the service.  Once we stopped and started the Hyper-V Virtual Machine Management VMMS (see image below) the error went away and didn't come back.

Stop and Start the VMMS or Hyper-V Virtual Machine Service

Monday, June 05, 2017

How to setup FreeNAS as an iSCSI Target for Windows 10 and Windows Server

This is a post based off a live event I did on my youtube channel.  How to setup Windows 10 / Windows Server with an iSCSI Target using FreeNAS

This post assumes you already have a pre-configured FreeNAS system all setup and ready to go.  It is recommended that you use mirrored VDEVs for any type of virtualization use.  For more information on FreeNAS and the different types of setups check out the Introduction to FreeNAS from iX University.


In the above image it shows a 2 TB iSCSI target for windows to connect to.  To create one you create a FreeNAS zvol.  Show by the image below are the properties of the zvol.


The Setup:

All the iSCSI settings are under the sharing menu.

Target Global Configuration:
(you don't really have to do anything with this just use the default settings if you would like)


Portals:

The portal discovery Auth Method should be set to None
The Discovery Auth Group should be set to 1 (or the auth group number you are going to use)
The ip is set to the ip of the FreeNAS server in this case 192.168.1.10 on port 3260 (the default iSCSI port)


Initiators:
Here you can specify specific machines and/or authorized networks that can connect to the share.  We are using the ALL for this very basic setup.


Authorized Access

Here is where you put in the security information for the share and the group ID.  In Portals we set the Group ID to 1 and that is set here as well.  Make sure you have the information stored for this in a safe place.


Target:

Here is where we specify our target name and how to access it.  Note the Group ID for the Portal and Initiator group, it is the same as the security ID we had set.


Extent:

Here is where we define the iSCSI disk properties.  The biggest issue is going to be whether you pick a file or device based Extent Type.  I find device based extents are easier to use and the threshold warning primitive is fully supported where file based extents it can be argued that file based extents ability to have multiple exports per volume is better but performance between the two is about the same.  It depends what you want.

You can read more about it here http://doc.freenas.org/9.10/sharing.html#extents


Associated Targets

here is where you define on what LUN you want what target and what extent.  So you can have multiple targets and extents on the same FreeNAS server.


Make sure you don't make the same mistake I made, and be sure to start the service otherwise there won't be anything to connect to.

Setting up the connection in Windows:


You can use the quick connect or the Discovery tab to setup the iSCSI initiator, I recommend using the Discovery Tab when setting it up use the Microsoft iSCSI connector.  I also typically enable multi-path.  I also set the initiator IP as the machine where the connection is coming from on which ever network.


One the drive is connected go into disk manager this will prompt you to initialize the iSCSI target, and treats it as an internally connected drive.


Here are the benchmarks using CrystalDiskMark 5.2.1

FreeNAS iSCSI Target on 1GB test file


My RAID 10 (Internal RAID CARD)


As you can see really decent performance and the main limiting factor on the FreeNAS is the 1Gbps network connection.

I have 2 of these NAS systems at work on a LAGG interface for the Hyper-V Cluster I work as failover cluster shares and they work great.  Control Up continuously shows low disk latency and that it is very quick.

How to fix CURL call imporitng an RSS feed on a site blocking CURL calls

There is a 3rd party service provider that my organization uses called bibliocommons.  They have these nice book carousels.  However the car...