Thursday, April 19, 2018

Phase One Unable to open database Error on OS X High Sierra

PhaseOne Error when opening project
A good friend of mine just got a new Macbook Pro about 2 months ago.  He was in contact with the PhaseOne Vendor and they asked him to do a file system scan with Disk Warrior.  Now Disk Warrior isn't that expensive but it is costly at $120.00 USD and in Canadian Funds it is quite a bit more.  We ran Techtool Pro 9.6 and Apple Disk Utility and both found no issues with the file system.

I thought it was worth giving Onyx from titanium software a try.  It does several things that a disk utility will not do like cleaning caches, such as the kernel and file caches.

After running a default maintenance with Onyx PhaseOne launch with no problem, and sessions that were closing were now remaining open.

Sunday, April 15, 2018

FreeNAS 11.1.4, Cisco Meraki 10Gig network and Server 2016

I
There is only so much data you can get through on a 1 Gig network.  Right now we have a 7 node cluster plus a couple big beefy intel servers with 1 gig lags setup for though put.  We purchased a piece of software called pathsolutions; I had heard about it on This Week in Enterprise Tech and at the time we were having big problems with drop outs,  active directory login times and profiles.  Our infrastructure is currently setup with a minimum 2 gig LACP lagg on all cluster and NAS servers.  Pathsolutions helped up optimize our network but we were still having issues with switches dropping or being unresponsive for a short period of time.  This hasn't cause any issues as to date but it shows that we are at times maxing out our network as you can see below.


As you can see our network is doing ok, there aren't any really big issues but we are totally maxing it out when we run our backups.  We are currently using Allied Telesis switches but we are slowing migrating to Cisco Meraki Switches because of the cloud based network management features.  It is really quite impressive, we looked at the Allied Telesis management solutions and it was just much more cost effective to go with the merakis.

Test Environment Setup:

FreeNAS:
  • OS 11.1.U4
  • AMD 965 Phenom 2 x4 965 @ 3.0 Ghz
  • 16 GB DDR3 RAM (NON-ECC)
  • 4 X 3TB WD Red Drives
  • 4 X 4TB WD Gold Drives
  • Intel 320 80GB SSD Zil Cache
  • Intel 320 80GB SSD L2ARC Cache
  • Intel X540 T2 Supermicro Addon Card.


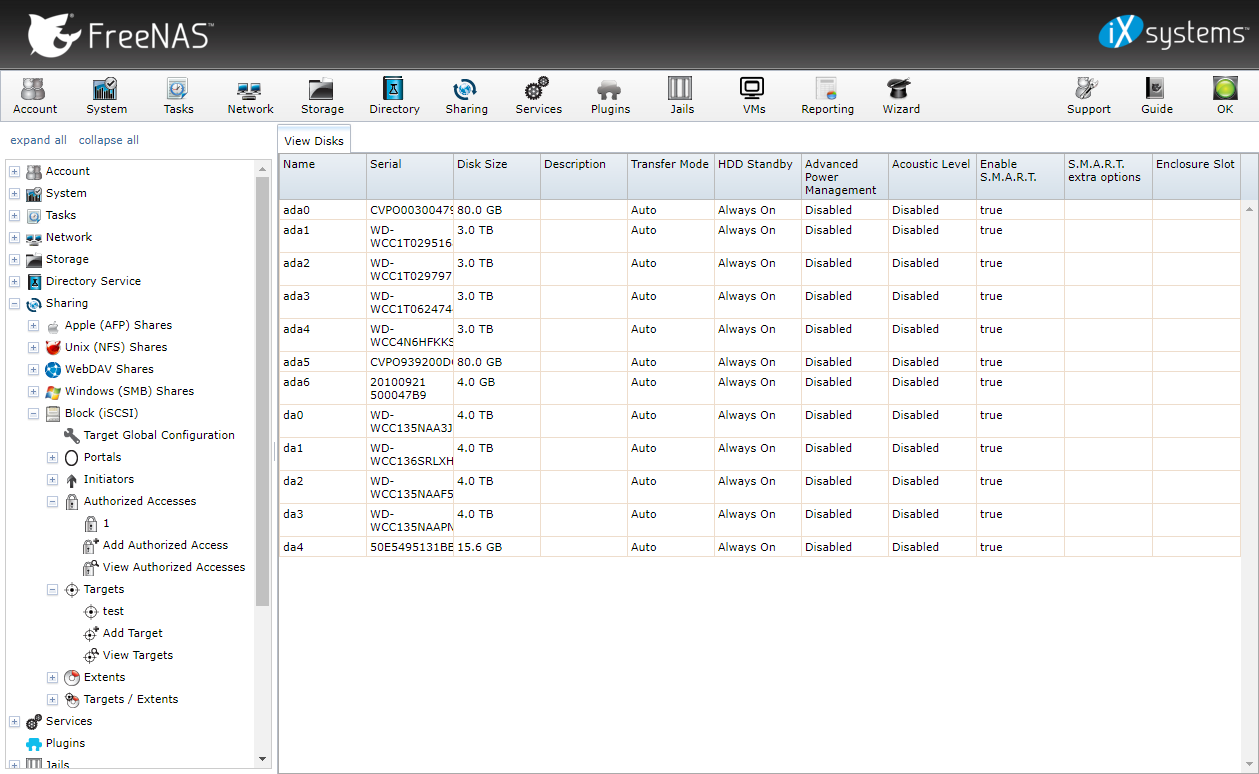
Drives on the FreeNAS


Drive Setup Mirrored VDevs
iSCSI Connection Disk
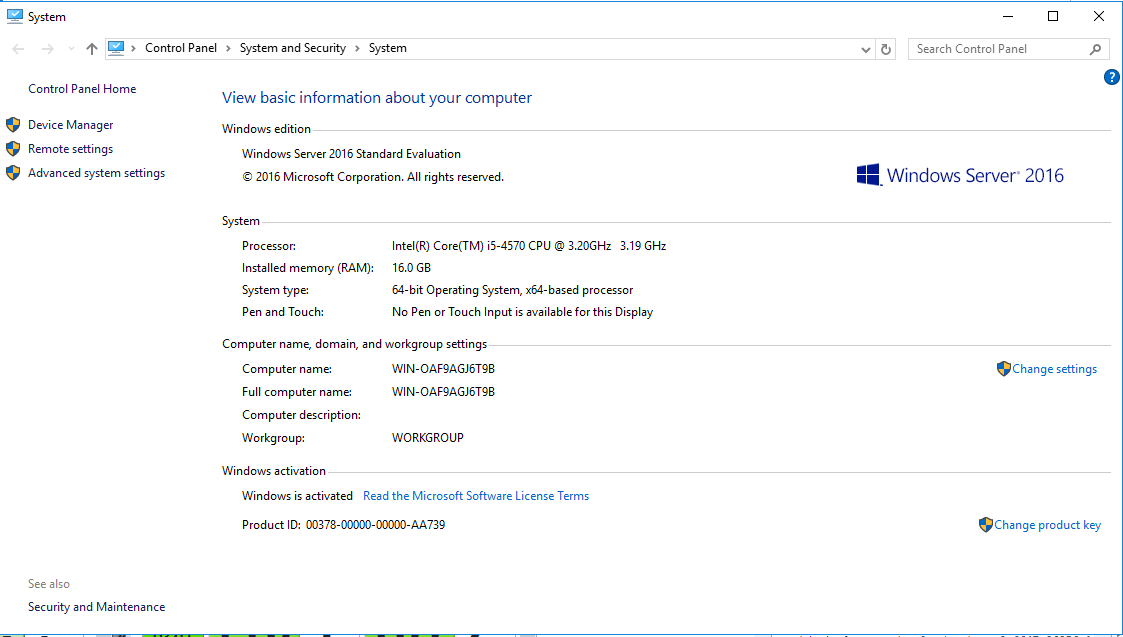

Windows:
Test Server

Switches:
  • 2 X Cisco Meraki MS350-24X Switches with stacking enabled
Cables:

The test server connected to the FreeNAS Server via iSCSI target and we did 2 different types of test one that connects direct to the the zpool drives and the other as connecting to a file in the mirrored vdev pool.


iSCSI Target

With the setup done we and the drive formatted, I proceeded with the testing.  We formatted the iSCSI target a few times during our testing particularly looking at the difference between NTFS and ReFS since the latter is suppose to be better for Veeam and most other applications.

Here are the different benchmarks we produced using crystal mark

All the benchmarks.


NTFS iSCSI file target


NTFS iSCSI zpool target


REFS iSCSI File Target


REFS iSCSI zpool target
The numbers I'm getting are fantastic, and I'm going to be looking into if 10Gig can be lagged with 2 1Gig connection (more for the redundancy then anything).  That way if we lose the 10Gig connection, we can continue to "limp" along until we can fix the issue.


Production iSCSI HDD Benchmarks

Production iSCSI SSD Benchmark
As you can see the test server shows a 10 X increase in Seq Q32T1 read performance, and almost a minimum 5 X increase in write, with all the other benchmarks showing an almost 2X increase in performance.  The actual production servers have much better hardware then what is on the test FreeNAS system, with the exception of the 3 and 4 TB spinning drives.  I am really looking forward to getting the new 10Gig put in place the trick is going to be doing this without breaking the infrastructure with the iSCSI targets.

Saturday, April 07, 2018

Adding Let's Encrypt TLS Certificate to SirsiDynix Horizon Web Serivces Tomcat Server


Following up on my post on How to setup Horizon Web Services I am now going to go over how to secure your connection as much as possible using a Let's Encrypt TLS/SSL Certificate.  Horizon Web Services is an application created by SirsiDynix that uses apache tomcat that allows access to a library ILS via API along with some other things (bookmine, bluecloud connection, etc).


Horizon Web Services can be run on the following Operating Systems in both 32 and 64 bit:

  • Microsoft Windows Server 2008 r2 or 2012 r2
  • Linux (Red Hat Enterprise 6 or 7; SUSE Enterprise 10 or 11)
  • Sun Solaris 10 or 11 (both Intel and Sparc)
This post will be how to secure Horizon Web Services on Windows Server 2012, almost everything will be done by Administrative CMD Prompt.  Sirsidynix recommends working out of your Web Services Directory and this is the order we are going to go though to setup our TLS/SSL certificate.


  1. Setup an environmental variable for the pathing to the Java bin directory
  2. Create a Certificate Signing Request
  3. Get an SSL Certificate from ZeroSSL.com
  4. Add the Certificate verification to your DNS
  5. Schedule a task every 3 months to update the TLS certificate or find a way to automate it.

Setting up the Environmental Variable in Windows

Everything we need to setup/add the TLS/SSL certificate in apache tomcat is in the Java Directory.  Right click on the computer and get the properties -> Go to the Advanced Tab -> press on the Environment Variables button.


System Properties Dialog Box


Setting Environment Variables

When you go to run the Tomcat TLS/SSL commands you will need to put "$JAVAVAR" in quotes in your command prompt so windows know where to run the commands we are going to run.

Create a CSR (Certificate Signing Request)


Tomcat uses a java keystore for storing all the certificate information.  There are a couple of things you will want to think about and document ahead of time before you start setting up your CSR.  


  1. One is the Alias for the keystore
  2. Is the name of your keystore file
  3. The password for your keystore file
The keystore alias and file name can be literally anything.  See the example below

"$JAVAVAR"\keytool -genkey -alias webservices -keyalg RSA -sigalg SHA256withRSA -keystore supersecrets -keysize 2048

The break down of the above statement is the keystore data is in an "container" called webservices.  This "container/alias" is in a file called supersecrets which is in the webservices directory.  This is protected by a password which you specify when you create the keystore file.  By default the tomcat keystore password is changeme.


NOTE:

the keystore has a .keystore extension associated with it though I found you don't need to put the .keystore behind the keystore file name, but if you want to use something like Portecle to view, edit and maintain your keystore you will need to change your open view to all files.

Make sure your in your Web Services Directory (Typically D:\SirsiDynix\WebServices)

Command to create the keytool for the TLS/SSL Certificate
After you run the command you will see something like this in your WebServices Directory
Files in the WebServices Directory
With your CSR file now created we can go to zerossl.com and start creating our TLS/SSL Certificate


Select the Free SSL Certificate Wizard

I didn't have an IP setup where I could use port 443 to verify the TLS certificate so I used DNS verification.  Paste your CSR in the right hand field and leave the left box blank so it auto generates your Let's Encrypt Key.


When verifying your TLS/SSL Certificate using DNS verification you will need to make an A record and setup a txt record with something like the following.


ACME-CHALLENGE for DNS TXT RECORD
Once you have been verified you will be taken to the confirmation page.


Your Certificate is Ready
Here you download the certs and then you can added it to the keystore.  Your domain and intermediate certs are in the domain-crt.txt file with the domain cert being the first part and the intermediate certs are the second part


Files from zerossl.com
The domain-crt opened in a text editor
Import the Intermediate Cert
Import Domain Cert

Now you need to open the server.xml file typically located in webservices -> conf folder; and edit the keystoreFile, keystorePass, and server.  Once this is done save the file and either reboot or restart the Tomcat Server.


If you want to have a full look at your keystore you can use 
Portecle and can dig deep and make changes to the certificates


Portecle GUI


Auto-Renew the Certificate

When I figure out a good way to automate the updating of the TLS Certificate I will definitely update this post in the meantime the best thing I can come up with are a calendar alert and to schedule it into the maintenance cycle, which isn't the worst thing in the world it makes you have a look at the server and make sure it is working and up to date.  You can download the auto-renew portable app for renewing here 
https://github.com/do-know/Crypt-LE/releases


Update!  Horizon Web Services Released April 3rd!

https://support.sirsidynix.com/alert/81823

Sunday, April 01, 2018

Setting printing options with Envisionware public printing software


Envisionware Print Release Screen
For public user printing the organization I work for uses Envisionware LPTONE print management software.  This is run on a physical machine that is connected to both a wired and wireless network to enable laptop printing.  The issue that came up recently is the need for double sided printing, now on the client the driver doesn't really allow for double sided printing it is a very basic just print driver.  Typically we had set this up to be black and white single sided usually called Black and White Printer.  However we now want to start offering these options to our uses so to resolve the issue I decided to make multiple network printers on the print release station.  As you see below on the left are the Envisionware virtual printers and to the right are the print drivers for the virtual printers.


Envisionware Printer Setup

Now the software is running on Windows 7 Pro, which has a limit of 20 Device Connections at a time.  When I added 4 different versions of the driver I had the virtual printers randomly dropping connections (not showing up) to the clients;  this appeared to be a result of virtual device connections.  


https://www.envisionware.com/lptone/
I had to remove the Windows Fax, and a PDF printer which were installed on the computer, it appears that Envisionware LPT One doubles the number of printers with virtual printer connections, so if we need to add any more printers we need to upgrade our print release station to windows server as it appears we have reached the Windows 7 device connection limit.

Each printer must be setup with a different print driver below is an example of the colour double sided print driver settings.
Colour and Paper Settings

Print Server Driver

Each printer is setup similar but a little bit differently as I have listed below with the changes, I have 1 HP printer which is a non-duplexing black and white printing unit which is used for the single sided printing but this could easily be changed to the Toshiba Printer which is setup for all the rest of the Envisionware Virtual Printers.  Below is a basic setup of the Windows Print Driver settings.
  • Black and White Single Sided - No 2 Sided Printing, Black and White Print Setting
  • Black and White Double Sided - 2 Sided Printing, Black and White Print Setting
  • Colour Double Sided - 2 Sided Printing, Colour Print Setting
  • Colour Single Sided - No 2 Sided Printing, Colour Print Setting
With all the Drivers setup the Envisionware print administrator shows what printer is assigned the the release station in this case I have 1 HP and 3 Toshiba Printers created by the differentially named print drivers, and I have them assigned to the Print Release Station called ADRELEASE-V4.

ADRELEASE-V4

Black And White Double Sided
We can now edit the configuration of the printer by double clicking on the print driver under the family configuration.  You get a dialog as shown below.
Envisionware Print Configuration
Double clicking on the printer brings up the Family Information "The Client Settings" this is where you specify costs, per sheet or cost per page and if the print driver assigned for the print family is setup for duplex printing.  To enable the duplex printer you change the duplex setting from none to vertical or horizontal binding.  If you want "book style" type printing you select vertical.  Then you can decided how you want to charge for your printing.  If you want to charge for each side of the print keep adjust price for duplex printing unchecked.  However if you want a price per age the enable the checkbox and it will do costing per piece of paper rather then printed side.

Envisionware Print Settings for Clients
That is basiclly it in a nutshell, the print client is pretty clear when they go to print and I have the the single sided black and white printer assigned as the default printer for all clients but that can be changed in the Printer Family Information settings as show above.

How to migrate PFSense Over to KEA DHCP Server from ISC DHCP Server

I am a PFSENSE User and I manage PFSENSE for some other organizations and the time has come to make the switch for the DHCP Server over to K...