Showing posts with label Microsoft. Show all posts

Tuesday, April 25, 2023

Microsoft Family Safety


What is the Microsoft Family Safety?

It is a free service offered by Microsoft that allows you to manage your family's devices and share information.  Much like the google family link service, but is for use with all of Microsoft's services such as office, xbox game services, screen time tracking, and reporting.

What do you need to use this?  All you need is an email address, it can be from any service.  My wife and I both have Microsoft accounts we are using with the service and the kids have an associated Gmail account (because Chromebooks).


You will send an invite to an already active email; or you will have to create an account.


When you set them up, they will have the option of being setup as a managed user or as a family organizer.  The organizer is an "administrator" and settings for restrictions are not applied to them.  If there is more then one family organizer the only options another organizer has is to remove them from the family group.


Adding a family member as a standard account you have many more features that you can control.


Overview

The overview for the accounts is where you modify a number of the account settings, which is specific to each managed family member.  You can also modify setting though the manage consent settings.


Connecting A Device


The PC Account needs to be a standard user.  XBox, Android and iOS devices are also supported.  If want to setup limits you have to do so for each child there isn't a global setting you can apply to the family users.  Settings have to be applied individually.


You can specify scheduled times, to limit screen time and what games are playable on the devices.


Content Filters

Content filters come in two sections Web and Search then Apps and Games.  You can specifiy specific website to be allowed only or block specific websites.  You can set age limits for games and any apps you don't want your kids to have access to.


The real power in Family Safety is the calendar and one note features for family.  Being able to automatically add everyone to add items for Grocery lists; or having the shared calendars for family to automatically show up for everyone is fantastic.


If you haven't set it up I highly recommend setting this up for your family; keep in mind that all family members will get a basic Microsoft account; which gives them 5GB of one drive space and access to the online versions of Word, PowerPoint and Excel.  The free service is quite comprehensive, and helps me keep an eye on my family.

https://www.microsoft.com/en-us/microsoft-365/family-safety

Tuesday, August 09, 2022

Hyper-V VM Backup using Powershell (VM-Export)


One of the many things I've been working on is an automated script to do VM backups.  I've been doing a lot of work automating processes with PowerShell recently so I thought I would just sit down and finish hammering out this little script I was working on.

This PowerShell script exports Hyper-V VM's to a directory; and sends an email notification when the export completes or if there is an error.  I am not 100% there with the backup as there are still a few bugs like sending an email when the entire script finished but I am confident enough of this working that I am going to pass this along for anyone to use if they wish.


##########BACKUP VM SCRIPT##########
#Set Variables for count, date and VM's you want to backup
$BackupNum = 0;
$TimeStart = Get-Date;
#Set the names of the computers you want to backup
$ComputerNameArray = '$VM1','$VM2','$VM3','$VM4','$VM5','$VM6','$VM7','$VM8','$VM9';
#Get the Number of Computers you want to backup
$BackupTotal = ($ComputerNameArray.count -1);
#Set the Path to save the backups
$SavePath = "$PATH TO FOLDER";

#Run the backup while the backup number is less then the backup total
while($BackupNum -le $BackupTotal){
#Set the first computer to be backed up
$ComputerName = $ComputerNameArray[$BackupNum];

#Check to see if there are previous backups
if (Test-Path -Path $SavePath\$ComputerName) {
#if the computer name is not blank remove the previous backup
if ($ComputerName -ne ""){
Remove-Item -Path "$SavePath\$ComputerName" -Force -Recurse
}
}

#Get the start time of the backup
$TimeStart = Get-Date;

#Export Backup
$ExportJob = Export-VM -Name $ComputerName -Path $SavePath;

#After the export runs get the time finished and send an email notification
$TimeFinished = Get-Date;
Send-MailMessage -From '$MAILFROM' -To '$EMAIL' -Subject "VM Backup for $ComputerName was Successful" -Body "The VM $ComputerName was successfully backed up. It started at $TimeStart and Finished at $TimeFinished" -smtpserver '$SMTP_SERVER'
#Auto Increment the export so we can get the next computer name
$BackupNum++
}

#While the jobstate is running or not started; get the progress
while( $ExportJob.State -eq "Running" -or $ExportJob.State -eq "NotStarted"){ 
$progress = $ExportJob.Progress.PercentComplete;
Write-Output ("[Export] " + $($ExportJob.Progress.PercentComplete) + "% complete"); 

#If the backup state is not Completed and errors out
if($ExportJob.State -ne "Completed") { 
#Get the time finished
$TimeFinished = Get-Date;
#Send an email that the export did not finish
Send-MailMessage -From '$MAILFROM' -To '$MAILTO' -Subject "Backup For $ComputerName Failed at $progress % complete" -smtpserver '$SMTPSERVER'
Write-Error ("Export Job did not complete: " +$ExportJob.State);
throw $ExportJob.Error;
}
##########END SCRIPT###########

Resources

Wednesday, January 05, 2022

Log4J MS Fix with Active Directory and Detection with Lansweeper

Log4J has been in the news for a while, so to patch the windows systems, I updated everyone's version of Java to the latest version.  In accordance with Microsoft's Environmental variable fix, I setup the variable to be deployed with Active Directory (After I verified that no apps would lose functionality).  You can read more about the Environmental variable fix by clicking on this article Microsoft Statement and Mitigations for Log4J.

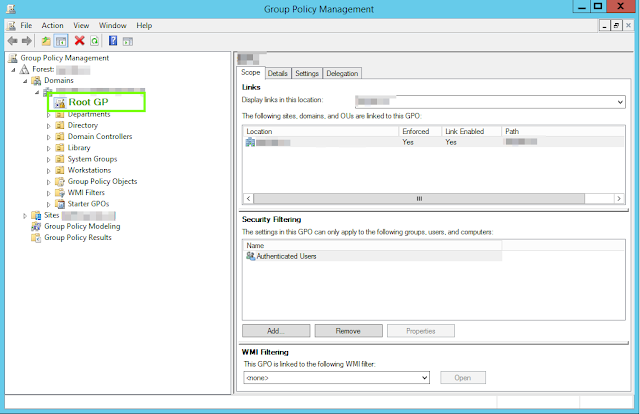
So to deploy the fix I used Active Directory.  I have a global GP for setting basic permissions and it is enforced with everyone so it makes the most sense to put it there.


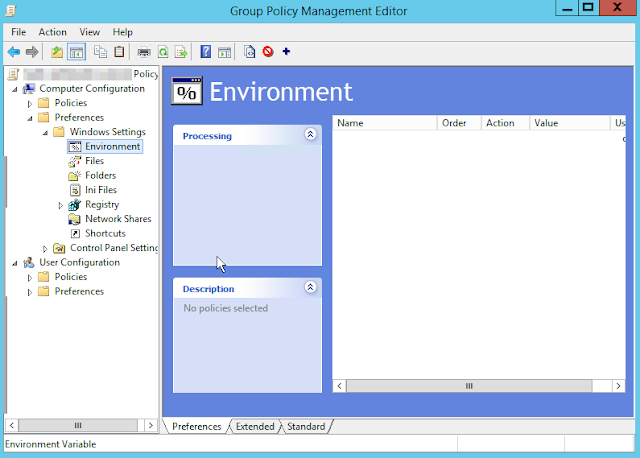
So edit the policy go to Computer Configuration -> Preferences -> Windows Settings ->Environment.  


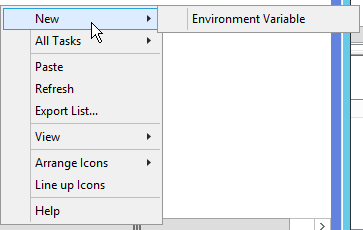
Right click (or under action) New -> Environment Variable

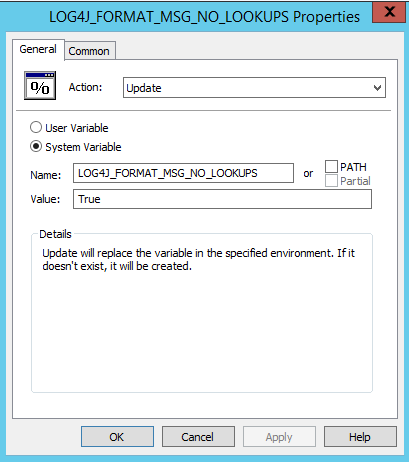
Enter in the following:

NAME = LOG4J_FORMAT_MSG_NO_LOOKUPS

Value=TRUE


Along with the variable, I have also updated Java to the latest version using LANSWEEPER's Software push functions.  I have 70 clients to update, and I deployed this early afternoon, and over half of them were done by the time I left.

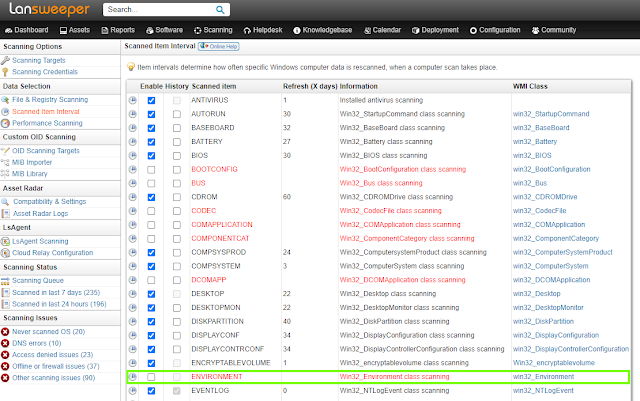
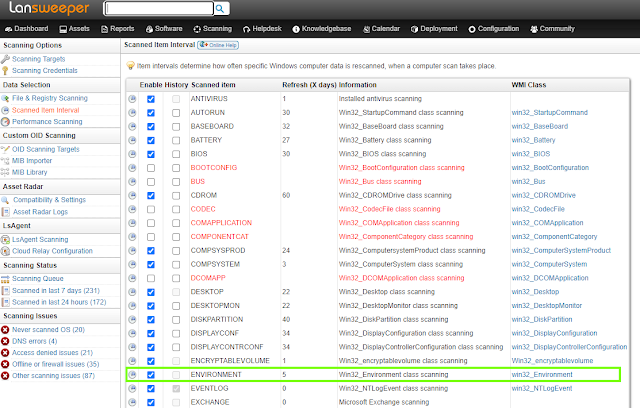
I wrote a script in Lansweeper that checks for the environmental variable.  You first have to enable Environmental scanning.  Under Scanning Select Scanned Item Interval


By default Environment is not checked (disabled) as shown below.


You have to enable it for this detection script to work.


With that done this script will check for to see if the Environmental Variable has been added.

/******************************************************************************/

Select Top 1000000 tblassets.AssetID,

  tblassets.AssetName,

  tsysassettypes.AssetTypename,

  tsysassettypes.AssetTypeIcon10 As icon,

  tblassets.IPAddress,

  tblassets.Lastseen,

  tblassets.Lasttried,

  tblEnvironment.Name As Name1,

  tblEnvironment.VariableValue As VariableValue1

From tblassets

  Inner Join tblassetcustom On tblassets.AssetID = tblassetcustom.AssetID

  Inner Join tsysassettypes On tsysassettypes.AssetType = tblassets.Assettype

  Inner Join lansweeperdb.dbo.tblEnvironment On tblassets.AssetID =

      tblEnvironment.AssetID

Where tblEnvironment.Name = 'LOG4J_FORMAT_MSG_NO_LOOKUPS' And

  tblEnvironment.VariableValue = 'true' And tblassetcustom.State = 1

Tuesday, September 15, 2020

Setting up Microsoft for Non-Profits

Google has been given access to GSUITE for a while now and I've setup several non-profits with this and do occasionally help them administrate it if required.  Now Microsoft is getting in the game (and this is a good thing) now giving Office 365 for free for non-profits.

Microsoft 365 is now free for non-profits
This post will go though what is required to apply and (hopefully) get approved for Microsoft 365 for Non-Profits.  I highly recommend before going forward you go thought the https://www.microsoft.com/en-us/nonprofits/ site and verify your eligibility.  The plans that are available for free are the Office 365 Nonprofit Business Essentials and 

Before you setup your Microsoft 365 account I recommend you have the following:
  • a techsoup account
  • a domain, ie. $yourdomain.ca
  • an email on that domain that can receive email.  This may require setting up an email alias if you don't have your own server
  • a way to verify your registration.  I recommend using a business or corporation number
  • picture of registration information
When you have all this information setup then you can go ahead and signup for Microsoft 365 Business for Non Profits.  When signing up I used a image of the registration information.  In the case of the setup I did I used the corporation number, and your techsoup validation token.

For more information about what is included in the free version of office 365 for non-profits.  https://www.techsoup.org/support/articles-and-how-tos/what-you-need-to-know-about-microsoft-office-365-nonprofit


Once you've filled out all the information you will get a verification email stating that the office 365 application is in progress.

Office 365 Verification
Once your organization has been verified you will get an email informing you to some of the services that are available for your organization.


When you go to login you can use the non-profit portal to login.  Typically you will be logging in with the format $user@$domain.onmicrosoft.com

Once you login to the non-profit portal you see your status and quick links for github, linkedin, and more Microsoft services that are available to you.


When you sign in to office.com you will be taken to a dashboard.


From here you can go into the office admin, non-profit portal, etc.  At least for this non-profit I am showing you the dashboard for they are allowed up to 25 unique users.


My experience with google there is no limit on the number of users you can have, but if you want Microsoft's products and services this is a fantastic service which I am sure will cut into google apps for non-profits adopters.  I found the setup and verification quick and fairly easy.  You are required to setup 2FA for the administrator account and for that I use and recommend Microsoft Authenticator available on Google Play and iOS


Thursday, February 06, 2020

Renaming an Windows Essentials Server

I have a few servers setup with server essentials because I have some software I wanted to run on Windows server but couldn't use full server and Windows 7 and 10 were not desirable.  I recently needed to change the name on one of these servers but it was a little tricky.  As shown below the server is currently named SIP

The server to be renamed
Unfortunately, when we get the item's properties, the name and domain change is not available. 

Name and Domain change is not available.
 Edit the registry and go to the entry HKLM\System\CurrentControlSet\Services\CertSvc

Edit the registry
 You can export the key if to back it up, I have found it is not necessary.

Export the CertSvc
 Delete the CertSvc registry

Delete the CertSvc registry entry.
Once you remove the key and reboot you will then be able to change the name of the system.

Now able to rename the server

When you change the computer name you will see this warning.  If you are using AD users be careful, It did not affect the server I was using but just be mindful.

Essentials warring on renaming

After you change the name and reboot your computer name will be changed.

Name Change
After changing the name and rebooting the system we can see that our system name is changed and we can still login to the system despite the warning.

System renaming is complete

You can see my full 8 minute video on how to do this on my YouTube page https://youtu.be/DP76WpqlUFo


References
https://winadminnotes.wordpress.com/2015/11/19/renaming-the-windows-server-essentials/

Tuesday, October 10, 2017

Microsoft MVP Award

On October 1st I was awarded with a Microsoft MVP award for Cloud and Datacenter Management.  I am very honored and humbled to receive the award and will continue to work to maintain this accreditation and adhere myself to the high standards of the MVP Community.

What/Who is a Microsoft MVP?

The Microsoft MVP (Most Valuable Professional) Program are community members who are active and contribute back to the communities they are apart of.  Today there are more than 4,000 MVPs globally, and there are around 200 here in Canada. The Microsoft MVP Award gives Microsoft the unique opportunity to celebrate, honor and say thank you to top-notch technology experts who make outstanding contributions to their communities.

What does it take and why would you want to
 become a Microsoft MVP?
The Microsoft MVP Award gives the unique opportunity to celebrate, honor and say thank community members and technology experts who make outstanding contributions to their communities. These technology experts have an unstoppable urge to get their hands on new, exciting technologies and love to share their knowledge. While there is no single way to become an MVP;  you might want to think about why you want to become an MVP—is it because you’re already doing amazing work in the community and you’d like recognition? Then think about what your impact is in the community and start spreading the word about who you are and what you love to do.

https://mvp.microsoft.com/


Friday, August 18, 2017

My First Hyper-V Cluster Setup

Microsoft Hyper-V Cluster Setup
About four years ago I began an investigation into how the organization I work for could have some sort of High Availability (HA) on a budget.  During a server room reorg some one mentioned using a new blade based system as a cluster and I took it and ran with it.  I started investigating what was required for a Microsoft Hyper-V cluster.  Since we were already using Hyper-V just on a Host basis, it made sense.  Now the rest is history, the Hyper-V cluster has been in production just over three years now running about 16 VMs on 6 nodes, and only looking at scaling the current infrastructure.

Going through and researching what it takes to run a Hyper-V cluster.  My list of requirements are as follows:

  • Systems must be the same level of hardware (can't mix AMD/INTEL)
  • All Nodes/Hosts must have all the same networks and listed in the same order (minimum of 2)
  • All Nodes/Hosts must have access to what will be the cluster storage
  • You should have a primary and secondary AD Controllers for the cluster (physical machines preferred)
  • Network settings and IP addresses on the host/nodes should be unique; compare the settings between the network adapter and the switch it connects to and make sure that no settings are in conflict.
  • The AD Controllers should be setup for DNS and DHCP Failover (DHCP Failover server 2012R2 and later) The servers in the cluster must be using Domain Name System (DNS) for name resolution. It is recommended that cluster nodes/hosts are just member servers.
  • Domain role All servers in the cluster must be in the same Active Directory domain. As a best practice, all clustered servers should have the same domain role
  • You need two or more Hosts/Nodes for a fail over cluster
I originally tried to make server 2012R2 run off SAMBA 3 for the shares but found it impossible to get working with FreeNAS as the implementations seem to be a bit different.


Current Hardware Setup:

  • 2 x Intel Atom Systems for AD Controllers.
  • 1 x AMD Blade System with 6 Nodes.
  • 2 x 3.2 Ghz 4 core nodes with 32GB Ram, Dual Gig Intel i350 LACP LAGG Network interface
  • 4 x 2.6 Ghz 8 core nodes with 32GB Ram, Dual Gig Intel i350 LACP LAGG Network interface
  • 1 x 48 port Allied Telesis Websmart Switch
  • 2 x FreeNAS NAS Appliances configured for iSCSI target shares Dual Gig Intel i350 LACP LAGG Network interface
Hyper-V Cluster Setup
Network Interfaces:

The cluster system has a total of 6 network interfaces that virtual machines will work off the host and are as follows.

Untagged VLAN 300
192.168.0.0/24 - Communication Network/NAS also includes AD Controllers for Cluster 
- Cluster/Client Communication Permitted


Tagged Vlan 301
192.168.1.0/24 - Staff Domain Infrastructure network 
- no Cluster Communication Permitted
Tagged Vlan 302
192.168.2.0/24 - Infrastructure Network (access to switches etc) 
- Cluster/Client Communication Permitted


Tagged Vlan 303 
192.168.3.0/24 - Primary Database Application
- no Cluster Communication Permitted


Tagged Vlan 304
192.168.4.0/24 - Contractor Network
- no Cluster Communication Permitted

Tagged Vlan 305
192.168.5.0/24 - Specific DMZ Communications Network
- no Cluster Communication Permitted

The Hyper-V cluster Nics are Teamed using the Intel Driver; FreeNAS does the Teaming in it's software and the switches are teamed as well and all have the VLAN tags setup as stated above.  It is important to have the networks in the same order on each of the Hyper-V Cluster Nodes otherwise you will have communication issues.  See my post on troubleshooting Hyper-V cluster communication errors.

Storage:

The FreeNAS systems are identical with a vdev mirror setups following best practices in the FreeNAS Guide linked to below.

Enterprise Level SSD x 4 480GB drives - vdev mirror 1TB capacity with multiple disk redundancy

Enterprise Level HDD x 6 4TB drives - vdev mirror  12TB capacity with multiple disk redundancy

Enterprise Level SSD x 240 GB Drive - for the zlog

Enterprise Level SSD x 120 GB Drive - For L2Arc Cache

The FreeNAS has been configured into 2 Tanks which are a set of drives setup in a vdev mirror as stated above.  For more information about freenas I recommend going through the FreeNAS Guide

The NAS has been configured as so
10GB Cluster Witness Disk
1.5 TB High Performance SSD Target
12 TB High Density HHD Target

Cluster Nodes:

As stated before the Cluster Nodes are merely members of the Cluster Active Directory which is controlled by 2 Physical Active Directory Controllers.  The Nodes have the Microsoft Cluster Roll installed and all nodes are connected to the FreeNAS iSCSI Targets.
View my video on connecting Windows to FreeNAS iSCSI Targets

Once all the the nodes are added (to get them added into a cluster you have to pass the Cluster Configuration Wizard then they will be joined to the cluster.  The Cluster shared storage that is accessible is typically C:\ClusterStorage\$DISKNAME

When you start importing your virtual machines save them to the cluster shared disks, then you can use the configure roles wizard to make the VM Guests HA.

Summary:

I've enjoyed learning about Hyper-V clustering and getting it setup and working isn't too difficult; maintaining it is pretty trivial as well.  It's not perfect but for what my organization needs it fits the bill quite nicely.  I am very proud of the work I've done, and improving the current cluster, it has scaled pretty nicely and a lot of the problems the organization had running of a single hyper-v host have gone away.  See below for some items I will need to do to improve the Hyper-V Cluster setup and some good resources for reading about Hyper-V Clustering.


Changes that need to be made:

The iSCSI targets need to be on a separate/private network from the Cluster Communication Network


Separate Cluster Quorum Disk (probably from a different NAS) for updates etc.

Setup the Cluster across multiple switches to prevent failure by a switch being down.

Fix some errors in the Cluster Validation Report I've run recently.

Good Reads


https://technet.microsoft.com/en-us/library/jj863389(v=ws.11).aspx


https://technet.microsoft.com/en-us/library/cc732181(v=ws.10).aspx


https://blogs.technet.microsoft.com/askcore/2014/02/19/configuring-windows-failover-cluster-networks/


https://technet.microsoft.com/en-us/library/hh127064.aspx


https://blogs.technet.microsoft.com/askpfeplat/2013/03/10/windows-server-2012-hyper-v-best-practices-in-easy-checklist-form/


http://www.altaro.com/hyper-v/19-best-practices-hyper-v-cluster/


https://channel9.msdn.com/Events/TechEd/Europe/2014/CDP-B335

Sunday, April 23, 2017

Enabling and Setting up SSD/HDD Storage Tiers in Hyper-V on Server 2012R2

In this post I am going to cover how to create a storage spaces tiered storage array, format it to use ReFS and have Server 2012R2 Mount the drive after/when the system is restarted.  You will have to have the Server 2012R2 installed with the Hyper-V role added before we begin.

When installed you can see from the GUI 4 disks that you have available in my case I have 4 but only three can be pooled because in this list my OS disk is being shown in here.


This powershell command shows what disks can be pooled.
#List all disks that can be pooled and output in table format (format-table)           

Get-PhysicalDisk -CanPool $True | ftFriendlyName,OperationalStatus,Size,MediaType       

The results of the powershell commands are shown below.


To make our lives easier we create a variable with unspecified disks.
           
#Store all physical disks that can be pooled into a variable, $pd           
$pd = (Get-PhysicalDisk -CanPool $True | Where MediaType -NE UnSpecified)           

#Create a new Storage Pool using the disks in variable $pd with a name of My Storage Pool      

---For 2012R2 and earlier---     
New-StoragePool -PhysicalDisks $pd –StorageSubSystemFriendlyName “Storage Spaces*” -FriendlyName “DATA”         

---For Server 2016 and newer---
New-StoragePool -PhysicalDisks $pd –StorageSubSystemFriendlyName “Windows Storage*” -FriendlyName “DATA”   


#View the disks in the Storage Pool just created           
Get-StoragePool -FriendlyName "DATA" | Get-PhysicalDisk | SelectFriendlyName, MediaType


So we have 2 types of disks shown in our storage pool.  SSD and HDD

We run the following commands to create a tiered storage pool.  This will create a ssd pool and hdd pool

#Create two tiers in the Storage Pool created. One for SSD disks and one for HDD disks           
$ssd_Tier = New-StorageTier -StoragePoolFriendlyName "DATA" -FriendlyName SSD_Tier -MediaType SSD           
$hdd_Tier = New-StorageTier -StoragePoolFriendlyName "DATA" -FriendlyName HDD_Tier -MediaType HDD

Now we can switch to the gui and create our VHD which will mount to the HOST OS.  We will also be able to create a writeback cache.  From here we can start the Wizard in the GUI.


Now here is where we can select the option to create tiered storage spaces and name your virtual disk.


Here is where you can specify what kind of setup you want in my case simple or mirrored. However I could not do mirrored as I did not have enough physical disks available so for the purposes of this post I went with simple.  Though for performance and redundancy I would select mirrored.  StorageSpaces allows for 3 types of resilient storage.


Resilient storage. Storage Spaces provides three storage layouts (also known as resiliency types):
  • Mirror. Writes data in a stripe across multiple disks while also writing one or two extra copies of the data. Use the mirror layout for most workloads – it helps protect your data from disk failures and provides great performance, especially when you add some SSDs to your storage pool and use storage tiers.
  • Parity. Writes data in a stripe across physical disks while also writing one or two copies of parity information. Use the parity layout for archival and streaming media workloads, or other workloads where you want to maximize capacity and you’re OK with lower write performance.
  • Simple (no resiliency). Writes data in a stripe across physical disks without any extra copies or parity information. Because the simple layout doesn’t provide any protection from disk failures, use it only when you require the highest performance and capacity and you’re OK with losing or recreating the data if a disk fails. You can also use the simple layout when your application provides its own data protection.
Once you go forward you will see something like this for the following screen.


You will see an alert about the write-back cache, and I will end up with a 700GB drive 1 x 120 GB SSD and 2 x 320 GB HDD.  Now because this lab is a simple setup (3 drives) and if I wanted any kind of redundancy (which I would want for a production environment) I would want to use a mirror setup for the storage spaces instead of simple for the storage layout.

Update - April 24, 2017

After that you will want to get your storage space volume to auto mount

Open an administrative level PowerShell prompt and type in the following.
Get-VirtualDisk | Where-Object {$_.IsManualAttach –eq $True}
This lists off your virtual disks where the IsManualAttach property is turned on and the disks WILL NOT auto-reattach on restart.
Now run the line again but include the following:
Get-VirtualDisk | Where-Object {$_.IsManualAttach –eq $True} | Set-VirtualDisk –IsManualAttach $False
Now the virtual disk will auto mount after a restart/power cycle.

Update - April 26, 2017

I was unable to use the procedure above to work with NVMe based SAS drives. If you want to know how that was setup see my post How to setup Storage Tiers on Server 2012R2 with Powershell and NVMe Drives I go through step by step on how to setup the storage spaces using powershell.


For more information about storage spaces please refer to the following articles


and for referencing some of the powershell commands I used checkout


Automount Storage Spaces Virtual Disk


You can also view the whole process on my youtube channel. https://www.youtube.com/watch?v=hNhX65DDaT4


Removing Show Recent History and Recently Open Documents from Windows Explorer

How to remove the Recent History and Recently Open Documents from Windows Explorer Using the Registry Editor Press the Windows Key + R, type...