Wednesday, December 13, 2017

How to deploy a Printer with Active Directory and Group Policy

How to use Active Directory and Specifying Printers to Specific Workstations


I was handed a project that could easily of been fixed by a really long usb cable (50 - 100 ft) but for flexibility of the physical devices it was better to look at a network based solution for managing the printer.  However there are a couple caveats about the situation with the printer and the workstation requiring access.
  1. The network printer is on a completely different network then the workstation
  2. The workstation is on a managed domain
  3. We only want the one workstation to have access to the printer on the domain
  4. Power location is a problem
  5. Network location is a problem
The printer is on a network that is 172.31.x.x and has a IP reserved via PFSense firewall, the workstation is on a 192.168.x.x network on an Active Directory Domain that is assigned via DHCP and the network is controlled by a different PFSense firewall.

Now I realize that I could setup a route in the firewall to the printer allowing the domain account to access the printer, but to keep the complexity down on the firewalls (and that we would have to do a failover to make appropriate rule changes on our failover firewall) we decided not to add routes to the printer.  I did have a virtual machine (not on the domain but in a workgroup) which was being used as a print release station with software from Envisionware for print and release printing from public workstations.  The public workstations are just in a workgroup and on a 172.31.x.x network and our staff network is on a 192.168.x.x network.  Our staff however can remote into the print release workstation to release jobs etc so it seemed to be the most elegant solution.

Step 1 - Make sure your print server is prepped.


The printer we are using is an HP Black and White Small business laser printer so we going to use the universal HP driver so we need to download and extract the driver.  In this case C:/HP Universal Print Driver as shown below.  I'm going to use DNS for making the printer connection so the computer name in this case is Reference01.  We are going to call the shared printer a Human Understandable Name in this case CRC Printer


Once the printer is shared out we use the Additional Drivers feature to add our 32 and 64 bit drivers so when our clients connect they know what driver to use and if they don't have it it automatically installs it if they have the proper permissions.  


32 and 64 bit drivers ready to automatically install
So lets clarify things here.  We are defining our 172.31.x.x network as our "Public" network and our 192.168.x.x as our "Domain and Private" network.  We are going to use the Windows Firewall to restrict access to the Print server on two different networks.  Since we are using the Envisionware print release software we can block all RDP/SMB/Print Share ports on the Public Network.  We are not blocking the TCP/IP port we used for connecting to the network print nor are we blocking the Envisionware software which is usually installed on a randomized port.   On our Domain/Private Network we will require SMB/RDP/Print Share ports to be available.  We will need to add this Print Share to our Active Directory Print Server and add some GP powershell scripts and OU access via GP.  We need to first make our Domain OU for the The new printer and add appropriate firewall rules to restrict access/allow access.  On the Domain network I have all the typical printer sharing ports

STEP 2 - Setup your OUs and Group Policies


So as you can see in the image below I have a ROOT GP Policy, an OU called Group1 with a Group 1 GP and an OU called Workstation with a GP called LocalPrinter.  I have other GP settings which are applied on a global basis and I am using OUs to have a greater finite control of what Group Policies I want to apply which is why this policy is three levels down.  In this case the GP settings I want to have finite control over is the printer we just shared.  I only want this printer to show up on this workstation when the user login and remove it when they logout.  
Group Policy Management
So we put our Workstation (Public1) in the workstation OU, and we apply the following GP settings

User Configuration -> Policies -> Windows Settings -> Scripts

Create Powershell Script in the Login/Logoff
When you get the properties of the logon script you want to select the powershell tab and hit add

Script Name: Add Workstation Printer

Script Parameter:
Add-Printer - ConnectionName \\Reference01\CRC Printer

Powershell Script for adding the printer in GP
and similarly we want to do the same thing to remove the printer from the user profile if they roam to another machine.  So the logoff powershell script is the same with the Remove Switch instead of the Add

Script Name: Remove Workstation Printer

Script Parameter:
Remove-Printer - ConnectionName \\Reference01\CRC Printer

STEP 3 - Add the Shared Printer to Active Directory Print Management


Now that we have our GP and OUs all setup we can move forward and add the printer to our AD Printer Management Server.  We want to add the Workstation Printer Server to work with our AD.  Right click on print management and select add/remove servers
Server 2012R2 AD Print Management


Add the shared printer from the Workstation
Browse to/find the workstation print server we want to apply to our uses Group Policy in the OU
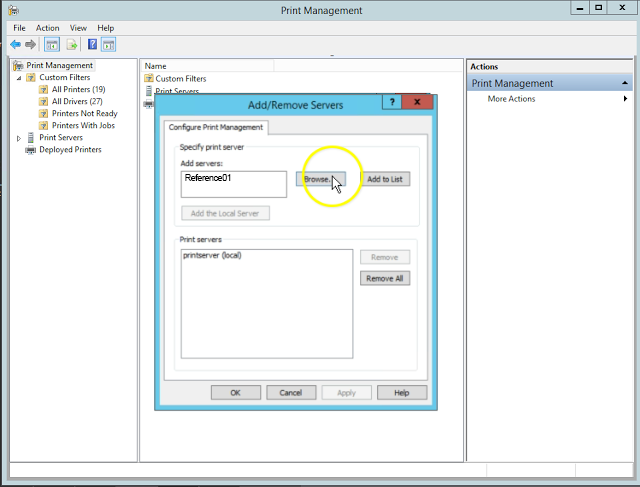
Browse/Add the new workstation printer (Reference01)


List of Print Servers
Go to the print server (in this case "Reference") click on printers and select the printer you want to deploy
Deploy with Group Policy
The settings here I have applying Per Machine and Per User; then we select Browse to select the GP we want to deploy to.
Deploy with Group Policy Settings
Browse UI for finding GPO Name

Now with the GP deployed I find it helps to do a GPUPDATE then logoff and logon; on both the workstation and the Server.  If everything works as it should you should see this.

A successfully deployed printer

A successfully deployed printer via AD using OUs and GPs.  All users should have no problem connecting on that machine with the current GP settings we have setup unless you have other restrictions in your group policy.


STEP 4 - Test and Verify.


Always best practice to test and verify anything you do and works the way you expect.

Wednesday, November 29, 2017

Create a USB Bootable Disk on OS X

To create a bootable USB Disk in Mac OS X, You must have the Application of the version of Mac OS X that you want to install downloaded and extracted.  Please make sure you have a mac and root access before proceeding.

So for this example we are going to use macOS Sierra.  You must have the "Install macOS Sierra.app" and if your looking for step by step instructions it must be downloaded into your Applications Folder.

To download an older version of MacOS from Yosemite to Catalina, you can download the MacOS App using this url https://support.apple.com/en-us/HT211683


Plugin a Flash Drive; I'm going to use a Verbatim 16GB USB Flash Drive. Open /Applications/Utilities/Terminal.app

sudo /Applications/Install\ macOS\ Seirra.app/Contents/Resources/createinstallmedia --volume /Volumes/STORE \N \GO --applicationpath /Applications/Install\ macOS\ Seirra.app --nointeraction

You can modify this command line to use with any previous version of OS X if you can get a copy of the Install.app and replace the bolded text with the previous version of the OS X install.app  for example "Install\ OS\ X\ El\ Capitan" and you must put \ $text so the mac can recognize spaces in the name.  The \ is an "escape" and tells the OS that there is a "space" character.

***UPDATE***

You can find this on apple's knowledge base for the issue but they removed the application path for the USB installer.

sudo /Applications/Install\ macOS\ High\ Seirra.app/Contents/Resources/createinstallmedia --volume /Volumes/STORE \N \GO

https://support.apple.com/en-us/HT201372

***Pre High Seirra***

sudo /Applications/Install\ macOS\ Seirra.app/Contents/Resources/createinstallmedia --volume /Volumes/STORE \N \GO --applicationpath /Applications/Install\ macOS\ Seirra.app --nointeraction

Below is the log from my terminal screen.  This could take up to 10 - 30 minutes depending on your system, and if may have to make adjustments if your file system is case sensitive or not.

sudo /Applications/Install\ macOS\ Sierra.app/Contents/Resources/createinstallmedia --volume /Volumes/STORE\ N\ GO --applicationpath /Applications/Install\ macOS\ Sierra.app --no interaction
Erasing Disk: 0%... 10%... 20%... 30%...100%...
Copying installer files to disk...
Copy complete.
Making disk bootable...
Copying boot files...
Copy complete.
Done.

At the end of this you will have a bootable USB device that you can do a system recovery, disk image, or a fresh install of your mac with.

Monday, November 27, 2017

ENETUNREACH FTP Error in Filezilla caused by Kaspersky Security Center 10

 Server/client security software is annoying at best but it is even more annoying when things are not clear how to fix a problem much like I had with Kaspersky Security Center 10 and Filezilla.  After a server update a new policy was made and all FTP access was denied from our clients and they needed access for us to continue to do our business.  Here is how to fix the ENETUNREACH Error that you will get if your trying to use Filezilla with Kaspersky.
Filezilla FTP ENETUNREACH Error caused by Kaspersky Security Center 10

If your using Kaspersky Security Center 10 and Filezilla for any FTP services you may require if you don't have a proper policy in place you will encounter the following error

Error: The data connection could not be established: ENETUNREACH - Network unreachable

To resolve the error and allow your users to FTP again you need to make the following changes in your policy.


Right click on the policy and go Properties.

Go to Anti-Virus Protection -> General Protection Settings -> Monitored Ports Settings


De-select/uncheck the FTP port as shown in the image below.


Hit OK then go to Firewall Settings -> Configure Rules for Network Packets and Data Streams


Add a new Network Packet Rule


After you add the rule you can move it to the top of the list to ensure it doesn't get blocked by another rule.  You can also limit this to particular IP addresses if you only want specific users to have access.


Hit Ok -> Hit Apply -> Hit Ok

That's it your done.


Special thanks to Pavel Labanov and his great YouTube video also documenting how to fix this issue.

Thursday, November 23, 2017

Hyper-V Virtual Switch Settings

Back in September I got a message from the facebook group VMware vSphere and Microsoft Hyper-V I am a part of and I got asked for some help with an issue with Hyper-V Switches.

The Issue:


The host machine is Server 2012R2 With the Hyper-V Role Enabled. Then a client VM was made on the host and connected it to virtual switch to communicate with my host.
The host operating system is pinging vm but i am unable to ping my host OS from VM .
host and guest vm and virtual switch created in host are all on same subnet and the firewall is off on both systems
So some simple questions about the setup.

Q:   What type of virtual switch?

A:   Virtual switch is internal

Q:   DHCP Server Setup?

A:   Yes on Host

So lets review our Hyper-V virtual switch Types:


External 


A Hyper-V virtual switch in external mode allows communications between virtual adapters connected to virtual machines and the management operating system. It uses single or teamed physical adapters to connect to a physical switch, thereby allowing communications with other systems.


External virtual networks are used where you want to allow communications between
  • VM to VM on the same VM Host
  • VM to VM Host (and visa-versa)
  • VM to externally located servers (and visa-versa)
  • (Optional) VM Host to externally located servers (and visa-versa)
External Virtual Switch


Internal 

A Hyper-V virtual switch in internal mode allows communications only between virtual adapters connected to virtual machines and the management operating system (VM Host).

Internal virtual networks are used where you want to allow communications between
  • VM to VM on the same physical server
  • VM to VM Host (and visa-versa)
Internal Virtual Switch


Private

A Hyper-V virtual switch in private mode allows communications only between virtual adapters connected to virtual machines.
Private virtual networks are used where you want to allow communications between
  • Virtual machine to virtual machine on the same physical server
Private Virtual Switch


Host Network Adapters


Dedicated

Dedicated switches are a physical Network Card on the host just for use just by virtual machines. 

They allow communication between:

Virtual machine to virtual machine on the same physical server
Virtual machine to externally located servers (and visa-versa)
The prevent the VM Host from using the adapter

A dedicated switch is just an external network switch that doesn't allow the host OS from using the adapter.


Dedicated Virtual Switch

According to the what we know the firewall being off and having a DHCP server setup everything should have been working unless we didn't have the DHCP server running on the right network.  The IP range on the host internal network adapter and the VM internal network adapters appeared to be getting different 169 addresses so the DHCP server was not running on the internal network.  Changing the IP address to STATIC IP addresses on the same subnet resolved the issue.  So it was an issue with the DHCP server on the internal network.


Video

I did a full video of the 3 mail virtual network options down below.


https://youtu.be/zI3p1AjZkPU

Sources

https://blogs.technet.microsoft.com/jhoward/2008/06/17/hyper-v-what-are-the-uses-for-different-types-of-virtual-networks/

https://www.altaro.com/hyper-v/the-hyper-v-virtual-switch-explained-part-1/

Monday, November 20, 2017

SirsiDynix HIP Search Error 30015e

If your orgainization uses SirsiDynix Hip and you get a 30015e Error, The SirsiDynix KB has a post about the iPac 2.x admin tool, the other thing it could be as was in this case if you use a third party for your Customer front end for your catalogue such as bibliocommons having an issue with hold could cause the JBOSS to run out of memory.  Bibliocommons in this case were performing an upgrade that caused an issue with holds.  Since HIP is required for holds it made sense to either try reboot the hip server or try start the JBOSS Service.  Since it is the middle of the day and the Horizon Client requires HIP restarting JBOSS made the most sense.  This can cause the HIP Search to display the error unable to retrieve data. 30015e


Search Error with code 30015e
If you login to your hip server and restart jBOSS your search should come back just fine so long as you haven't modified any of the settings posted in the iPac 2.x admin tool.  If that doesn't resolve your issue follow the instructions in the KB Below.

https://support.sirsidynix.com/kb/129707

Friday, November 17, 2017

Creating a Security System with iSpyConnect

I heard of iSPY about 5 years ago, but found it buggy and it did not work with the camera that I needed it to work with.  I thought I'd revisit the project because I had a project that I needed to setup an inexpensive security system for.  I downloaded and installed ispy on a windows 8.1 VM with 8GB of RAM; 120GB Drive for the OS and Application and a 500GB drive for storage.


The project was to view and monitor a hidden public area where someone was stealing DVD movies; and they were leaving RFID tags in the area that is going to be monitored.  A company can spend a few thousand dollars on a security system, but it would also require an additional few thousand dollars worth of setup in the proposed location which was not practical.

Reasons I went with iSPYConnect
  1. The budget, it almost non-existent
  2. No wiring required except for power
  3. Microsoft Hyper-V server for setting up the iSPY Server
They did have a Windows 8 Key and Install Disk for use in the Hyper-V System that was not being used, so I created a basic VM with 8GB of Dynamic Ram, 2 core processor and 120GB drive for the OS and 500GB drive for the video storage.  The camera that was selected was a D-Link DCS-2530L for monitoring the location.
Specs on the D-LINK DCS-2530L
  • 180° Field of View
  • 1080p HD Quality Video
  • Unique De-Warping Technology
  • Sound and Motion Detection
  • Local Recording via SD Card
  • Night Vision
D-Link DCS-2530 Picture Quality
I did have some difficulty getting the Webcam to connect to the WiFi Network, but got it resolved, the Camera would connect to the WiFi then it got removed by the security features in the Cisco WiFi Access Points being used.  I had to whitelist the camera once I got it connected to the network.  The procedure was simple since the camera was already in the list.  The Wifi AP that is in use is a Cisco Meraki, and you need to go into Air Marshal and change the status from contained to whitelisted.  Then I was able to access the camera on the LAN.

Configuring the Camera

There are a couple of things to keep in mind at least in this use case.  I had to set the camera to a constant 1 constant mbps bit rate at 720p quality.  Anything more then that and the camera had disconnection issues with the ispy software and I also used the VLC and setting it to the other setting (excellent) was just compressed so much it was not usable.

D-Link Home Page
RTSP Streams


Camera Configuration

In the setup by default ispy tries to use mjpg for the video capture which is just to slow, I was getting framerates of 0.6 to 0.8.  To resolve this problem I used the VLC Stream capture feature in ispy, for this I disabled the basic security features in the camera to access the stream as it seems to break when I turn it on.  Then using the VLC plugin, I was getting 7 to 9 FPS which is good enough for what we were looking to get.  This camera has 3 possible feeds as you can see by the RTSP streams listed above.  You can also test these streams by using VLC Player and open the stream. rtsp://$IPADDRESS:554/live1.sdp

Quality Comparison

Default Settings Using IP Camera Wizard

VLC RTSP Stream

Configuring iSPYConnect to use RTSP Streams

How to setup iSpy to use RTSP with a D-Link 2530L video

With the D-Link 2530L the rtsp stream does not come up using the IP Camera wizard so we need to manually add the RTSP stream to iSpy.

Add a camera and select VLC Plugin in the tab.


Once that is done you can configure the rest of the settings how you like it is very straight forward.  By default it keeps the videos for 72 hours before deleting them.

I did this using Hyper-V but you could also do this on a Mac or Linux system using another virtualization system such as virtualbox or kvm, it is up to you what you use and what you have available to you.

About iSPYConnect


Started back in 2007 the software has continually evolved and improved to become a robust, feature rich solution.
The number one use of iSpy is small business security, but home monitoring, neighborhood watch, checking in on the kids, desktop monitoring, nanny-watch and mobile access through a iSpyConnect.com are valued features.
Facial recognition and detection of changes in lighting and audio offer the subtleties that set the software apart from competitors.
Getting started with iSpy is easy: all you need is a webcam or IP camera connected to your computer or network.
iSpy connects to the camera and shows the live view. You can then define specific areas of the video that iSpy should watch for movement, and set a threshold value for the amount of motion that would trigger automatic recording. iSpy can also operate in always-recording or manual-recording modes and supports scheduling and remote access (with an iSpyConnect subscription)
iSpy was designed to provide a low-cost alternative to expensive surveillance systems. It has become a highly scalable application that can be tailored to record and take actions on specific incidents as defined by the user either locally or remotely.

Monday, October 30, 2017

How to update a Horizon ILS Training Database

If you're a SirsiDynix Horizon library using SQL server this tutorial is for you.  I will cover how to restore a training database with a backup from the production database and then make changes in the Horizon Client to make those differences visible.

This tutorial assumes you have the proper permissions for both your ILS database and the Horizon client.  With this you can easily update your training database with the latest up to date information and depending on your hardware it can take as little as 5 - 10 minutes.

  1. Log into the Microsoft SQL Management Studio on a workstation that has access to the backup or on the server itself.

  2. Select your training database if not already made. Then select Tasks -> Restore -> Database

  3. Make sure you have the database you want to restore the data to selected.   Then change the source to "From Device" and select your backup database file.  In this case Z:\DBBackup\$DATEOFMYBACKUP.bak


  4. Make sure you check and make sure that Restore is checked.  Then go to options and check Overwrite the existing database. 

    ***IMPORTANT***
    - Make sure the "Restore As" Data and Log files are for the database you have selected otherwise you could overwrite production data. 

    Since we are using the Training_DATA and Training_Logs we know that we are not using the production data because lets assume that the production db is called production.  With our production database called production lets assume our Rows Data is called production_data.mdf and the logs production_log.ldf.


  5. The restore process will take about 5 minutes.  Then you can exit out of SQL Management Studio then open the Horizon Client with an account that has administrator access.

  6. You will get a Middle Tier Error on login. Just note the error and click ok.  We will be fixing this

  7. Once you are logged in go to Administration -> Table Editor -> Matham

  8. Double click on the line in the box.

  9. You want to find and edit two items shown below highlighted in Yellow

    Horizon App Server Version -> Select NO Horizon Application Server.  You don't need to put anything in the Horizon Application Server URL because we just disabled the URL.  I find it is a good idea to put TRAINING or something like that

  10. Now we want to close that window and repeat steps 7 and 8 but now we want to select location

  11. Double click the location line (this will be the name of the production database because we restored the training database from a backup.)

  12. The next thing you want to edit is the Location NAME.  When you change this it will update the Horizon Client Window with a new header.  So I put ***TRAINING*** - $PUTWHATYOUWANTHERE.  You can see it is in the top left corner of the Horizon Client Window


How to fix CURL call imporitng an RSS feed on a site blocking CURL calls

There is a 3rd party service provider that my organization uses called bibliocommons.  They have these nice book carousels.  However the car...