Wednesday, April 26, 2017

How to setup Storage Tiers on Server 2012R2 with Powershell and NVMe Drives


I wrote in my blog on April 23 a process for setting up storage spaces on Windows Server 2012R2 and when I went to use it on my production machine for a scheduled reconfiguration I ran into issues because of some differences in the hardware setup.  It just goes to show that no matter how well you try plan, if something is different in your lab vs production it's going to bite you.

However when I went to do to the reconfiguration for Storage Spaces to a Tiered Storage Spaces Configuration to enable Mirroring on the 2 NVMe Drives on the server and configuring 8 HDD Drives in a mirrored setup as well.  So what I did first was a full backup (export) of 3 Hyper-V virtual machines, which took the most time totaling 1TB of Data and took 3 hours to copy off to a NAS (the local backup drive was unavailable).

Once the server reconfiguration started it actually went very well till we got to setting up the Storage Pool.

Detach the current VHD you have setup with storage spaces.  Go to Storage Pools under Volumes and right click on the virtual disk and select Detach Virtual Disk.


Then delete the virtual disk and remove the storage pool.  Once that is done you will need to setup the storage spaces pool and the disk in powershell, My disk list actually had an issue where the MediaType of two of my disks were set as unknown.

The powershell commands I used to create my storage spaces pool.

$pd = (Get-PhysicalDisk -CanPool $True)

This allows me to include the unknown disks in the pool that Storage Spaces doesn't recognize.

New-StoragePool -PhysicalDisks $pd -StorageSubSystemFriendlyName "Storage Spaces*" -FriendlyName "DATA"

***UPDATE for anyone using above 2012R2 use the following***

New-StoragePool -PhysicalDisks $pd -StorageSubSystemFriendlyName "Windows Storage*" -FriendlyName "DATA"

*****************

Once the disks are in the Storage Pool, I need to defined the 2 undefined disks (in this case they are hdd drives) so I used this powershell command.

Set-PhysicalDisk -FriendlyName PhysicalDisk$X -MediaType HDD

Obviously the $X is a variable holder for the number of the physical disk defined in the storage spaces


As you can see storage spaces sees 2 SSD Media Types and 6 HDD Drives.  If you try to use the gui and setup the storage spaces in a Mirror configuration, you will get an error.  For some reason at least on the server I'm working on the GUI only sees one SSD.  So back to Powershell I used the following commands to create the Virtual Disk.

$vd1 = New-VirtualDisk -StoragePoolFriendlyName "Data" -FriendlyNameTieredSpace -StorageTiers @($ssd_tier, $hdd_tier) -StorageTierSizes @(900GB, 1.5TB) -ResiliencySettingName Mirror -WriteCacheSize 1GB

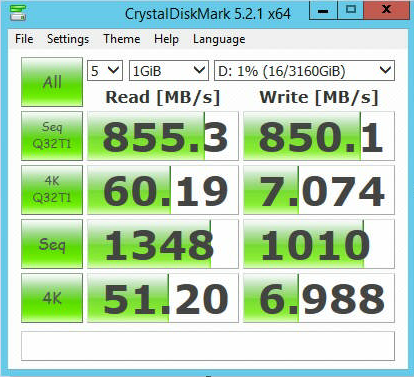
This will create the virtual disk and it will show up in Storage Spaces and then you can attach the disk in Storage Spaces.  You can then expand the Virtual Disk to use the full extent of the Storage Space if you want.  I have a total allocated space of 3.09 TB and according to CrystalDisk Benchmark it sure looks like it's running properly (logging into the virtual servers also is way faster).


As you can see all the drives are in good health it sees all the NVMe SSDs.  I haven't verified what happens when I pull out a drive but am expecting it to work well (I'll have to schedule another test to verify this).

Here is are some benchmarks one REFS and the other NTFS.  I'm going to stay with NTFS for now but when we update to server 2016 I will probably push to use REFS.


REFS Benchmark

NTFS Benchmark

****UPDATE****

If your using Windows 10 and want to setup storage spaces you need to use "Windows Storage*" instead of "Storage Spaces*"


Sunday, April 23, 2017

Enabling and Setting up SSD/HDD Storage Tiers in Hyper-V on Server 2012R2

In this post I am going to cover how to create a storage spaces tiered storage array, format it to use ReFS and have Server 2012R2 Mount the drive after/when the system is restarted.  You will have to have the Server 2012R2 installed with the Hyper-V role added before we begin.

When installed you can see from the GUI 4 disks that you have available in my case I have 4 but only three can be pooled because in this list my OS disk is being shown in here.


This powershell command shows what disks can be pooled.
#List all disks that can be pooled and output in table format (format-table)           

Get-PhysicalDisk -CanPool $True | ftFriendlyName,OperationalStatus,Size,MediaType       

The results of the powershell commands are shown below.


To make our lives easier we create a variable with unspecified disks.
           
#Store all physical disks that can be pooled into a variable, $pd           
$pd = (Get-PhysicalDisk -CanPool $True | Where MediaType -NE UnSpecified)           

#Create a new Storage Pool using the disks in variable $pd with a name of My Storage Pool      

---For 2012R2 and earlier---     
New-StoragePool -PhysicalDisks $pd –StorageSubSystemFriendlyName “Storage Spaces*” -FriendlyName “DATA”         

---For Server 2016 and newer---
New-StoragePool -PhysicalDisks $pd –StorageSubSystemFriendlyName “Windows Storage*” -FriendlyName “DATA”   


#View the disks in the Storage Pool just created           
Get-StoragePool -FriendlyName "DATA" | Get-PhysicalDisk | SelectFriendlyName, MediaType


So we have 2 types of disks shown in our storage pool.  SSD and HDD

We run the following commands to create a tiered storage pool.  This will create a ssd pool and hdd pool

#Create two tiers in the Storage Pool created. One for SSD disks and one for HDD disks           
$ssd_Tier = New-StorageTier -StoragePoolFriendlyName "DATA" -FriendlyName SSD_Tier -MediaType SSD           
$hdd_Tier = New-StorageTier -StoragePoolFriendlyName "DATA" -FriendlyName HDD_Tier -MediaType HDD

Now we can switch to the gui and create our VHD which will mount to the HOST OS.  We will also be able to create a writeback cache.  From here we can start the Wizard in the GUI.


Now here is where we can select the option to create tiered storage spaces and name your virtual disk.


Here is where you can specify what kind of setup you want in my case simple or mirrored. However I could not do mirrored as I did not have enough physical disks available so for the purposes of this post I went with simple.  Though for performance and redundancy I would select mirrored.  StorageSpaces allows for 3 types of resilient storage.


Resilient storage. Storage Spaces provides three storage layouts (also known as resiliency types):
  • Mirror. Writes data in a stripe across multiple disks while also writing one or two extra copies of the data. Use the mirror layout for most workloads – it helps protect your data from disk failures and provides great performance, especially when you add some SSDs to your storage pool and use storage tiers.
  • Parity. Writes data in a stripe across physical disks while also writing one or two copies of parity information. Use the parity layout for archival and streaming media workloads, or other workloads where you want to maximize capacity and you’re OK with lower write performance.
  • Simple (no resiliency). Writes data in a stripe across physical disks without any extra copies or parity information. Because the simple layout doesn’t provide any protection from disk failures, use it only when you require the highest performance and capacity and you’re OK with losing or recreating the data if a disk fails. You can also use the simple layout when your application provides its own data protection.
Once you go forward you will see something like this for the following screen.


You will see an alert about the write-back cache, and I will end up with a 700GB drive 1 x 120 GB SSD and 2 x 320 GB HDD.  Now because this lab is a simple setup (3 drives) and if I wanted any kind of redundancy (which I would want for a production environment) I would want to use a mirror setup for the storage spaces instead of simple for the storage layout.

Update - April 24, 2017

After that you will want to get your storage space volume to auto mount

Open an administrative level PowerShell prompt and type in the following.
Get-VirtualDisk | Where-Object {$_.IsManualAttach –eq $True}
This lists off your virtual disks where the IsManualAttach property is turned on and the disks WILL NOT auto-reattach on restart.
Now run the line again but include the following:
Get-VirtualDisk | Where-Object {$_.IsManualAttach –eq $True} | Set-VirtualDisk –IsManualAttach $False
Now the virtual disk will auto mount after a restart/power cycle.

Update - April 26, 2017

I was unable to use the procedure above to work with NVMe based SAS drives. If you want to know how that was setup see my post How to setup Storage Tiers on Server 2012R2 with Powershell and NVMe Drives I go through step by step on how to setup the storage spaces using powershell.


For more information about storage spaces please refer to the following articles


and for referencing some of the powershell commands I used checkout


Automount Storage Spaces Virtual Disk


You can also view the whole process on my youtube channel. https://www.youtube.com/watch?v=hNhX65DDaT4


Wednesday, April 12, 2017

Enabling Trim on 3rd Party SSD on MacOS

Solid State Drives or SSD's as they are commonly referred to are now the easiest and cheapest way to bring new life to your old computer.  Many of the SSD's max out the bandwidth provided by the bus that your computer connects to the hard drive.  On MacOS though if your lucky enough to have an older mac then you can upgrade with any SSD you would like but what you don't know is that Apple doesn't enable TRIM by default even though most SSD's support TRIM. 

Why do you want Trim?  I'm not going to go into it in detail because Techspot has a great article you can read in detail here

Basically SSD's can not directly over write cells with new data, but must first be erase it at the block level.  This is called garbage collection.  The flash memory uses over provisioning used to improve performance and longevity of the SSD.   

The less space not consumed by your data becomes what is called dynamic over provisioning – because it changes as the amount of data stored changes.  When less data is stored by the user, the amount of dynamic over provisioning increases, further improving performance and longevity.

Here is what you need to do to enable Trim on your SSD on your Mac.

1. Close all programs except for Terminal if you

First you can check and see it if Trim is enabled.  You can do this 2 ways.

Terminal.


system_profiler SPSerialATADataType | grep 'TRIM'

You will get a response of TRIM Support: Yes or No

Or go under the Apple Menu -> about this Mac -> and run System Report


If you get a Yes you don't need to do anything trim is enabled.

If you get a No type the following command.

sudo trimforce enable

Then answer yes to the two questions and it will reboot.

Trim will be enabled after the reboot.  You can verify this by using the terminal command
system_profiler SPSerialATADataType | grep 'TRIM' or checking the system report.

How to migrate PFSense Over to KEA DHCP Server from ISC DHCP Server

I am a PFSENSE User and I manage PFSENSE for some other organizations and the time has come to make the switch for the DHCP Server over to K...