Monday, May 29, 2017

Troubleshooting Microsoft Failover Cluster Communication Errors Part 2

In my previous post I though I had resolved all the issues with my Hyper-V cluster.  I was WRONG.  As annoying as it was the cluster worked fine for about 4 days and then decided to have a massive communication error and I lost 4 of my 6 nodes.  So I went over the cluster with a fine tooth comb and found that settings had been changed on the Nodes.

I found several issues with the cluster some I could fix other would have to wait for a replacement switch.  First all the networks that should be on the nodes were there but the outage issues with the Switch put some of the networks on private and public networks which were fire-walling the cluster communications.  The second issue had to do with Multiple subnets and binding order, the network issues hand caused a reset of the network adapters, and validating network communications continues to be an issue and a setting in the Cluster was causing some DNS issues.  Also apart of these fixes we did a full reboot of all of our switches and this is because our network monitoring system Pathsolutions had registered 6 of our main switches with a packet loss of 15% or greater.  So what I had done was moved 4 of the nodes to 3 different switches in an effort to better distribute the network load.

Using the cluster validation wizard I was able to troubleshoot some of the issues with the cluster network problems.

Firewall

So on the networks that got reset the firewall was blocking port 3343 so I grudgingly opened the port on all three firewall networks until I can find a better solution.  Microsoft Hyper-V Cluster requires port 3343 protocol UDP to communicate properly.


Multiple Subnets

For the cluster there are two AD controllers in failover mode and they properly replicate changes to and from each other as expected.  However the cluster nodes were getting new IP addresses after the network failures and I had not reserved the IP addresses so that was causing some issues along with other interfaces resetting to DHCP and causing a multiple external interface and DNS issues.  This was compounded because the binding order also got screwed up.


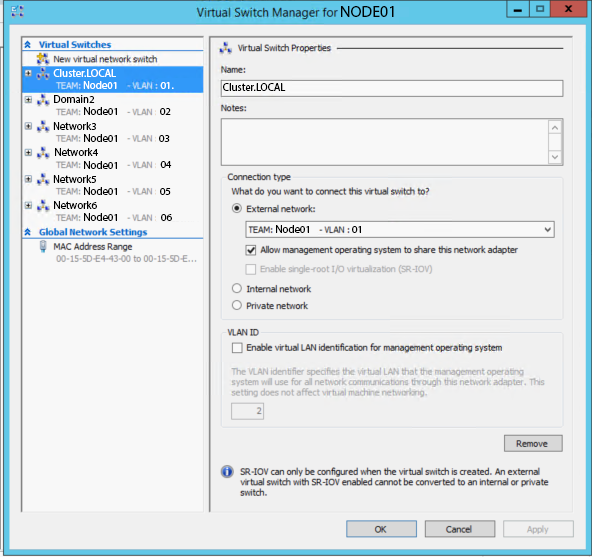
This took the most work to fix.  First you need to adjust the order in your Hyper-V switch manager then you fix the IP address on the Hyper-V virtual nic shown by the vEthernet


So the domain networks are both fully DHCP enabled and gets the DNS from the DNS Servers on vEthernet(01) and on vEthernet (01) that is the primary cluster network where the address has been reserved.

IP Example

192.168.1.11
255.255.255.0
192.168.1.1

DNS
192.168.1.1
192.168.1.2

and the unidentified networks are statically assigned with no default gateway and no DNS servers defined.

172.31.1.11
255.255.255.0


Validate Network Communications

Unfortunately there is nothing I can currently do about this but it is showing a packet loss of 10% or more


After doing all these fixes and using the Cluster Validation tool to double check and make sure the issues have been resolved.  So instead of a bunch of big red X's I get 2 warnings that I get to work on resolving but for now the Cluster is backup and running great.


<< Back to Part 1

Thursday, May 18, 2017

Troubleshooting Microsoft Failover Cluster Communication Errors Part 1

Hyper-V high availability clusters are great they allow you to better manage your downtime, updates and improve your productivity dramatically, not to mention the benefits of having systems on VHD/VHDX disks that are faster to backup and recover back to.  However it is important to have good infrastructure setup to accommodate the resources required by the Cluster.

The 6 node Hyper-V cluster I had setup starting acting buggy this is after it had been running rock solid for about 2 years.  I keep this cluster pretty up-to-date with current system patches, and I also use Control Up to monitor the real time status of the cluster and a Standalone Hyper-V Server.  (On a side note Control Up helped me diagnose an I/O issue with my Standalone server.  Read Post)


The symptoms were:

  • slow access to the cluster manager
  • cluster node timeouts/drops
  • DNS Errors
  • iSCSI Target Timeouts/Delayed writes
  • Control Up alerts on NIC Packet Errors/Drops
  • Validating Cluster Test -> Network Failure
  • Cluster Update Errors
After having a quick look at the problem and a reboot of a down node where the only issue seemed to be a generic communication/TCP error a reboot of the node in question seemed to resolve the issue; however the issue seemed to be resolved for the work day but would show up again the next morning with communication errors between the nodes.  All the Server managers, Cluster Manager had logs reporting communication failures, migration failures but nothing really more than that so we just kept rebooting the systems in the morning to keep things going until I could come back and troubleshoot the system more thoroughly, but I had suspected that it was the switch the cluster was plugged into.

Cluster Errors Log


After the switch was rebooted everything was performing much better, all the nodes appeared to be happy everything was running fast I was able to move servers onto different nodes.  However there was one issue that came up after the fact it appeared that one of the nodes had been removed from DNS in Active Directory which was causing an issue with the other nodes being able to communicate.  The only place I seen the issue was on a single node that had gotten it's DNS updated and showed the node missing all IP addresses and Microsoft highlights it in red which is very handy.


After re-adding the missing node to the DNS in AD, everything appears to be resolved.  So if you are getting this kind of error make sure you using a switch that can handle the traffic, and double check your Active Directory controllers for DNS and if your DHCP Server to make sure all nodes are getting the address their suppose to be getting and are available on the network.

Another issue that popped up where the cluster was throwing out this error.  "Cluster network name resource 'cluster name' failed registration of one or more associated dns name(s) for the following reason: DNS Server Failure"


I did doing 2 things to repair this issue and this is all done in the Failover Cluster Manager.


1)  a repair of the cluster

  • Right click on the server name and take it offline.
  • Right click on the server name -> More Actions -> Repair


2)  Move the server to another node with more resources
  • Click on the cluster in the Cluster Core Resources
  • In the Action Panel click on "more Actions" -> Move Core Cluster Resources -> Select Node or Best Possible Node


When you right click on the Cluster Name in the Cluster Core Resources and right click on Properties you will see the window above.  This is what a healthy Cluster should look like.

Go to Part 2 >>


Tuesday, May 09, 2017

Server 2012R2, Veeam and FreeNAS SMB Backup Server

Veeam Backup and Replication allows backup to a SMB storage device, as a user of FreeNAS this to me seems like a no brainier to setup a dedicated NAS Appliance for keeping a full nightly backup that is not apart of the replication server.  This posts assumes you have a basic install of FreeNAS already setup and ready to go.

So what I have is an older AMD 945 Phenom 2 with 8GB of Ram.  The NAS has a 128GB SSD LARC Cache, and 4x500GB Drives in a RAIDZ and 4X1TB Drives in a RAIDZ.  This allows for a Total 2 Disk Redundancy for the ZPOOL or 1 disk per pool.


Now I'm not using an AD for this I have a specific use case however Veeam does have a webinar where if you want you can learn about using Veeam with AD.


Now for this I am going to be using a user called Veeam and for the purposes of this blog post let's say the password is P@ssw0rd! ;)  This server is on a isolated network.


So lets create the Veeam user so we can use our SMB Share.  I made the user a member of the nobody group.


Now I'm going to give the veeam user exclusive ownership of the main store.

Under Storage -> Volumes -> /mnt/Veeam -> Change Permissions


We want the permission type to be a Windows ACL.  If we were to use a DATASET we wouldn't have to make this change but this is a dedicated box.  Once that is done go to sharing and map the path to the folder we are going to share.  In this case /mnt/Veeam

I added a couple VFS objects that are suppose to help with SMB Connections.
  • streams_xattr
  • aio_pthread
  • acl_tdb
  • acl_xattr
  • shadow_copy
  • shadow_copy_test
  • xattr_tdb

 Once our path is specified we can then edit our share by going under services -> SMB
I'm using pretty much all the default settings, and am binding the SMB Service to a particular IP on the network range we have restricted access to.  I've made the user Veeam the guest account but since we don't have guest accounts enabled it doesn't do anything.


Once all this is configured turn on the service and connect the windows host.

The drive should now mount and you can create and move/delete files.  That concludes the FreeNAS part of our setup now we apply the settings to our Veeam Software.


Next we want to add our backup repository.  I called this Veeam.

Select Backup Infrastructure -> Right Click and Add Backup Repositiory

Specify a Name for the Backup Repository

Specify the type of Server in this case we want Shared Folder

Fill out all the info required to get access to the share.  In our case we need to specify that this share requires credentials and we need to add/modify the account to add our username/password for the share login.  For our NAS it is veeam/veeam with the password P@ssw0rd! ;)

This server has spinning drives so we want to make sure everything is optimized for that.


Shows that the share is showing up properly with the amount of disk space.


Now that the Backup Repository is added we can now Create a backup job.


Select the virtual machine(s) we wish to backup.


Select the Backup Repository - In this case the FreeNAS Server we have just setup.


Modify some advanced settings for Dedup and backup verification.


Setup guest aware processing (if possible) so the VM can continue to run while the backup happens.


Define your Schedule if desired


That's it your done.  You can run the backup manually on schedule etc.  You can also setup email based alerts in both FreeNAS and Veeam to help you keep an eye on your NAS and the backup job status. 


Monday, May 01, 2017

Managing A Domain Based Hyper-V Servers from a Workgroup Workstation


You may have a situation where for what ever reason you need to manage domain based Hyper-V Servers from a machine not connected to the domain.  Now really best practice you should use a machine connected to the domain but for whatever reason, issue with a domain controller, lost of a security policy etc.  It is possible to remotely manage server 2012R2 Hyper-V machines on a domain from a workgroup host.  To enable this you need to be on the same network and create a local user account on the system you want to manage and add that user the following group.


  • Hyper-V Administrators


Step 1 - Right Click on the Windows Logo and select Run


Step 2 - Type in "control userpasswords2" without the quotes.  This will bring up the local users and groups manager.


Step 3 - When the user accounts window opens go to the Advanced Tab.


Step 4 - Add a local user this should be the same user your going to use on the local machine to remotely manage your Hyper-V Hosts.


Fill out the your account information and uncheck the "User must change password at next logon" and check the "password never expires" check box.

Step 5 - Then go into groups and add the user to the following group.

  • Hyper-V Administrators
Right click on Hyper-V Administrators and select Properties


Add the user to the group, make sure you use the local machine and not the domain.  Then hit OK.

Once that is done you can then go and add the server to your workstation Hyper-V Console.  To do that right click on the Hyper-V Manager and select "Connect to Server..."


Then select "Another Computer" via the radio button and type in the Resolvable Name or the IP Address of the Server you want to connect to and hit ok.

Once complete you will have the Hyper-V host in your Hyper-V Manager and access and management to all virtual machines on that host.


How to fix CURL call imporitng an RSS feed on a site blocking CURL calls

There is a 3rd party service provider that my organization uses called bibliocommons.  They have these nice book carousels.  However the car...