Showing posts with label windows server. Show all posts

Tuesday, February 25, 2020

SNMP and Network Printing in Windows

SNMP can be pretty useful, it is used for collecting and organizing information about managed devices on IP networks.  It allows you to get information about a device such as a printer.  Why do I bring this up because if you not careful, it can cause your windows printers to appear offline depending on how your printer driver is configured.

Now when we setup printers we don't deviate to far from the defaults if at all.  However because we have a number of printers that are under contract and to automate the submission of the use count we were asked to install a piece of software called FMAUDIT.  Now the setup of the software was really easy but you don't get to control any of the settings until after you've installed the software.  By then it has scanned your network, I would prefer to have it ask me to scan the network while it is install or if I would prefer to add the network later (forewarning to anyone installing the software).  The software uses SNMP to scan the network and add all printers using the SNMP community name "scanme1".  It added all my printers with "scanme1" to it's database, So I decided to change the SNMP of our contract printers to something else lets call it "scanme2".  When I did that the software got the printers and did what it needs to do.  However the Windows printservers suddenly put the printers offline because the driver is using SNMP to talk to the printer.

To view this go to Printer Properties -> Ports -> Configure Ports


Printer Properties Dialog Box

and in the configure ports dialog box you have the option of enabling or disabling SNMP Status and if you have it on but the community name is not correct the printer shows as offline (Which makes total sense).


SNMP Location in the Configure Driver

As you can see below the image is showing that the printer JLL-Toshiba-Copier is offline.


SNMP Community name mismatch causes a printer to show up offline

So you have two options for fixing this issue.
  1. Make sure that the SNMP community name in the driver is set to the same as the printer 
  2. disable the SNMP status for the windows driver.  
It is pretty useful to have so I just changed the name from SCANME1 to SCANME2, and the printer came back with no problem.  Remember by default windows enables SNMP lookup so do keep that in mind.


Making sure the community name is the same or disabling SNMP in the driver will bring the printer back online.

Thursday, February 06, 2020

Renaming an Windows Essentials Server

I have a few servers setup with server essentials because I have some software I wanted to run on Windows server but couldn't use full server and Windows 7 and 10 were not desirable.  I recently needed to change the name on one of these servers but it was a little tricky.  As shown below the server is currently named SIP

The server to be renamed
Unfortunately, when we get the item's properties, the name and domain change is not available. 

Name and Domain change is not available.
 Edit the registry and go to the entry HKLM\System\CurrentControlSet\Services\CertSvc

Edit the registry
 You can export the key if to back it up, I have found it is not necessary.

Export the CertSvc
 Delete the CertSvc registry

Delete the CertSvc registry entry.
Once you remove the key and reboot you will then be able to change the name of the system.

Now able to rename the server

When you change the computer name you will see this warning.  If you are using AD users be careful, It did not affect the server I was using but just be mindful.

Essentials warring on renaming

After you change the name and reboot your computer name will be changed.

Name Change
After changing the name and rebooting the system we can see that our system name is changed and we can still login to the system despite the warning.

System renaming is complete

You can see my full 8 minute video on how to do this on my YouTube page https://youtu.be/DP76WpqlUFo


References
https://winadminnotes.wordpress.com/2015/11/19/renaming-the-windows-server-essentials/

Thursday, September 20, 2018

Setting windows server network binding/priority order

In Windows Server you can have multiple networks "VLANS" connected to your computer.  Windows will randomly setup the priority of your virtual networks which can cause a problem for you especially in a clustered hyper-v environment.  You can set the network priority of your virtual networks in two ways in server 2012R2 but is a little bit different in 2016.

In server 2012R2 go to network and sharing

Press the "ALT" Key and the advanced menu will be displayed.


Under advanced select "Advanced Settings"


You can then set the order of what networks get priority.  With the top most being the highest priority.


In Server 2016 this has changed a bit where you set the metric for the binding priority.

If your using Hyper-V you need to select the vEthernet interface -> Right Click and get properties -> Select Advanced TCP/IP Settings and deselect "automatic metric" and put a metric with the lower value gets the binding


Reference:

https://docs.microsoft.com/en-us/powershell/module/netadapter/set-netadapter?view=win10-ps
https://www.mssqltips.com/sqlservertip/4928/configure-network-binding-order-for-a-windows-server-2016-failover-cluster/
https://labs.supinfochina.com/en/change-network-card-priority-in-windows-server-2012-r2/
https://social.technet.microsoft.com/Forums/windowsserver/en-US/da2cebda-4ead-401e-a821-3330eb5d4988/change-network-binding-order?forum=windowsserver2008r2networking
https://social.technet.microsoft.com/Forums/windows/en-US/cb8dac7f-5f04-42b1-8065-a95c946f6ec2/change-network-adapter-priority-order?forum=ws2016

Tuesday, July 17, 2018

Configuring High Availability for Windows Server and a FreeNAS iSCSI target using Cisco Meraki Switches


This post will go over how to setup a 10 gig link with a 1gig failover between Windows and FreeNAS using a Cisco Meraki Stack.  The FreeNAS Server is setup using a FAILOVER link aggregation which allows the FreeNAS Server to keep it's IP address in the event of a switch or link failure.  The Meraki Stack has the Windows Server setup for LACP for aggregation on port 1 on 125.46 and port 24 on 125.47.  FreeNAS is set up for LACP for aggregation on port 1 on 125.27 and port 24 on 125.46.  LACP automatically disables the slower port and it is used in a FAILOVER mode as shown in the image below.

Meraki Stack Setup


The Windows Connection is setup as two different network interfaces with 2 different IP addresses.  As shown in the image below there is a 10 gig network interface and a 1 gig network interface.  These interfaces cannot be aggregated together, if you do they will not operate properly.
Windows Network Interface Setup


FreeNAS Network Setup For FAILOVER aggregation

The Windows Server for the Hyper-V Server or just as the host has actually two different IP addresses as stated before.  This should not be a problem if your using it as a Hyper-V host as the VM's that you are running will get it's traffic from the failover connection should the primary connection fails.


Before our failover here are some benchmarks of our FreeNAS connection using the iSCSI Connector


As you can see we are pretty much saturating the network bandwidth of the 10gig link, and now when we cause a failure (in this case I disconnected the 10Gig link) the Storage hesitates for a few seconds before re-routing the network traffic through the failover link.


Windows Showing a failure in the 10 gig link


Once the failure in the link is auto detected port 1 on 125.47 is no longer disabled in the Meraki Stack and the server continues to operate as it should just at a reduced capacity and performance.


The Meraki enables the 1gig link to allow network traffic to continue to flow to the iSCSI target


The Windows server and FreeNAS continue to operate and communicate with eachother but in a reduced capacity until the primary 10 gig link can be restored.

When failing the link back there is no noticeable interruption that I was able to notice from Windows, FreeNAS or the switches.  The only noticeable interruption was when the failure occurred and I doubt it would be noticeable unless it was some application that need to work in real time.  During the failover I wouldn't even call the event a hiccup it went that smooth.  My testing included killing the power from an entire switch in the stack, and killing each link on both switch on both servers.

I must say I was really very impressed by how well the failover worked and I can't wait to get this setup into our production environment.


Friday, July 06, 2018

How to Fix/Setup Teaming and VLans while using Hyper-V on Server 2012, 2012R2 and 2016


If you want to see my youtube video on this post you can view it here.
I've recently had an issue where I got an error getting Vlan and teaming info from the Intel network driver I had installed on server 2012R2.  I had a similar issue back in September of last year with Server 2012 where I couldn't edit, view, add or remove vlans on my Windows 2012 Server.  This month I all of a sudden got an error on almost all our Server 2012R2 systems.  The error is "Get Team Info Failed" as shown below.  


After doing some research and finding this post by Intel about a similar issue; I came across this post which was published in October of 2017 showing how Intel expects you to setup network teaming and Vlans in Windows Server.  Previously our organization setup the all teaming and vlans in the Intel driver as shown below.


Intel Teaming Setup in the Intel Driver


List of Vlans in the Intel Driver
Setting up our nic teaming and vlan networks this way we were susceptible to our settings getting corrupt, over written, moved, or just missing https://www.intel.com/content/www/us/en/support/articles/000007376/network-and-i-o/ethernet-products.html

There is no error or performance difference that I can tell when the driver gets corrupted or missing except when you want to add/edit/remove vlans or edit the teaming on the adapters.  As displayed in the settings below.


Intel Driver Settings


Intel Team Settings on Corrupt/Missing Driver


Settings on Corrupt/Missing Driver


Vlans on Missing/Corrupt Driver.

The way Intel recommends the driver gets setup in Windows is significantly different and since we are using Intel networking hardware I have changed our setup for the servers following Intel's documented setup for Windows Server.  Now since this happened on our production servers, it was a bit tricky to get it changed over to the Intel documented setup.

STEP 1:  First thing we need to do is make sure no one and no service is using the server at the moment, so we will want to pause any backup jobs and either shutdown or move off any VM's running on the server where we are making these changes.  For expediency I recommend downloading the latest Intel drive and keeping it somewhere accessible, as well as documentation with how your server is connected to your switches so you can specify your Native Vlan and any associated tags.


STEP 2:  In Hyper-V (if running) go to the virtual switch manager and set all of your virtual switches to private network.  This will disassociate the switch from any setup VLANs on the host and will allow you remove and update the driver.  Be sure to apply the settings once all your networks have been changed.


Virtual Switch Manager - Setting to Private will allow you to remove and update your intel network driver.
STEP 3:  Remove/Upgrade the Intel network driver (if applicable)


Remove and Update Drivers if Applicable.

STEP 4:  Setup Teaming on your Hyper-V Server

Go to your local server manager and where NIC Teaming is Disabled, click on the Disabled Text.


Enable NIC Teaming by clicking on the Disabled Text


Before creating your team you will want to read this post from Microsoft about the Teaming and Load Balancing Features in windows server to best decide what you will need for your Teaming configuration.  For my purposes I am using a two port LACP LAGG with Dynamic load balancing.

If you have more then one interface/adapter select the ones you want to team and by either shift or Ctrl clicking the interfaces/adapters then from the Tasks menu select Add to New Team

Select the network adapters you want to team and select add to team under the task menu

Now with your team created you can add your VLANs.  You need to select your team in the Teams box on the left of side then under Tasks select Add Interface


Add VLAN interfaces by selecteing the Team and under tasks select Add Interface

This will come up with your settings for your default interface.  This will be your specified Untagged VLAN in your network switch.


Vlans are tied to the Microsoft Multiplexor Driver. 
The more networks you make the Multiplexor driver will auto increment.

As you add more VLANs you will need to specifiy the VLANS your adding by selecting Specific VLAN and inputing the VLAN number.  The Vlan is tied to the Microsoft Network Adapter Multiplexor Driver.  As you add VLANs the number of the Multiplexor Driver will Auto Increment up.  So if you added VLAN 500 the Multiplexor Driver will be Multiplexor Driver #2, and if you added VLAN 300 after it would be Multiplexor Driver #3 and so on.

When you go to reset your Hyper-V virutal switches you will need to remember or have documented which VLAN is associated with which Multiplexor Driver.  In the case below the switch is associated with the untagged vlan which is Multiplexor Driver.  Apply your settings and your done.


The Hyper-V Switches will select the Multiplexor driver so it is important to know which Vlan you have associated with which multiplexor driver number.  You can get the properites of the VLAN from the local server console to find out the multiplexor driver number.

Now you have fixed your network driver and VLans with how Intel recommends for setup is done on Server 2012, 2012R2 and 2016.

Sunday, March 25, 2018

Upgrading Server 2012 to 2012R2 and Hyper-V Import Types

Just recently I had to upgrade a server from Windows Server 2012 to 2012R2, due to some driver changes in the intel 82576 adapter that prevents the addition and removal of VLAN tags in Windows Server and that 2012 mainstream support ended in May 2017.  Server 2012R2 doesn't really extend mainstream support by much (till October 2018), but most of our infrastructure is built on in so migration to 2012R2 is easier for that reason alone.  

I managed to do the whole migration over 2 days and most of that was due to an issue with adding SSD's to the system (Turns out the RAID controller doesn't support them properly) and a lack of documentation on the VM guests and on the Hyper-V host. 

There are 3 different ways to do an import of a Hyper-V Guest listed below; for simplicity I just used Register in-place for this procedure.


Hyper-V offers three import types:
  • Register in-place – This type assumes export files are in the location where you'll store and run the virtual machine. The imported virtual machine has the same ID as it did at the time of export. Because of this, if the virtual machine is already registered with Hyper-V, it needs to be deleted before the import works. When the import has completed, the export files become the running state files and can't be removed.
  • Restore the virtual machine – Restore the virtual machine to a location you choose, or use the default to Hyper-V. This import type creates a copy of the exported files and moves them to the selected location. When imported, the virtual machine has the same ID as it did at the time of export. Because of this, if the virtual machine is already running in Hyper-V, it needs to be deleted before the import can be completed. When the import has completed, the exported files remain intact and can be removed or imported again.
  • Copy the virtual machine – This is similar to the Restore type in that you select a location for the files. The difference is that the imported virtual machine has a new unique ID, which means you can import the virtual machine to the same host multiple times.
For more detailed information please reference https://docs.microsoft.com/en-us/windows-server/virtualization/hyper-v/deploy/export-and-import-virtual-machines 

For simplicity I've only used the Register in-place option.


STAGE 1: Migrate VM's on 2012 Server

My workstation is a Dual socket 6 core Xeon system (12 Physical cores 24 Cores Total) running 2012R2 for developing and testing and staging VMs for deployment.  In this case my Workstation was becoming the temporary home for hosting the guest VM's from the old system was being upgraded.  So with the exception of 2 VM guests, the VM's could be moved during regular office hours.

A list of the services running on the VM Host
  • EmailRelay
  • Imaging Server/WOL Server
  • Minecraft Server
  • Website X 2
  • Print Release Server
  • VRNetwork DHCP Server (New and not yet in production)
When doing the migration to the Temporary Hyper-V host the process was very simple.
  1. Shutdown the VM Guest and Export the VM
  2. Copy exported VM to new temporary location on the server
  3. Do a Register In-Place Import of the VM
I had created a SMB share on the temporary host for the old host; shutdown and exported the guest server on 2012 and copied it to the 2012R2 host.  The transfer for the VM's took place during off hours, and since most of the services can be down during off hours no one really noticed the outage.  The whole process took a few hours, the websites which we didn't want to really bring down for any length of time were down for about 15 minutes while the VM's were copied.
STAGE 2: Register in-place import

As the VM's finished being copied over I did a register in-place import which doesn't move the VM's into the default location you specify when you had setup Hyper-V.  So If I did an export and called it websites I can copy the entire folder and doing the in-place import still keeps everything in the folder as shown below.
Exported VM, Doing an in-place import keeps everything together.
STAGE 3 - Restore VM's to the Server:

Once the old server was upgraded to 2012R2 and the NIC was upgraded to an Intel i350.  I restored the VM's to the system and decided to continue to use the register in-place import method, but I maybe should have gone with the Restore option for the final import (makes it easier if you want to just backup the VHDX files).  If I had backed up the VM's to a file share all the host had access to I might have used the Copy option.

Notes & Issues:

A couple of issues I had with this migration to the temporary VM Host was due to the lack of documentation.  I discovered that a couple of VM's had broke durning import because the "migrate to a machine with a different processor" wasn't checked, but also that they had Dynamic MAC Addresses.  This broke the IP Address they received from the DHCP as they had a different MAC Address.  I had to go though and double check each VM guest and verify all the MAC Addresses were set to static.  The other issue revolved around VLAN Tags.  There were VLAN tags assigned to the host in the switch that were not correct or improperly configured.  All in all there are only 5 VLANS that were required:

VLANs:

  • NAVTIVE VLAN 0X
  • VLAN 1X
  • VLAN 2X
  • VLAN 3X
  • VLAN 4X - NOT REQUIRED FOR HYPER-V GUEST (HOST ONLY)
I made Hyper-V switches for VLANS 0X - 3X and left VLAN 4X just on the host and is used for doing VSS backups of the VHDX files.

All in all I am relatively happy with how the upgrade went, I am currently working on documentation for our Hyper-V Servers with information required to rebuild them in less then a day.

Here is an example of my VM Guest Documentation (work in progress)

https://docs.google.com/spreadsheets/d/1hJu2lJ_ahpJ_2JYY2J8r0mBozO3LhNPm9G_qtpYIjf0/edit?usp=sharing

Here is an example of my Hypervisor Host Documentation (work in progress)

https://docs.google.com/spreadsheets/d/1RusCrWB_538DWBPV96r_RrsscxaG2uk5ua70sL6yDuU/edit#gid=0


Tuesday, March 13, 2018

Enter Network Credentials Error - Redirected Folders and Installing Software


Installing Software on an AD with
Exclusive Access Redirected Folders
I've been busy switching our users from Roaming Profiles to redirected users.  Things have been really good so far, no profile load issues, things on the network are fast, really can't complain.  Until we tried to install some software on a non-administrator profile.

A trouble ticket was entered and when I went to look into what the problem was I found there was no problem everything was working as it was suppose to.  The issue was the process on how the install was trying to happen.  Typically you would install the software on the machine as an administrator, however here the admin was trying to install the software on a redirected folder where the APPDATA is also being redirected so the administrator doesn't have any access to proceed with the installation.  The software should have been installed as administrator for all users, with a properly logged in admin account.

Regardless here is the procedure for installing software on a redirected user with exclusive folder access.


1. - Run the software you want to install as administrator


2. - Enter in the Administrator Username and Password for doing the install


3. Enter in the currently logged on user's credentials to access their redirected appdata directory


That is it.  Once that is done the installer will run as normal.  There are lots of different ways you can go about allowing permissions for the administrator to do the install without prompting for network access.  This is how our redirected folders are setup right now with the users exclusive access.  If you were to login as an administrator to do the install this isn't a problem.


You can see my youtube video of he whole process here. https://www.youtube.com/watch?v=3l0vBSNsyeo&list=PLK66vLttv9ASoZ6vrsRQHj5A1h9vJ8tS8&index=2


Monday, June 05, 2017

How to setup FreeNAS as an iSCSI Target for Windows 10 and Windows Server

This is a post based off a live event I did on my youtube channel.  How to setup Windows 10 / Windows Server with an iSCSI Target using FreeNAS

This post assumes you already have a pre-configured FreeNAS system all setup and ready to go.  It is recommended that you use mirrored VDEVs for any type of virtualization use.  For more information on FreeNAS and the different types of setups check out the Introduction to FreeNAS from iX University.


In the above image it shows a 2 TB iSCSI target for windows to connect to.  To create one you create a FreeNAS zvol.  Show by the image below are the properties of the zvol.


The Setup:

All the iSCSI settings are under the sharing menu.

Target Global Configuration:
(you don't really have to do anything with this just use the default settings if you would like)


Portals:

The portal discovery Auth Method should be set to None
The Discovery Auth Group should be set to 1 (or the auth group number you are going to use)
The ip is set to the ip of the FreeNAS server in this case 192.168.1.10 on port 3260 (the default iSCSI port)


Initiators:
Here you can specify specific machines and/or authorized networks that can connect to the share.  We are using the ALL for this very basic setup.


Authorized Access

Here is where you put in the security information for the share and the group ID.  In Portals we set the Group ID to 1 and that is set here as well.  Make sure you have the information stored for this in a safe place.


Target:

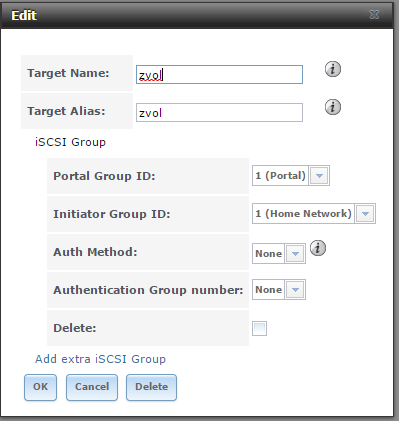
Here is where we specify our target name and how to access it.  Note the Group ID for the Portal and Initiator group, it is the same as the security ID we had set.


Extent:

Here is where we define the iSCSI disk properties.  The biggest issue is going to be whether you pick a file or device based Extent Type.  I find device based extents are easier to use and the threshold warning primitive is fully supported where file based extents it can be argued that file based extents ability to have multiple exports per volume is better but performance between the two is about the same.  It depends what you want.

You can read more about it here http://doc.freenas.org/9.10/sharing.html#extents


Associated Targets

here is where you define on what LUN you want what target and what extent.  So you can have multiple targets and extents on the same FreeNAS server.


Make sure you don't make the same mistake I made, and be sure to start the service otherwise there won't be anything to connect to.

Setting up the connection in Windows:


You can use the quick connect or the Discovery tab to setup the iSCSI initiator, I recommend using the Discovery Tab when setting it up use the Microsoft iSCSI connector.  I also typically enable multi-path.  I also set the initiator IP as the machine where the connection is coming from on which ever network.


One the drive is connected go into disk manager this will prompt you to initialize the iSCSI target, and treats it as an internally connected drive.


Here are the benchmarks using CrystalDiskMark 5.2.1

FreeNAS iSCSI Target on 1GB test file


My RAID 10 (Internal RAID CARD)


As you can see really decent performance and the main limiting factor on the FreeNAS is the 1Gbps network connection.

I have 2 of these NAS systems at work on a LAGG interface for the Hyper-V Cluster I work as failover cluster shares and they work great.  Control Up continuously shows low disk latency and that it is very quick.

Updating your godaddy certs during the G2 intermediate hierarchy to the TLS Root CA - R1 hierarchy

  If you use godaddy TLS certificates you should be aware of some changes during the transition from the G2 certificates to the new R1 Certi...