Showing posts with label Windows 10. Show all posts

Tuesday, June 29, 2021

Modifying Network SMB (Samba) Passwords

I had an issue with papercut where a SMB connection path was saved with the wrong username and password allowing higher then wanted privileges.  To change the user to one with lower privileges you can use the Manage Network Passwords from control panel.

 Type Manage Passwords in the windows 10 search


When open select the credential you want to modify.  In my case the second one highlighted in green.  Hit the dropdown to edit the settings.


When you hit edit, you will get a dialog with the name/ip of the server and then you can update the username/password as shown below.


Then hit save.  Once you do that if you put your $username and $password in properly, and try to access the network resource over SMB in explorer \\$server\ you should have full access (according to the user permissions that are granted to you by the server) as shown below


Wednesday, December 26, 2018

Fixing Windows 10 Long Startup Time and Fixing Windows 10 Start Menu

Sometimes a Windows Update or third party software can cause issues with your system.  In the two cases I'm referring one I'm sure was caused by a Windows Update, the other was caused by third party software.  System One is a Lenovo m93p and System 2 is a HP AMD based laptop.

System One - Fixing Windows 10 Long Startup Time

In the first case Running Windows 10 1803, after an update in June (though I believe this to be a May patch), the system started taking longer then 10 minutes to boot.  This system is big of a black sheep as I required some different software so reinstalling Windows would have been a bit of a pain.  Over this period, I re-imaged the system on 3 different SSD's and it seemed to help a little bit but then after a week or two after imaging it would be back to a 10 minute or longer startup.  Doing some more digging for this blog post I found this post (though too late for me but someone might find this useful.)  A very similar case of the boot up issue I was experiencing I found here https://answers.microsoft.com/en-us/windows/forum/windows_10-update/slow-boot-for-windows-1803/997b3e18-d347-4a8f-93e0-829dd0f6e8d2 

The Lenovo m93 system I was dealing with had no, additional chipset hardware (such as Nvidia or AMD).   Fast boot was disabled, power management was all set to high performance.  The symptoms were the same; a long wait to start for Windows boot times.  Though I did not remove KB4103721 as I didn't find out about this post after the fact,  I started by swapping the SATA SSD in the system and re-imaged the system though this help temporarily alleviate the issue it did return.  The eventual solution I used was upgrading the system from 1803 to 1809.  It has been over a month now and the system has not had any boot up issues since.  To do that without re-imaging I used the Windows 10 Upgrade Assistant.  https://www.microsoft.com/en-us/software-download/windows10

If your stuck on 1803 and need to stay on 1803 try remove KB4103721, if your experiencing this boot problem otherwise start planning your upgrade to 1809, that is what worked for me.

System Two - Fixing Windows 10 Start Menu

A friend of mine brought me their laptop because it was running slow; so when I booted it up it was indeed running slow, and I discovered that there were two antiviruses running on the system and that the start menu was also not working.  After removing the two AV products, the start menu did not come back to good working order, and I was getting a PIN error when trying to login to windows,  even after trying the fixes below.
  
https://answers.microsoft.com/en-us/windows/forum/windows_10-start/windows-10-start-button-not-working/765f193c-4c67-4b85-81e0-645dfd29836c
https://www.techadvisor.co.uk/how-to/windows/fix-start-menu-3623893/

What did work was upgrading them to 1809, now everything seems to be running just fine.  https://www.microsoft.com/en-us/software-download/windows10

Wednesday, October 03, 2018

Using, Adding and Changing VLANs on Windows 10

To use vlans under Windows 10 you need to use powershell and the setup is pretty simple. Open powershell as an administrator type in the following

Set-NetAdapter –Name "Ethernet Adapter Name" -VlanID XXX where "Ethernet Adapter Name" is the name of your ethernet adapter and xxx is the VLAN ID number in this case 99

If your ethernet adapter supports VLANS you will get asked to apply the vlan to the ethernet adapter much like the image below


Otherwise you will get an error like this


If your successful then you can get DHCP if it is enabled on the network or make changes to your IP address with what ever you need.  As you can see below I have a .97.83 address from a DHCP server on VlanID 99


I had 2 different laptops I tested this with a Lenovo Y580 with a Qualcomm Atheros AR8161 PCI-E Gigabit Ethernet Controller (NDIS 6.30), and a Lenovo ThinkPad E570 with a Realtek R8111GUS PCI-E Ethernet Controller.  The Realtek did not seem to support vlan tagging though windows but you can try installing the Realtek diagnostic toolkit and see if you can get vlan tagging enabled.  This was a test just with straight Windows 10.  

Monday, June 05, 2017

How to setup FreeNAS as an iSCSI Target for Windows 10 and Windows Server

This is a post based off a live event I did on my youtube channel.  How to setup Windows 10 / Windows Server with an iSCSI Target using FreeNAS

This post assumes you already have a pre-configured FreeNAS system all setup and ready to go.  It is recommended that you use mirrored VDEVs for any type of virtualization use.  For more information on FreeNAS and the different types of setups check out the Introduction to FreeNAS from iX University.


In the above image it shows a 2 TB iSCSI target for windows to connect to.  To create one you create a FreeNAS zvol.  Show by the image below are the properties of the zvol.


The Setup:

All the iSCSI settings are under the sharing menu.

Target Global Configuration:
(you don't really have to do anything with this just use the default settings if you would like)


Portals:

The portal discovery Auth Method should be set to None
The Discovery Auth Group should be set to 1 (or the auth group number you are going to use)
The ip is set to the ip of the FreeNAS server in this case 192.168.1.10 on port 3260 (the default iSCSI port)


Initiators:
Here you can specify specific machines and/or authorized networks that can connect to the share.  We are using the ALL for this very basic setup.


Authorized Access

Here is where you put in the security information for the share and the group ID.  In Portals we set the Group ID to 1 and that is set here as well.  Make sure you have the information stored for this in a safe place.


Target:

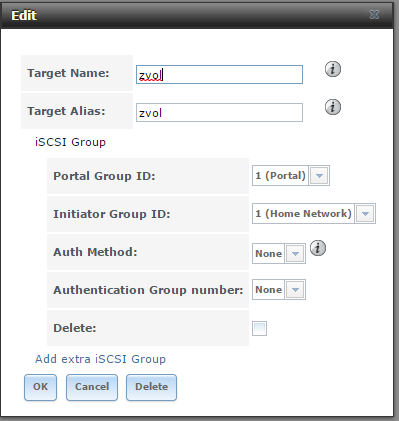
Here is where we specify our target name and how to access it.  Note the Group ID for the Portal and Initiator group, it is the same as the security ID we had set.


Extent:

Here is where we define the iSCSI disk properties.  The biggest issue is going to be whether you pick a file or device based Extent Type.  I find device based extents are easier to use and the threshold warning primitive is fully supported where file based extents it can be argued that file based extents ability to have multiple exports per volume is better but performance between the two is about the same.  It depends what you want.

You can read more about it here http://doc.freenas.org/9.10/sharing.html#extents


Associated Targets

here is where you define on what LUN you want what target and what extent.  So you can have multiple targets and extents on the same FreeNAS server.


Make sure you don't make the same mistake I made, and be sure to start the service otherwise there won't be anything to connect to.

Setting up the connection in Windows:


You can use the quick connect or the Discovery tab to setup the iSCSI initiator, I recommend using the Discovery Tab when setting it up use the Microsoft iSCSI connector.  I also typically enable multi-path.  I also set the initiator IP as the machine where the connection is coming from on which ever network.


One the drive is connected go into disk manager this will prompt you to initialize the iSCSI target, and treats it as an internally connected drive.


Here are the benchmarks using CrystalDiskMark 5.2.1

FreeNAS iSCSI Target on 1GB test file


My RAID 10 (Internal RAID CARD)


As you can see really decent performance and the main limiting factor on the FreeNAS is the 1Gbps network connection.

I have 2 of these NAS systems at work on a LAGG interface for the Hyper-V Cluster I work as failover cluster shares and they work great.  Control Up continuously shows low disk latency and that it is very quick.

Removing Show Recent History and Recently Open Documents from Windows Explorer

How to remove the Recent History and Recently Open Documents from Windows Explorer Using the Registry Editor Press the Windows Key + R, type...