Showing posts with label printing. Show all posts

Tuesday, January 04, 2022

How to print from papercut mobile on a desktop / laptop system

This post is a guide how one would setup public style printing for an office, library, school or other print for pay, print for public user service.  The following example would be a how to print; if a generic account were setup for public printing for your network with papercut; specifically when being used with a chromebook or other desktop based browser client.


1 - When connected to the same network as the printer put in the URL for printing. https://print.yourdomain.ca
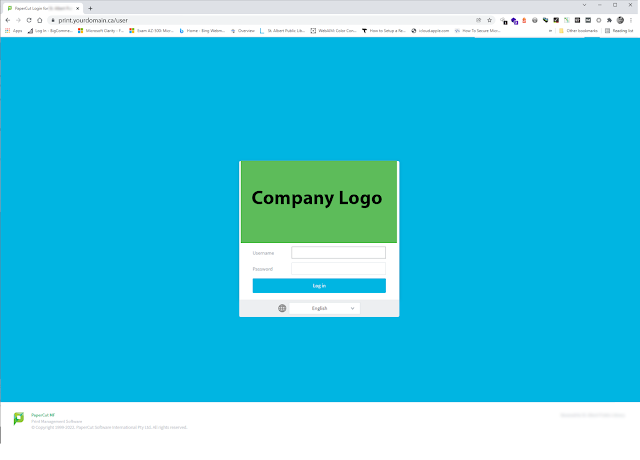


2 - Enter in the username and password (this would be the generic account for the user wanting to print)
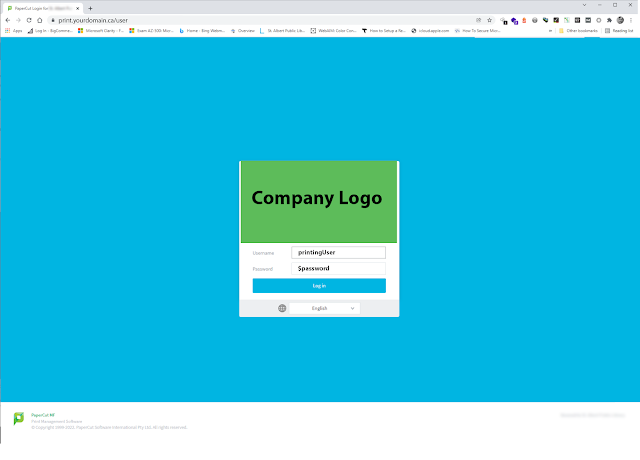


3 - you will be taken to the “Submit a Job” screen
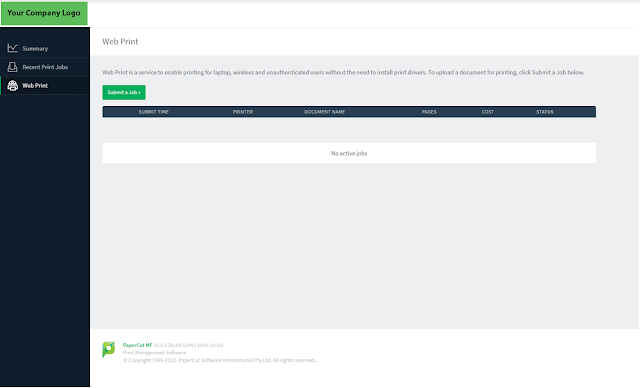


4 - Press the “Submit a job button and select the printer (in this case say printer_2)
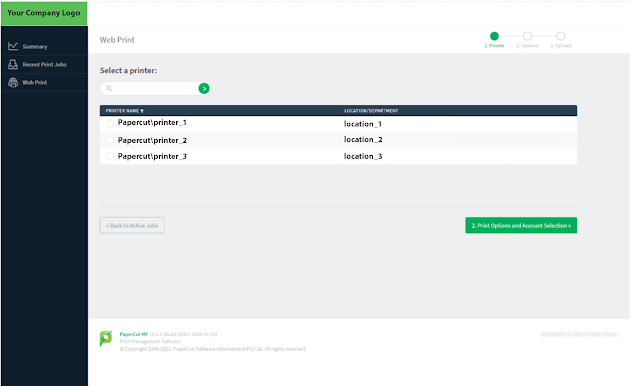


Then press "
2. Print Options and Account Selection"


5 - Select you options then and select “Upload Documents”


6 - Select your file (This would be typically in the downloads folder)


7 - Once selected, press “upload and complete”


8 - Once Uploaded the job will sit in the queue, until released by the papercut queue release account.


Papercut queue release account view


Monday, October 25, 2021

PC Reliance receipt printing issue on Windows 10


PC Reliance is a piece of software produced by SirsiDynix and is used for off-line circulation when performing an ILS upgrade or if the ILS is going to be down for a prolonged period of time.  Horizon based libraries have been using this for at least 10 years and the last update for the software was in October 2008.  Under Windows 7, it did not require any changing of the driver default settings.  However if you are running Windows 10 you will have to reconfigure the driver software in this case an Epson TM-T88V.

Going with the default install setting on the Epson TM-T88V, the receipt printer works fine for all applications.  Vend, Horizon ILS Client, notepad, etc.  as shown below.


When you open PC Reliance you don't have many options to configure below is a look at the GUI; and a item put in for checkout so we can do a test print.


However when you try and use PC Reliance you get this when you print the reciept.


The fix is to change the setting on your receipt printer.  Go to your printer right click and select printer properties

Then select Preferences.


Then Select Advanced


By Default, the settings are as follows


You need to change them to the following:

TrueType Font: Substitute with Device Font (Not required to change)

Print Optimizations: Disable


Once that is saved and enabled, your receipt will now print properly.


Thursday, March 05, 2020

Setting up kiosk printing mode for Vend

In January of 2020 I wrote a post about Setting up a point of sale (POS) system for a Horizon library.  Since then we have decided enable our second location in VEND and setup a single register.  Vend has a great post on setting up Chrome for kiosk printing; which is great but there are two issues with it that are mutually exclusive; meaning that if you solve one problem it causes the other.  What I discovered is that Google Chrome, would either print the webpage header/footer on the receipt or you would have to hit print twice to print the receipt.  The new Microsoft Edge does not have this problem.

Setting up VEND it was highly recommended sticking to chrome on windows, though they have a long list of recommended hardware and software on their site.  

Typically when you print from a browser such as chrome, you print and you get the google print preview


Printing From Chrome
And you can also set it up to print from the system dialogue window by pressing Ctrl + Shift + P


System Printing Dialogue Window
This can be controlled from Google Admin if you have Google for Business/Non-Profit/Education by going into Device Management -> Chrome -> Settings

With the options of 

  • Allow using print preview
  • Always use the system print dialog instead of print preview

Google Admin - Control Print Preview
If your not using google admin you use the the command line switches in sequence a list of command-line-switches for the Chromium project can be found here

For chrome we want to put the following at the end of the quote after a space on the shortcut.


--enable-print-preview --kiosk --kiosk-printing


This enables chrome's print preview mode so it doesn't use the system's dialogue, puts the chrome browser in kiosk mode and kiosk-printing automatically causes chrome to hit the print button leaving the preview up for a second or two.  If your using google admin you can skip the --enable-print-preview flag if you have it defined in the settings as shown in the Google Admin picture above.  Below is chrome with the command line switches.


Chrome is great and it worked ok but the main issue we came across was with the print-preview enabled it would print the page header and footer on the receipt


Receipt with the website header and footer which is printed
when you have kiosk tags enabled on chrome.

If you disable the print-preview, and use the system dialogue box for printing the receipt turns out without the web page header/footer on the receipt, but you had to either hit return or press the print button twice which is not the best thing for a cash register.


Receipt with no web page header/footer

So I downloaded and installed the new chromium based Microsoft edge and tried the chrome command line witches on edge and they worked great!  In fact you don't even need the --enable-print-preview switch, the receipt comes out with no wasted paper and everything else works just as it did on chrome; so we switch our VEND register to Microsoft Edge.

Using the Vend article for setting up kiosk mode, I did also some additional things using group policy to secure the system, and setup a startup script when the computer launches.

Here are some additional actions I had taken to secure the VEND Register System
  • Create a admin and limited user (the vend register runs as the limited user)
  • Set the default page to be the vend register store, along with the home page setting
  • Create a startup script to launch edge using Task Scheduler
Task Scheduler

      "C:\Program Files (x86)\Microsoft\Edge\Application\msedge.exe"
      --kiosk --kiosk-printing
  • Setup Group Policy to disable CTL+ALT+DEL options
Open the Local Group Policy Editor:
Click Start.
Enter Run.
Type gpedit.msc.
Click OK.
Navigate to User Configuration > Administrative Templates > System > Ctl+Alt+Del Options.
Prevent users from being able to use the following functionality by enabling the removal of the functions:
Remove Task Manager
Remove Lock Computer
Remove Change Password
Remove Logoff
To enable these to be removed:
Double-click the option.
Select Enabled.
Click OK.

Disable CTL+ALT+DEL 

  • Then to disable the windows key
Open regedit.
Click on the Windows menu and type run, then put in regedit
click HKEY_LOCAL_ MACHINE on Local Machine  
Double-click the System\CurrentControlSet\Control folder, and then click the Keyboard Layout folder. 
On the Edit menu, click Add Value, type in Scancode Map, 
click REG_BINARY as the Data Type, and then click OK. 
Type 00000000000000000300000000005BE000005CE000000000 in the Data field, and then click OK. 
Close Registry Editor and restart the computer.
Disable Windows Key

Tuesday, February 25, 2020

SNMP and Network Printing in Windows

SNMP can be pretty useful, it is used for collecting and organizing information about managed devices on IP networks.  It allows you to get information about a device such as a printer.  Why do I bring this up because if you not careful, it can cause your windows printers to appear offline depending on how your printer driver is configured.

Now when we setup printers we don't deviate to far from the defaults if at all.  However because we have a number of printers that are under contract and to automate the submission of the use count we were asked to install a piece of software called FMAUDIT.  Now the setup of the software was really easy but you don't get to control any of the settings until after you've installed the software.  By then it has scanned your network, I would prefer to have it ask me to scan the network while it is install or if I would prefer to add the network later (forewarning to anyone installing the software).  The software uses SNMP to scan the network and add all printers using the SNMP community name "scanme1".  It added all my printers with "scanme1" to it's database, So I decided to change the SNMP of our contract printers to something else lets call it "scanme2".  When I did that the software got the printers and did what it needs to do.  However the Windows printservers suddenly put the printers offline because the driver is using SNMP to talk to the printer.

To view this go to Printer Properties -> Ports -> Configure Ports


Printer Properties Dialog Box

and in the configure ports dialog box you have the option of enabling or disabling SNMP Status and if you have it on but the community name is not correct the printer shows as offline (Which makes total sense).


SNMP Location in the Configure Driver

As you can see below the image is showing that the printer JLL-Toshiba-Copier is offline.


SNMP Community name mismatch causes a printer to show up offline

So you have two options for fixing this issue.
  1. Make sure that the SNMP community name in the driver is set to the same as the printer 
  2. disable the SNMP status for the windows driver.  
It is pretty useful to have so I just changed the name from SCANME1 to SCANME2, and the printer came back with no problem.  Remember by default windows enables SNMP lookup so do keep that in mind.


Making sure the community name is the same or disabling SNMP in the driver will bring the printer back online.

Sunday, April 01, 2018

Setting printing options with Envisionware public printing software


Envisionware Print Release Screen
For public user printing the organization I work for uses Envisionware LPTONE print management software.  This is run on a physical machine that is connected to both a wired and wireless network to enable laptop printing.  The issue that came up recently is the need for double sided printing, now on the client the driver doesn't really allow for double sided printing it is a very basic just print driver.  Typically we had set this up to be black and white single sided usually called Black and White Printer.  However we now want to start offering these options to our uses so to resolve the issue I decided to make multiple network printers on the print release station.  As you see below on the left are the Envisionware virtual printers and to the right are the print drivers for the virtual printers.


Envisionware Printer Setup

Now the software is running on Windows 7 Pro, which has a limit of 20 Device Connections at a time.  When I added 4 different versions of the driver I had the virtual printers randomly dropping connections (not showing up) to the clients;  this appeared to be a result of virtual device connections.  


https://www.envisionware.com/lptone/
I had to remove the Windows Fax, and a PDF printer which were installed on the computer, it appears that Envisionware LPT One doubles the number of printers with virtual printer connections, so if we need to add any more printers we need to upgrade our print release station to windows server as it appears we have reached the Windows 7 device connection limit.

Each printer must be setup with a different print driver below is an example of the colour double sided print driver settings.
Colour and Paper Settings

Print Server Driver

Each printer is setup similar but a little bit differently as I have listed below with the changes, I have 1 HP printer which is a non-duplexing black and white printing unit which is used for the single sided printing but this could easily be changed to the Toshiba Printer which is setup for all the rest of the Envisionware Virtual Printers.  Below is a basic setup of the Windows Print Driver settings.
  • Black and White Single Sided - No 2 Sided Printing, Black and White Print Setting
  • Black and White Double Sided - 2 Sided Printing, Black and White Print Setting
  • Colour Double Sided - 2 Sided Printing, Colour Print Setting
  • Colour Single Sided - No 2 Sided Printing, Colour Print Setting
With all the Drivers setup the Envisionware print administrator shows what printer is assigned the the release station in this case I have 1 HP and 3 Toshiba Printers created by the differentially named print drivers, and I have them assigned to the Print Release Station called ADRELEASE-V4.

ADRELEASE-V4

Black And White Double Sided
We can now edit the configuration of the printer by double clicking on the print driver under the family configuration.  You get a dialog as shown below.
Envisionware Print Configuration
Double clicking on the printer brings up the Family Information "The Client Settings" this is where you specify costs, per sheet or cost per page and if the print driver assigned for the print family is setup for duplex printing.  To enable the duplex printer you change the duplex setting from none to vertical or horizontal binding.  If you want "book style" type printing you select vertical.  Then you can decided how you want to charge for your printing.  If you want to charge for each side of the print keep adjust price for duplex printing unchecked.  However if you want a price per age the enable the checkbox and it will do costing per piece of paper rather then printed side.

Envisionware Print Settings for Clients
That is basiclly it in a nutshell, the print client is pretty clear when they go to print and I have the the single sided black and white printer assigned as the default printer for all clients but that can be changed in the Printer Family Information settings as show above.

How to make google calendar more secure

With the rash of spam and phishing attempts lately, I would recommend making the following changes to your google calendar settings to secur...