I have had the good fortune in being able to have a look at the Meraki MX64 router/security appliance from Cisco. Since I use PFSense I was interested in see what this locked down proprietary appliance was all about. At my work we are using Meraki Switches and have been very happy with them, they are easy to setup, configure, manage, and the web based management system gives you a wonderful single pane of glass to view everything. I was interested in seeing if the router was as easy to setup and manage.Like all Cisco Meraki products, you add the device by going to the Network-Wide menu and go add device as shown below.
Then press the claim button on the right most side of the screen across from the search box.
You will get a popup asking for the serial number of the device or the order number(s).
Then put in the serial number, if you don't have the order or email you can find the serial number located at the bottom of the device
After that you will need to add the license for the device which would come from your provider. If you don't have a license you only have 14 days in which you will be able to use the device before getting a license.
Select "add another license"
Input the license provided by your provider. Select the operation License more devices (as we are adding the router to our meraki cloud)
Once that is done you will have a few side bar menu called Security & SD-WAN if you didn't have a meraki router before.
After getting the device registered, it took a while for the dashboard to recognize it but to be fair I have it going to the internet though my PFSense firewall, it did eventually make a connection. One thing I will note is it did come with a network preconfigured in the device probably supplied to our vendor when they sent it over at our request. For example it would have came on a non configured vlan 192.168.0.1/24 setup with DHCP which I would already have on my meraki network.
After getting the device connected, The network setup is located under the Addressing & VLANs menu
By default the device comes in routed mode and single lan setting.


Configuring the MX64 for use with VLANS is pretty easy, change the lan setting to VLANs then add the VLASs using the "Add VLAN" button. It is easy and very straight forward. I have left the deployment settings the same but I changed the Single Lan Setting to VLAN and setup the following.
- Setup VLAN 1 with a subnet of 192.168.0.0/24 - MX IP 192.168.0.1 (DHCP Served By Meraki MX)
- Setup VLAN 2 with a subnet of 192.168.10.0/24 - MX IP 192.168.0.10 (No DHCP)
- Setup VLAN 3 with a subnet of 172.32.0.0/24 - MX IP 172.32.0.4 (No DHCP)
I then setup the ports
- WAN port goes to my LAB network 192.168.182.0/24 the MX has an ip of 192.168.182.50
- Lan 3 I have going to my laptop with 2 VLANs attached. Lan 2 is setup as the NATIVE VLAN which has no DHCP Server
When I plugged my laptop into port 3 which as a native vlan of VLAN2 which has no DHCP server on that network I got a 169 address. When I changed my VLAN on my laptop to access VLAN 1; the output of ipconfig from my laptop where DHCP is being server by meraki mx I got the following:
PS C:\Users\Trevor Tye> ipconfig /all
Windows IP Configuration
Host Name . . . . . . . . . . . . : Lenovo-P52s
Primary Dns Suffix . . . . . . . :
Node Type . . . . . . . . . . . . : Hybrid
IP Routing Enabled. . . . . . . . : No
WINS Proxy Enabled. . . . . . . . : No
Ethernet adapter vEthernet (Default Switch):
Connection-specific DNS Suffix . :
Description . . . . . . . . . . . : Hyper-V Virtual Ethernet Adapter
Physical Address. . . . . . . . . :
DHCP Enabled. . . . . . . . . . . : No
Autoconfiguration Enabled . . . . : Yes
Link-local IPv6 Address . . . . . :(Preferred)
IPv4 Address. . . . . . . . . . . : (Preferred)
Subnet Mask . . . . . . . . . . . : 255.255.240.0
Default Gateway . . . . . . . . . :
DHCPv6 IAID . . . . . . . . . . . : 1006638429
DHCPv6 Client DUID. . . . . . . . : 00-01-00-01-23-4D-16-AA-48-2A-E3-1A-77-16
DNS Servers . . . . . . . . . . . : fec0:0:0:ffff::1%1
fec0:0:0:ffff::2%1
fec0:0:0:ffff::3%1
NetBIOS over Tcpip. . . . . . . . : Enabled
Ethernet adapter vEthernet (Internal Network):
Connection-specific DNS Suffix . :
Description . . . . . . . . . . . : Hyper-V Virtual Ethernet Adapter #3
Physical Address. . . . . . . . . :
DHCP Enabled. . . . . . . . . . . : Yes
Autoconfiguration Enabled . . . . : Yes
Link-local IPv6 Address . . . . . : (Preferred)
Autoconfiguration IPv4 Address. . : 169.254.38.103(Preferred)
Subnet Mask . . . . . . . . . . . : 255.255.0.0
Default Gateway . . . . . . . . . :
DHCPv6 IAID . . . . . . . . . . . :
DHCPv6 Client DUID. . . . . . . . :
DNS Servers . . . . . . . . . . . : fec0:0:0:ffff::1%1
fec0:0:0:ffff::2%1
fec0:0:0:ffff::3%1
NetBIOS over Tcpip. . . . . . . . : Enabled
Ethernet adapter vEthernet (External Switch):
Connection-specific DNS Suffix . :
Description . . . . . . . . . . . : Hyper-V Virtual Ethernet Adapter #2
Physical Address. . . . . . . . . :
DHCP Enabled. . . . . . . . . . . : Yes
Autoconfiguration Enabled . . . . : Yes
Link-local IPv6 Address . . . . . : (Preferred)
IPv4 Address. . . . . . . . . . . : 192.168.0.20(Preferred)
Subnet Mask . . . . . . . . . . . : 255.255.255.0
Lease Obtained. . . . . . . . . . : July 7, 2021 1:24:49 PM
Lease Expires . . . . . . . . . . : July 8, 2021 10:42:26 AM
Default Gateway . . . . . . . . . : 192.168.0.1
DHCP Server . . . . . . . . . . . : 192.168.0.1
DHCPv6 IAID . . . . . . . . . . . :
DHCPv6 Client DUID. . . . . . . . :
DNS Servers . . . . . . . . . . . : 192.168.0.1
NetBIOS over Tcpip. . . . . . . . : Enabled
Wireless LAN adapter Wi-Fi:
Media State . . . . . . . . . . . : Media disconnected
Connection-specific DNS Suffix . : optionkey.ca
Description . . . . . . . . . . . : Intel(R) Dual Band Wireless-AC 8265
Physical Address. . . . . . . . . : 18-1D-EA-2F-AE-59
DHCP Enabled. . . . . . . . . . . : Yes
Autoconfiguration Enabled . . . . : Yes
Wireless LAN adapter Local Area Connection* 3:
Media State . . . . . . . . . . . : Media disconnected
Connection-specific DNS Suffix . :
Description . . . . . . . . . . . : Microsoft Wi-Fi Direct Virtual Adapter #5
Physical Address. . . . . . . . . :
DHCP Enabled. . . . . . . . . . . : Yes
Autoconfiguration Enabled . . . . : Yes
Wireless LAN adapter Local Area Connection* 4:
Media State . . . . . . . . . . . : Media disconnected
Connection-specific DNS Suffix . :
Description . . . . . . . . . . . : Microsoft Wi-Fi Direct Virtual Adapter #6
Physical Address. . . . . . . . . :
DHCP Enabled. . . . . . . . . . . : No
Autoconfiguration Enabled . . . . : Yes
Ethernet adapter Ethernet 2:
Media State . . . . . . . . . . . : Media disconnected
Connection-specific DNS Suffix . :
Description . . . . . . . . . . . : TAP-Windows Adapter V9
Physical Address. . . . . . . . . :
DHCP Enabled. . . . . . . . . . . : Yes
Autoconfiguration Enabled . . . . : Yes
Ethernet adapter Bluetooth Network Connection:
Media State . . . . . . . . . . . : Media disconnected
Connection-specific DNS Suffix . :
Description . . . . . . . . . . . : Bluetooth Device (Personal Area Network)
Physical Address. . . . . . . . . :
DHCP Enabled. . . . . . . . . . . : Yes
Autoconfiguration Enabled . . . . : Yes
PS C:\Users\Trevor Tye>
In my lab network I have a subnet of 192.168.1.0/24 on the static route I setup a route to go to 192.168.1.0 from 192.168.10.1. For clarification my laptop is plugged into Port 3 on the switch which has a a native vlan of VLAN2 which has no DHCP services. Below is the appliance status menu showing the connected ports.
I had set the virtual switch on my laptop to VLAN1, demonstrating that VLANs work because VLAN 1 is being served DHCP by Meraki MX. The Static route I setup seems to be working as the ping test below shows pinging both the gateway and my workstation on the 192.168.1.0/24 network from 192.168.0.20
PS C:\Users\Trevor Tye> ping 192.168.1.1
Pinging 192.168.1.1 with 32 bytes of data:
Reply from 192.168.1.1: bytes=32 time<1ms TTL=64
Reply from 192.168.1.1: bytes=32 time<1ms TTL=64
Reply from 192.168.1.1: bytes=32 time<1ms TTL=64
Ping statistics for 192.168.1.1:
Packets: Sent = 3, Received = 3, Lost = 0 (0% loss),
Approximate round trip times in milli-seconds:
Minimum = 0ms, Maximum = 0ms, Average = 0ms
Control-C
PS C:\Users\Trevor Tye> ping 192.168.1.250
Pinging 192.168.1.250 with 32 bytes of data:
Reply from 192.168.1.250: bytes=32 time<1ms TTL=64
Reply from 192.168.1.250: bytes=32 time<1ms TTL=64
Reply from 192.168.1.250: bytes=32 time<1ms TTL=64
Reply from 192.168.1.250: bytes=32 time<1ms TTL=64
Ping statistics for 192.168.1.250:
Packets: Sent = 4, Received = 4, Lost = 0 (0% loss),
Approximate round trip times in milli-seconds:
Minimum = 0ms, Maximum = 0ms, Average = 0ms
The DHCP tab is nice as it shows the amount of IP's used and the uplink tab also gives some "nice to know information".
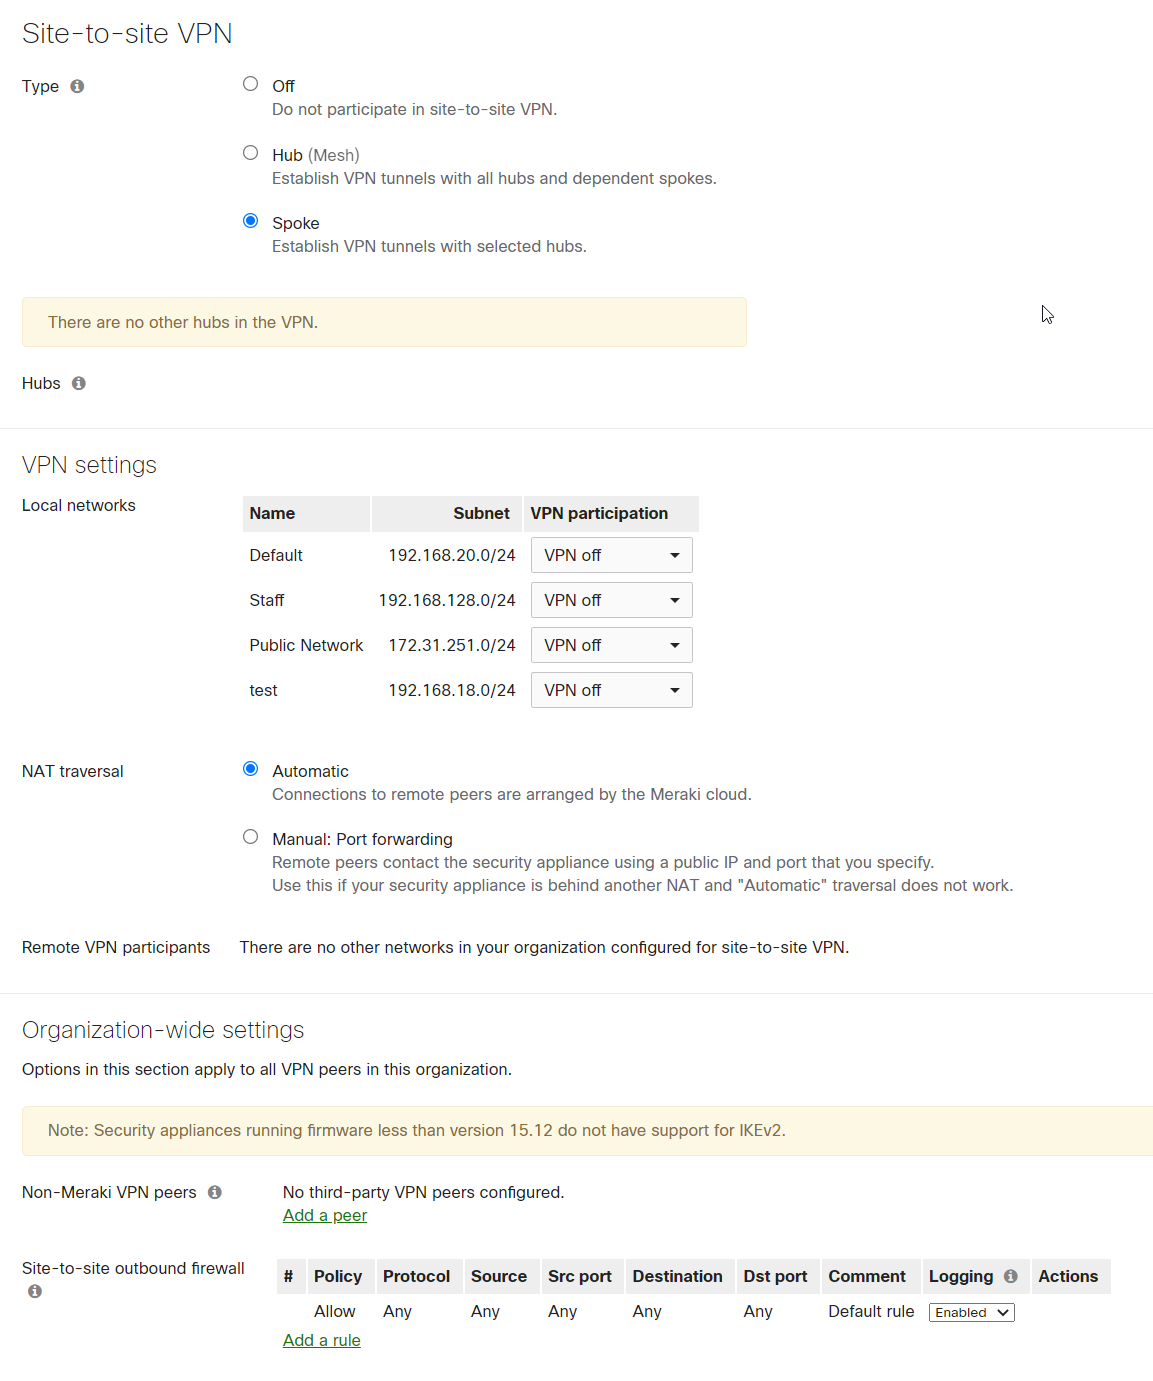
There are a lot of features I would like to play with but it looks like I would need multiple mx appliances, such as setting up the firewall rules, and VPN, it looks like it would be easy to do and setup.
Firewall:
VPN (Site 2 Site)
VPN Client
The Meraki MX comes with the typical router features such as URL allow/deny listing, content filtering, traffic shaping (with some nice defaults), but also has some nice integrations having quick access the the WiFi Splash page, VPN, threat detection (and Cisco Umbrella or use to be known as OpenDNS) and intrusion detection. In my opinion this would be great to have if your a smaller business or franchise with lots of locations, a service management company, or an organization you are looking to reduce the load of your IT staff and/or your staff are not technically inclined and/or have a limited experience with routing, setting up VPN servers or are very familiar with firewalls with different VPNs. In my lab this was very easy to setup, and get working, I find there is more power with PFSense, and this would be fantastic solution if your going all in. That is the thing though you have to go all in on Meraki. Depending on your budget, and what your organization is wanting to do it can be quite the asset.