This post assumes you already have a pre-configured FreeNAS system all setup and ready to go. It is recommended that you use mirrored VDEVs for any type of virtualization use. For more information on FreeNAS and the different types of setups check out the Introduction to FreeNAS from iX University.
In the above image it shows a 2 TB iSCSI target for windows to connect to. To create one you create a FreeNAS zvol. Show by the image below are the properties of the zvol.
The Setup:
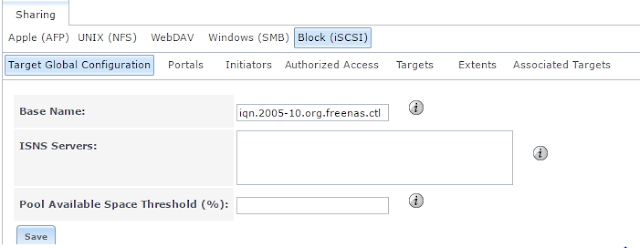
All the iSCSI settings are under the sharing menu.Target Global Configuration:
(you don't really have to do anything with this just use the default settings if you would like)
Portals:
The portal discovery Auth Method should be set to None
The Discovery Auth Group should be set to 1 (or the auth group number you are going to use)
The ip is set to the ip of the FreeNAS server in this case 192.168.1.10 on port 3260 (the default iSCSI port)
Initiators:
Here you can specify specific machines and/or authorized networks that can connect to the share. We are using the ALL for this very basic setup.
Authorized Access
Here is where you put in the security information for the share and the group ID. In Portals we set the Group ID to 1 and that is set here as well. Make sure you have the information stored for this in a safe place.
Target:
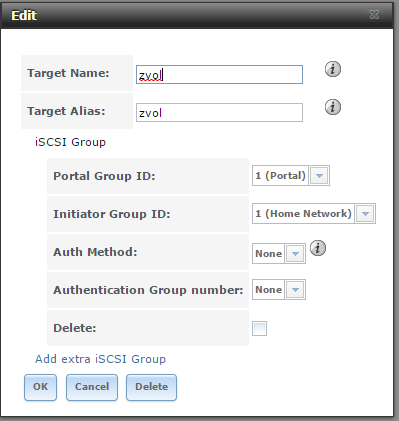
Here is where we specify our target name and how to access it. Note the Group ID for the Portal and Initiator group, it is the same as the security ID we had set.
Extent:
Here is where we define the iSCSI disk properties. The biggest issue is going to be whether you pick a file or device based Extent Type. I find device based extents are easier to use and the threshold warning primitive is fully supported where file based extents it can be argued that file based extents ability to have multiple exports per volume is better but performance between the two is about the same. It depends what you want.
You can read more about it here http://doc.freenas.org/9.10/sharing.html#extents
Associated Targets
here is where you define on what LUN you want what target and what extent. So you can have multiple targets and extents on the same FreeNAS server.
Make sure you don't make the same mistake I made, and be sure to start the service otherwise there won't be anything to connect to.
Setting up the connection in Windows:
You can use the quick connect or the Discovery tab to setup the iSCSI initiator, I recommend using the Discovery Tab when setting it up use the Microsoft iSCSI connector. I also typically enable multi-path. I also set the initiator IP as the machine where the connection is coming from on which ever network.
One the drive is connected go into disk manager this will prompt you to initialize the iSCSI target, and treats it as an internally connected drive.
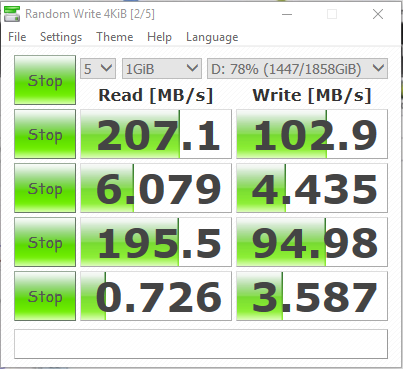
Here are the benchmarks using CrystalDiskMark 5.2.1
FreeNAS iSCSI Target on 1GB test file
My RAID 10 (Internal RAID CARD)
As you can see really decent performance and the main limiting factor on the FreeNAS is the 1Gbps network connection.
I have 2 of these NAS systems at work on a LAGG interface for the Hyper-V Cluster I work as failover cluster shares and they work great. Control Up continuously shows low disk latency and that it is very quick.


