Showing posts with label network. Show all posts

Tuesday, September 22, 2026

Fix a windows network printer that is offline

How to fix a network printer that get's installed and shows offline.

By default SNMP is set to public, so when you are installing a network printer; you need to ensure you have all the information about the printer.  If you don't configure the SNMP of your print driver to the same as the printer it installs but shows up offline.  It also takes forever to install.

There are two ways to approach a resolution to this problem.  Install the driver then change the SNMP in the driver or setup the port and add the printer.  In my case I added the printer first so then I'm going to update the port.


Get the properties of the printer you want to edit in my case the 2525AC and go to ports select the port in use and configure port


Change the SNMP Status from public to what it you need it to be


Hit OK and close the printer properties.  It will take a few seconds but then the printer status will change from offline to ready.


Saturday, September 02, 2023

Fixing Windows Network Connection when nothing appears to be wrong

How to fix a network connection on Windows when nothing appears to be wrong.

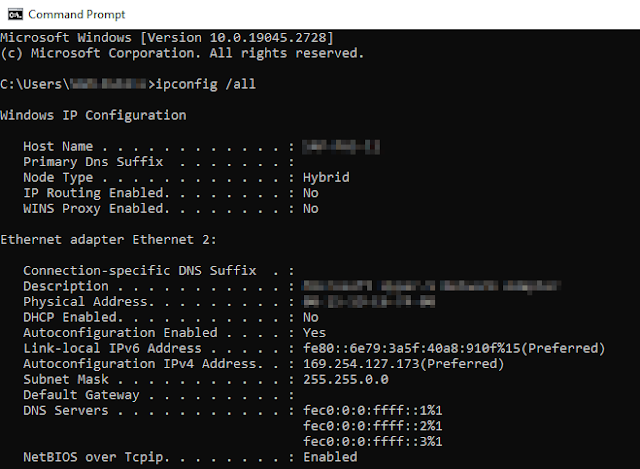
So recently a system running Windows 10 22H2 just lost it's network connection on boot up.  The PXE boot worked fine but when the system got into windows it would just get a 169.X.X.X address when running a ipconfig


Upon further investigation it appears the RPC Server has stopped working


While there are a number of reasons why this can happen, the fix that worked for me was restarting the services in order.

Restart Services

  • Application Layer Gateway Service – Manual Triggered
  • Network Connections – Manual
  • Network Location Awareness  –  Manual
  • Plug and Play – Manual
  • Remote Access Auto Connection Manager – Manual
  • Remote Access Connection Manager – Automatic
  • Remote Procedure Call (RPC) – Automatic
  • Telephony – Manual

After that run these command as administrator though powershell or cmd prompt

net localgroup administrators localservice /add

net localgroup administrators networkservice /add

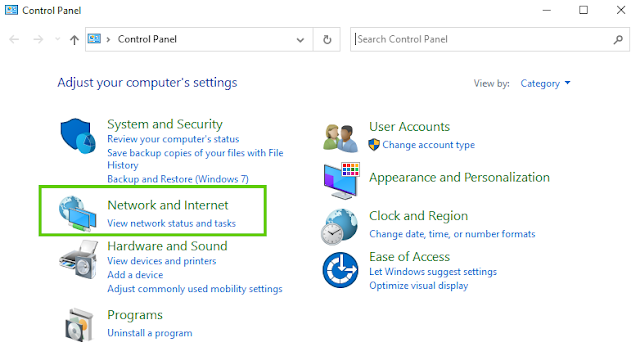
Then in explorer go to the networking settings in control panel


Then go to Network connections and run the diagnose and repair.


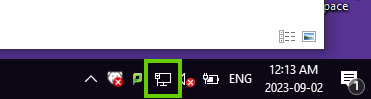
Once that has been run, and the system is rebooted you should get an ip address and the network icon should be showing up in the taskbar.


Sources

https://www.thewindowsclub.com/the-dependency-service-failed-to-start-on-windows-10#google_vignette

Tuesday, June 29, 2021

How to add and remove persistent routes in windows

So at one of my organizations satellite locations we changed the VPN connection for about a half dozen clients, which were accessible from my workstation for remote access/system administration.  This changed caused this access to break.

So to update and fix my access for this systems I had to reset my routing for the satellite networks.  I setup this access using persistent routes (as I wanted to keep access after a reboot).

I used route print to verify the connections that need to be purged before I add the new ones.

To do this user powershell or the cmd prompt and type the following 

route print

and press enter

You will see your Interface List then Active routes then Persistent routes.

Interface List

Active Routes

Persistent Routes

The persistent route I want to remove is the third line shown below, we will say the network is 192.168.1.0


So to remove the route In Powershell or CMD Prompt I type 

route delete 192.168.1.0


Then to add the new route there are few things I need to know before I add the new persistent route.  I will need to know my network and gateway, that the firewall has a VPN connection with pass rules for the network and the VPN's network.  So for this post let's say the firewall is configured properly but is not routing traffic automatically.  For this post lets say that my IP is 192.168.20.87 and my gateway is 192.168.20.1.  The VPN network I want to connect to is 192.168.8.1

So I type the following in the same prompt

route -p ADD 192.168.8.0 MASK 255.255.255.0 192.168.20.1


The -p will make the connection stay after a reboot, if you don't want it to stay remove the -p and you should be able to access the other network from the VPN.


Source 

https://www.howtogeek.com/howto/windows/adding-a-tcpip-route-to-the-windows-routing-table/

Modifying Network SMB (Samba) Passwords

I had an issue with papercut where a SMB connection path was saved with the wrong username and password allowing higher then wanted privileges.  To change the user to one with lower privileges you can use the Manage Network Passwords from control panel.

 Type Manage Passwords in the windows 10 search


When open select the credential you want to modify.  In my case the second one highlighted in green.  Hit the dropdown to edit the settings.


When you hit edit, you will get a dialog with the name/ip of the server and then you can update the username/password as shown below.


Then hit save.  Once you do that if you put your $username and $password in properly, and try to access the network resource over SMB in explorer \\$server\ you should have full access (according to the user permissions that are granted to you by the server) as shown below


Friday, July 06, 2018

How to Fix/Setup Teaming and VLans while using Hyper-V on Server 2012, 2012R2 and 2016


If you want to see my youtube video on this post you can view it here.
I've recently had an issue where I got an error getting Vlan and teaming info from the Intel network driver I had installed on server 2012R2.  I had a similar issue back in September of last year with Server 2012 where I couldn't edit, view, add or remove vlans on my Windows 2012 Server.  This month I all of a sudden got an error on almost all our Server 2012R2 systems.  The error is "Get Team Info Failed" as shown below.  


After doing some research and finding this post by Intel about a similar issue; I came across this post which was published in October of 2017 showing how Intel expects you to setup network teaming and Vlans in Windows Server.  Previously our organization setup the all teaming and vlans in the Intel driver as shown below.


Intel Teaming Setup in the Intel Driver


List of Vlans in the Intel Driver
Setting up our nic teaming and vlan networks this way we were susceptible to our settings getting corrupt, over written, moved, or just missing https://www.intel.com/content/www/us/en/support/articles/000007376/network-and-i-o/ethernet-products.html

There is no error or performance difference that I can tell when the driver gets corrupted or missing except when you want to add/edit/remove vlans or edit the teaming on the adapters.  As displayed in the settings below.


Intel Driver Settings


Intel Team Settings on Corrupt/Missing Driver


Settings on Corrupt/Missing Driver


Vlans on Missing/Corrupt Driver.

The way Intel recommends the driver gets setup in Windows is significantly different and since we are using Intel networking hardware I have changed our setup for the servers following Intel's documented setup for Windows Server.  Now since this happened on our production servers, it was a bit tricky to get it changed over to the Intel documented setup.

STEP 1:  First thing we need to do is make sure no one and no service is using the server at the moment, so we will want to pause any backup jobs and either shutdown or move off any VM's running on the server where we are making these changes.  For expediency I recommend downloading the latest Intel drive and keeping it somewhere accessible, as well as documentation with how your server is connected to your switches so you can specify your Native Vlan and any associated tags.


STEP 2:  In Hyper-V (if running) go to the virtual switch manager and set all of your virtual switches to private network.  This will disassociate the switch from any setup VLANs on the host and will allow you remove and update the driver.  Be sure to apply the settings once all your networks have been changed.


Virtual Switch Manager - Setting to Private will allow you to remove and update your intel network driver.
STEP 3:  Remove/Upgrade the Intel network driver (if applicable)


Remove and Update Drivers if Applicable.

STEP 4:  Setup Teaming on your Hyper-V Server

Go to your local server manager and where NIC Teaming is Disabled, click on the Disabled Text.


Enable NIC Teaming by clicking on the Disabled Text


Before creating your team you will want to read this post from Microsoft about the Teaming and Load Balancing Features in windows server to best decide what you will need for your Teaming configuration.  For my purposes I am using a two port LACP LAGG with Dynamic load balancing.

If you have more then one interface/adapter select the ones you want to team and by either shift or Ctrl clicking the interfaces/adapters then from the Tasks menu select Add to New Team

Select the network adapters you want to team and select add to team under the task menu

Now with your team created you can add your VLANs.  You need to select your team in the Teams box on the left of side then under Tasks select Add Interface


Add VLAN interfaces by selecteing the Team and under tasks select Add Interface

This will come up with your settings for your default interface.  This will be your specified Untagged VLAN in your network switch.


Vlans are tied to the Microsoft Multiplexor Driver. 
The more networks you make the Multiplexor driver will auto increment.

As you add more VLANs you will need to specifiy the VLANS your adding by selecting Specific VLAN and inputing the VLAN number.  The Vlan is tied to the Microsoft Network Adapter Multiplexor Driver.  As you add VLANs the number of the Multiplexor Driver will Auto Increment up.  So if you added VLAN 500 the Multiplexor Driver will be Multiplexor Driver #2, and if you added VLAN 300 after it would be Multiplexor Driver #3 and so on.

When you go to reset your Hyper-V virutal switches you will need to remember or have documented which VLAN is associated with which Multiplexor Driver.  In the case below the switch is associated with the untagged vlan which is Multiplexor Driver.  Apply your settings and your done.


The Hyper-V Switches will select the Multiplexor driver so it is important to know which Vlan you have associated with which multiplexor driver number.  You can get the properites of the VLAN from the local server console to find out the multiplexor driver number.

Now you have fixed your network driver and VLans with how Intel recommends for setup is done on Server 2012, 2012R2 and 2016.

Thursday, March 29, 2018

Redirected Folders and Saving Files Error

Redirected Folders Write Error
A user was having an issue with saving their office files to their documents folder.  Now we are setup in our AD to use Redirected folders.  We are migrating all users to Windows 10 but I haven't gotten to this system yet.  This apparently started about a week ago from but it hasn't been a big issue so they didn't report it as they were scheduled to be upgraded.  With Windows 7 it has this wired issue where it is trying to backup other users offline folders which it shouldn't, that could be a misconfiguration that I did on the AD on my part but I haven't seen or logged any issues on Windows 10, as compared with Windows 7.  

The fix for this was to disable offline folders, then it was able to write files to the redirected folder again.  I need to look into this more closely but for now the user is able to save the files where they need to go.

Wednesday, December 18, 2013

Expanding a FREENAS ZFS volume by drive replacement

Freenas is a great NAS solution especially given the price and the hardware of other NAS solutions; Freenas offers the best performance, expandability, value and flexibility in a NAS solution.  Freenas can provide NFS, Samba and Apple shares so the platform you want to use really doesn't matter what the client machine is.

Just reciently I've found my self down to 100GB of my 6.4 TB NAS and decided it was time to upgrade my storage space.  Now upgrading storage space on freenas isn't as simple as just replacing a bunch of drives; you must replace them one at a time and you wait for the drive to be completely replaced (resilvered) before replacing another drive otherwise you risk data corruption or loss.  By default the auto grow is set to off so if you want to grow the space on your nas you must enable the auto expand feature in freenas.  As always you should have another backup of this data.

So on your FreeNAS server you want to login via SSH or use the shell console provided in the web interface.  Type the following command.

zpool set autoexpand = on {your volume name}

Once that is enabled you may now grow your freenas storage by replacing drives.  As for myself I've replaced 4 320GB drives with 4 1TB drives moving my NAS from 6.4 GB to 8.3GB of storage space and to replace the drives it is a daily process with replacing a drive once a day until they are done.

How to make google calendar more secure

With the rash of spam and phishing attempts lately, I would recommend making the following changes to your google calendar settings to secur...