Saturday, June 11, 2016

Setting Up Veeam Backup and Replication in a Hyper-V Enviroment

This is a modification of a Veeam backup and Replication setup I have done that is in production.  This system is setup in a WORKGROUP enviroment.   This was done for 2 reasons, all the virtual machines are in a non-domain setup, and I didn't have the resources to setup a full domain for the Veeam setup.  I also have some recommended reading that I would suggest you do before you start to implement the Veeam Backup and Replication System.  This post is going to be a variation of the Simple Deployment Model based on the Veeam user guide.


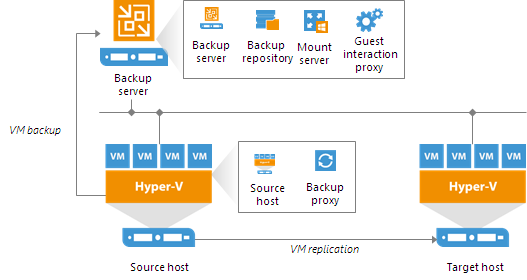
Veeam Hyper-V Simple Deployment Model

I do have some recommendations that I would suggest putting in place if your organizations budget can handle it.


  1. Two physical active directory controllers and 1 virtual read only controller if your using a clustered hyper-v system (Mostly used for the Cluster System)
  2. A cluster system for the Veeam Backup and Proxy Server which are virtualized.  Having a separate server for the Guest interaction proxy and backup proxy will take load off the source host.
  3. Freenas or other high storage and performance NAS System with dual power supplies and battery backup with at minimum 2 disk redundancy (for freenas known as RAIDZ2).
  4. Smart switches with LACP LAGG and vlan support

For the purposes of this post we are going to assume a few things.  You have all the necessary licences you require for Microsoft Windows Server 2012R2 or better including all CALS, SQL Server, SQL Server Cals, Veeam licences etc.  There is have a working infrastructure in place and for our purposes we are going to use 192.168.42.x network.  This is a setup for a SMB with no available offsite hosting capabilities, this is just an onsite redundant setup for when the virtualized servers needs to be put into a maintenance mode or  have had some sort of failure either in the VM or the Hyper-V Host.


The setup

We are going to use a workgroup setup and the VM's don't need to be on the same network as the host or the storage essentially what you really need to talk to each other is the NAS, Veeam Server, the Primary and Fail-Over servers and the gateway/router.   For my sanity on this post everything is just on the same network.  If you use a domain you can simplify a lot of this due to having a domain level admin on all systems attached to the domain.


Gateway/Router
Primary Host
Failover Host
Veeam Server
VM 1 (SQL Server)
VM 2 (Apache Server on internet)
VM 3 (3rd party connection server)
VM 4 (report server)
FreeNAS SMB
192.168.42.1
192.168.42.2
192.168.42.3
192.168.42.4
192.168.42.5
192.168.42.6
192.168.42.7
192.168.42.8
192.168.42.9


In Veeam when you setup a VM for replication the wizard gives you a variety of questions to answer.

1. Create a new replication job


2. Select your failover host and specify the save location.


3.  Verify The Job Settings.  Next I will be going though Advanced Settings


4.  This Veeam setup is on the same LAN, so optimizing for low bandwidth is not as important but you should always optimize your replication job for which ever environment your in.  In this case a LAN Network Target Server for Failover and Production.

5.  I've setup my Veeam instance for Application Aware Image Processing.  Guest Processing, which will allow you to create a transitionally consistent backup, configure transaction log handling settings, and enable guest file system indexing.

6.  Veeam also has the ability to excite PowerShell scripts when running fail-over/replication jobs.  I haven't set anything up yet but it is possible to do.

7.  If I had setup an off-host proxy server that would be handling the majority of the backup and not the Primary host server which does create quite a bit of additional load.  Currently as per the diagram in the beginning of this post there is the Veeam Server, The Primary Production Server and the Fail-Over/Backup Server.  I will be adding a off-host proxy server to take most of the load off the production server in an effort to speed up the backups and the replication time.

8.  If you have a copy of the VM on the backup server you can do what's called Replica Seeding.  This will significantly reduce the amount of bandwidth used.


9.  Here is where you define the guest processing for the Veeam Backup and Replication Server.  It is recommend that you set this up.


10.  Configure you backup/replication schedule


11.  This is the summary screen, it will tell you everything about your backup/replication job and it is pretty easy to find configuration errors.  One done your Veeam replication job is ready and running.


I would definitely recommend Veeam for any company that is looking for a easy fail-over solution especially if they need to be up 24/7.  The backup jobs work much the same way and when I have done testing of the fail-over I've setup it appears as just a blip in the process, and is not really noticed.  A few of my personal goals for this is to get an off-site proxy server set up, and move the backup server offsite and setup the reconfiguration ip addresses which Veeam is capable of.

I definitely recommend going though Veeam University https://www.veeam.com/university.html

Wednesday, April 06, 2016

Three Dumb Routers


Securing your network from IOT (Internet of Things)
IOT is the latest buzzword and a main feature when you go to buy a TV, fridge, thermostat, basically anything you want to buy it is all connected to the internet and that is a bad thing.   
First let me say based on manufacturer’s track records with routers, phones and other devices that connect to the internet this is just crying out to be exploited.
Second, manufacturers will not keep these devices up to date with the latest security patches to fix flaws that could allow a third party to intercept information, or worse gain access to these devices.
Third, unlike traditional computers, where there are alternatives to “throwing out” the device at the end of life, these devices are only good for a short while typically 3 years then you're expected to go buy a new one.


To best protect yourself and your home network I recommend using the “Three Dumb Routers” solution that is described by Steve Gibson in Episode 545 of the Security Now Podcast.


You need three routers, the make and models don’t matter, what matters is the network settings.  It would be best if you configure the other 2 routers before you connect them to your main network to do that consult the setup guide that came with your router.


One of them will be the “Root/Gateway” router or the router that you purchased or lease from your ISP is the Root router (Address Range 192.168.0.x/24) typically the default for all ISP gateway modem/routers; it provides the common link to the Internet for all your connected equipment in this case routers. This router is set up on what’s called a NAT configuration, which stands for Network Address Translations, and means that things on the Internet side, can’t access addresses on the “inside” of that router’s network directly.  The only thing that you would connect to this router on the Local Area Network side (the “inside”, not the Internet or WAN side) are the other two routers as shown in the diagram.  You shouldn’t connect any other devices to the inputs of the Main Gateway router, and it should have wif-fi turned off, if possible. In fact, it may just as well be a non-wifi router or a custom firewall like a PC running PFSense.

The Trusted Network


The trusted network we have on the address 192.168.1.x/24 and should also be set up for NAT-ing, which means anything on its Internet side won’t be able to access things on its LAN or “inside” segment.


The Untrusted (IOT) Network
Finally, we have the untrusted or IOT network; .again, this router is set up with NAT-ing and we have the address range set to 192.168.2.x/24. So, you will never have any trusted devices on the same segment as your untrusted devices. And the devices in each segment won’t be able to see the ones in the other segment.  Also on this network the only thing we want to allow in/out on this router are ports 80 and 443 as IOT devices most commonly only use those ports and if a IOT device requires additional ports it is best to add those ports as they are required.


Why this configuration provides the lowest risk
The reason that this set-up should be secure is that even if any potentially untrusted device is maliciously configured to scan its LAN environment, and if your important devices are not on that segment, they shouldn’t be visible to that untrusted device. There is a slight chance that the untrusted device might be able to find a way to “see” the network segment that is under the “Root” Gateway router but if the only things connected would be the trusted router.  Then there be no other computers or devices (e.g printers, NAS devices, etc.) that can be easily seen or exploited.


DISCLAIMER:
Routers have their own issues, such as vulnerabilities, and you should always check for updates to your routers do a backup of your settings before any upgrade.  Remember routers are your first defence to anything out there in cyberlan.

For additional information please consult Security Now Episode 545

Tuesday, March 08, 2016

Building A PFSense Firewall For Your Home

Build your own Firewall/Router with PFSense.

pfSense is an open source firewall/router computer software distribution based on FreeBSD. It is installed on a physical computer or a virtual machine to make a dedicated firewall/router for a network and is noted for its reliability and offering features often only found in expensive commercial firewalls. It can be configured and upgraded through a web-based interface, and requires no knowledge of the underlying FreeBSD system to manage. pfSense is commonly deployed as a perimeter firewall, router, wireless access pointDHCP server, DNS server, and as a VPNendpoint. pfSense supports installation of third-party packages like Snort or Squid through its Package Manager.

The system is fairly light weight an can be run on old or inexpensive hardware.  For my purpose which is a home/small business router, where I want VPN capability, squid proxy server and easy router for a web server and low power draw.

I went with a Asus J1800I-A SOC system.  It is a 2.4Ghz Dual core Celeron, and out fitted it with 4GB of DDR3L ram.

I had paid $98 for the SOC, $50 for the ram, $50 for the case and $45 for the PSU.  This SOC system has a PCI port and I used an INTEL Gigabit Adapter for the LAN port (49.99 to buy new).  I also have a 120 GB SSD for the system install.

Overall the system runs between 50 and 60% load.  The Disk usage is about 500mb for the ufs, tmp and var partition.  Memory Usage runs at about 6%.  The system is fast and easy to manage.

SOC:


Total: 284.98 + Tax

Sunday, February 14, 2016

Migrating and expanding virtualbox hard drives.

A user I work with using virtualbox as their hypervisor was having an issue with windows updates and saving files on their profile.  Upon investigation found out there was only about 500mb of storage space left.  To make things easier I worked from the directory the virtual hard disk was located.

Using the VBOXManage command I was able to resize the VM and convert the format without any changes to the users or data on the VM.  To accomplish this I used two commands the first being.


VBoxManage clonehd   --format VDI (the format of the drive was a paralles .hdd format)

Once Cloned, I then resized the drive using the following command

VBoxManage.exe modifyhd --resize $bytesize

The drive was a 40gb drive and I made the $bytesize value 80000 bytes or (80GB)

Everything since then has been running perfectly for that user.
Sources.
http://www.dedoimedo.com/computers/virtualbox-clone.html
http://superuser.com/questions/716649/how-to-change-fixed-size-vdi-with-modifyhd-command-in-windows

Sunday, August 02, 2015

NAIT's LINUX (UNIX) CORE CERTIFICATE

I had the pleasure of taking the NAIT "Linux (Unix) Core Certificate Program".   The reason I had chosen this program to update my skills is in our computing environment about 60% of our servers use open source software.  From the web server to the firewalls to the NAS devices the majority of our major infrastructure is or will be running on some sort of Linux/Unix system.  I was looking to improve my use and knowledge of the operating system.  I feel this course did exactly that; it is a course that I would highly recommend.  The following is a summary of the course, how I felt the course went and what I learned.

The NAIT course is broken down into 5 smaller courses.

CCTM520Linux/Unix Essentials and Command Line
CCTM530 Linux/Unix Installation and Management 
CCTM540 Linux/Unix Shell Scripting and Automation 
CCTM550 Linux/Unix Administration 
CCTM560 Linux/Unix Networking 

The instructor for the course is Harm Gerding

Overall I found this course very informative and that I didn't know Linux as well as I thought I did.  I picked up may more skills and updated ones I already had.  I found him knowledgeable, and confident when presenting.  His classroom exercises were well thought out and engaging.


Course CCTM520 - Linux/Unix Essentials and Command line

This course is really basic, it covers the following:

  • different distributions
  • desktop applications, x windows and accessiblity
  • general operating system use, how to use Man (manual pages) and info
  • editing and the manipulation of files, permissions, pipes, redirects, and STDIO
  • system variables, shells, and set command
I found this course to be a really good base for everything that followed; the notes provided were clear and concise.  I was worried that this course would be too basic, but I was happily mistaken, I really enjoyed this course and picked up several more tools that I now regularly use.  The most useful thing that was covered is vi.  I found it great and use many of the features in the program now that I didn't otherwise know about.


The course is exactly what the title says it is, the installation and management of Linux on systems.

Course objectives:
  • selecting a distro
  • partitioning and installing linux
  • using yum and apt for installing, updating and removing software
  • creating archive files
  • determining who is logged in
  • maintaining skeleton directories, profiles, setting limits and other settings
  • servers vs desktops vs virtual machines
  • file system types
  • basic user and group management, authentication and security
  • time, timezone  and ntp
  • managing and maintaining logs, logging and journalctl
This was an interesting part of the course, it is always fun to do a fresh install of an OS, and having a look at systemd the relatively new core for Linux was interesting and very informative.


I found this part of the course to be the most fun and rewarding.  I come from a web programming background (PHP, Javascript and CSS is what I mostly use) I took the Certificate course mainly for this course and it was well worth it.  There are many things in shell scripting that are different then in web programming, and since I do need to automate a lot of what I do I found this course to be the most useful.  Through the extent of this course we created many small shell scripts and we were given a useful guide when to use and not to use shell scripts.  I found after this course I am better able to write my own shell scripts and I understand how the Linux Operating system works especially with variables (now I can fix some of my older scripts) and reading and understanding scripts is much easier too.


I found this part of the course really good as well especially using the updated command line commands.

Course Objectives:
  • Sudo, su and security
  • TCP Wrappers
  • basic networking, and troubleshooting
  • netstat, ip command, and ping
  • file/printer sharing and printing
  • using virtual machines
  • backup and restore strategies and techniques
  • intro to mail servers/MTA ssh and telnet
  • GnuPG config, usage and revocation
This course was really good for getting us to use the commands and seeing the differences between the legacy commands vs the new commands.  I have been forcing myself to use the new commands to get use to them, they do require some getting use to but I have found it to be time well spent.


This part of the course was a lot of fun.  It took everything we had learn and forced the class to use it.  It involved setting up our own Lan, with specific ip addresses and subnets, making everything route properly to each network and out to the internet.  We discussed best practices, planning, dealing with and managing issues.

Course Objectives:
  • connecting between machines and enabling/disabling network services
  • covering common tcp/udp services and ports
  • network troubleshooting
  • tcpdumps, wireshark, port scans and nmap
  • name resolution, dig and nslookup
  • host vs network security.


Summary:

I found this course a great experience.  Harm is knowledgeable, he took his time and answered questions the students had and kept everyone very engaged.  The course covered a lot of material in two weeks and could have easily been much longer.  In fact we were not able to cover everything in the material (specifically IPv6) however the notes are good enough to go with on their own and there was a lot of discussion about IPv6 during the networking part of the course.  I would recommend this course to anyone if you have the computer skills and understanding to handle it.  I came out of this course knowing much more then I did before and many concepts are much clearer now then they were before.


Wednesday, June 17, 2015

Getting CMD Line FTP to work on Windows with a PFSense Firewall

PFSense Firewall Fix For Windows FTP
With PFSense especially with version 2.2 there is a known bug that it kills Windows Command line FTP (linux and Mac OS FTP though the cmd line work fine), which is a real pain if your on a Windows platform and your trying to automate something where a typical piece of software won't cut it.   There is FTP proxy plugin, but it is in beta, and at least for me it didn't seem to work.  https://forum.pfsense.org/index.php?topic=89841.0  at least it didn't for me.  I'd also rather not open a bunch of ports and have to manage and monitor all the different ports required in the firewall. 

I needed to setup an automated process on a windows client (no choice propriety software requires windows) to FTP text files to a old IBM mainframe FTP.  To work around this issue I found a nice piece of software from IPSwitch called Move It Freely.  You install the software and I highly recommend letting the software create the environmental variable so you can call the software from anywhere in the system.  In your .bat files or VB Scripts if you call ftps instead of ftp it calls the "Move It Freely" client.  Once you are connected make sure you change your transfer type to passive as Windows CMD Line FTP (ftp.exe) defaults with active as does Move it Freely.  That is why in windows FTP you need to put the command QUOTE PASV to enable passive mode.

Documentation for move it freely can be found here. 


Here is an example of a bat file to upload a file.

ftps $HOST -user:$Username -password:$Password
cd $directory
prompt
bin
hash
passive
put $FILE
quit

Thursday, May 28, 2015

How to Install .NET framework 3.5 on Windows 7 Embedded

You can view the video on the installation of .net 3.5 on my Youtube Channel

To install .NET framework 3.5 on Windows 7 Embedded, it is really a easy process once you know how to do it.  This is an update to my previous post, I decided that I would make this one extremely easy to follow with step by step directions.  My other post only worked occasionally, this one I've made sure it has worked every time that you do it.  There are some files you will need before we proceed.

Chrome or Firefox to get the files you will need.
.net verification tool
The full .net 3.5 Framework 

As you know with windows 7 how you would typically install the .net framework is though the add and remove programs.  This is restricted in Windows 7 Embedded.

To add .net 3.5 you typically go though the Programs and Features Category
and select Turn Windows Features on or off

This post will by pass this restriction without doing any registry edits or messing around with security settings.  For the rest of this post I will be working out of the downloads directory.  I've already loaded chrome and have downloaded the .net verification tool and the Full full .net 3.5 Framework 


open cmd prompt as administrator go to your downloads directory


and extract dotnetfx35.exe using command
dotnetfx35.exe /x:

You will get a prompt asking where you want to save the extracted files.  I am saving it to a folder called net35


Once extracted we will need to go to  net35 -> wcu -> dotNetFramework


You will then be prompted to save the extracted files.  I've put mine in a folder called net35

Navigate to net35 -> wcu -> dotNetFramework

run the extract command in the command prompt again and save the extracted files to the same directory

dotNetFx35Setup.exe /x:


inside of dotNetFX30 install the following files
netfx30a_x86
WCF
WCS
WF_32

This will install the essential files for .NET3, which is required before .NET3.5

Go up one directory level and go to the folder TOOLS and Install chwireg

Then go up a directory level find and run the setup application in compatibility mode vista sp1 and as administrator.


You can verifiy that .NET 3.5 SP1 has been installed by using the net_setupverifier


As you can see I have .NET 2 SP2, .NET 3 SP2 and .NET 3.5 SP1 all installed.

A couple other tools you may want to use or look at using once the frameworks are installed.

.NET Repair Tool go to https://support.microsoft.com/en-us/kb/2698555

.NET Clean-Up Tool http://blogs.msdn.com/b/astebner/archive/2013/11/06/10464416.aspx

Tuesday, May 26, 2015

Veeam Backup and Recovery

If you need to make a name change to the server that is installed with your veeam backup and recovery software there are a couple things you will need to change if you don't want to uninstall and reinstall the software.

For the Backup Service you need to change these two registry keys
Veeam refers to the local computer name in a couple of registry entries and promptly stopped working.
The keys for the backup service are:
HKLM\SOFTWARE\Veeam\Veeam Backup and Replication\SqlServerName
HKLM\SOFTWARE\Veeam\Veeam Backup Catalog\CatalogSharedFolderPath

For the SQL database service it is in
HKLM\SOFTWARE\Microsoft\MSSQLServer\LASTCONNECT

Friday, May 22, 2015

Printing a customized fixed header from MS Excel on every page

How to set a number of columns or rows in MS Excel to print on every page.  This should apply to MS Office 2007 and later.

In MS office ribbon go to the Page Layout Tab -> Print Titles


Then you will see this page setup pop up screen.


In the rows to repeat at top put in the range that you want to put on every page.  In this case I want rows 33 to 36 to repeat on every page I print.


Then select print preview to see the rows repeated on the top of every page.


Then Print your document.

Sunday, April 05, 2015

Cyptowall 3. From Infection to Recovery.

Cyptowall 3.  From Infection to Recovery.

Disclaimer - for protection of the companies and their staff involved I will not name or reference them any other way then "The Company" and "Staff". 
 
A few companies I've consulted with were hit with Cryptowall version 3.  The entry point was a staff member who opened something in the email they shouldn't have.  Their computer was protected with a "tier 1" anti-virus (For the record I use the term "Tier 1" very loosely.  The infected machines were using all up-to-date well known corporate anti-virus).
After the staff member opened the email attachment I'm told the anti-virus had claimed it blocked the infection, it however did not.  The virus ran until the staff member went home; there was no alerting the IT staff due to a lack of procedural operations if such an event were to occur.  Also IT staff being contractors or on call.   The virus encrypted almost all files on all mapped network windows file shares.  1/5 of all the files were encrypted and 1/2 of all the files were infected on all the shared drives for all users.
 
It is well known and documented that once infected with a ransomware the only course of action is to recover from an offline backup or pay the ransom.  As all the most recent files were encrypted the oldest backup were 1 to 2 weeks old which was an acceptable lost to the organizations involved.  Due to the size of the file shares doing an offline backup every night was not an option for the company; the backup drives are rotated weekly.  Archiving files are also not considered a high priority due to the price and size of hard drives.  The time to sift through and decide what projects and files can be archived can be time consuming. 

I was however able to get back approximately 2/3 of the differential data from the drives using some recovery software and specifying the date range from the last backup to the day before the virus infected the system.  My preferred choice of recovery software for windows is Active Undelete.

The software is very intuitive, reasonably priced and has helped me recover more files for clients from accidental deletion, dead hard drive or an accidental format. I ran a full drive scan, took about 6 hours through USB 3 on a laptop to recover the differential data.  Of that differential data 80% of the data appeared to be uncorrupted,usable and accurate as of the day modified.

I will be doing a follow up post on this for a backup solution that is ransomware resistant to with-in 24 hours from the time of the infection.  It really is a post you don't want to miss.

Cisco did a very good blog post on the technical aspects of cryptowall 3.

http://blogs.cisco.com/security/talos/cryptowall-3-0

Here are some links on the very first type of this crypto-ransomware cryptolocker.
http://en.wikipedia.org/wiki/CryptoLocker

The TWIT network did a great breakdown on cryptolocker on Security Now!
http://twit.tv/show/security-now/427


Monday, December 29, 2014

Build your own cloud

I've been in the computer industry for over 12 years and the biggest changes I've seen is the move to third party cloud services such as Dropbox, Box, Google Drive, One Drive, etc.  It has never been easier to send and receive files, especially for printing or getting photos from a photographer after a job is finished.  I've been a production manager for a print company and the easiest way we could get large oversized files to us was to try and have a ftp server with a java applet that worked about 70% of the time or a step by step PDF the links to a ftp program and hope the user was techy enough to follow the instructions.  I've help on some projects where I used a web based file manager like extplorer to create something like Dropbox only without someone needing to sign up and become a member of the cloud service but it never really worked quite right and it required more technical knowledge for creating users with proper directories.

I learned about owncloud last year from a google plus post and I found the project interesting and the thought of having my own 500gb cloud storage is pretty awesome.  I did a default install on a Linux php mysql platform, and it had a default limit of 2 GB  per upload.  I have a 50 mbps connection through telus so I have 10 up 50 down a 400 GB bandwidth cap.  This worked really well and it does not require more then basic computer skills to setup users and share files.

The user setup is really straight forward.  After a successful setup you can login and start creating users.  Go to where your name is and click on it; it is an actionable button and select users.  You will then see a screen much like this one.  To create a user simply put in a username and password and hit create;  That is it.  It's that simple.


You can get really crazy and setup different user groups, and have granular control of things on the server.  Some great use cases that I've setup others using the other software would be for submitting content for a contest, gallery or a website, large project collaboration, the list goes on.  Since you have control of the server you don't  have to go though the hassle of having the users create online accounts with Google, Microsoft, Dropbox or any other cloud storage service.  You can login, setup the user, and email them the URL or make a shortened URL via bit.ly and include their username and password.  They do the rest with the web browser and as you can see by the image below it is extremely straight forward.


New lets you create a new file but the main one we are interested in is the upload icon next to the new.  It will upload a file from the computer to your owncloud.


As you can see when you hover over a file in owncloud you get options as to what you want to do with it.  In this case share it.


If the person has your owncloud name in this case "demo" they can share it with you and it will end up in your owncloud, however they can also send it to you via email link and password protect it and set an expiration time for that access.  If you are setting this up as a "file drop solution" the drive that users upload files to could be shared out and accessed by those with the proper share path and username and password to access the files, making it extremely easy to access the files that are uploaded.

This is extremely impressive technology for an open platform, and that the community edition is free, is even better.  The site is also mobile responsive and works well in the browser, but if you want the app it's going to cost you a whole $1.00 on both Android and iOS.  There are also desktop apps for Windows, Mac OS and Linux.  You can also specify whether you want to enforce https or use either http and https depending on what your needs are and how your server is setup.

Tuesday, November 25, 2014

How to install and Remove Java on Ubuntu

Install Oracle Java in Ubuntu by PPA 


This provides instructions on how to install the Oracle Java JDK (which includes Java JDK, JRE and the Java browser plugin). The PPA provides the full Oracle JDK package. 

To add the PPA and install Oracle Java 7 in Ubuntu use this: 


sudo add-apt-repository ppa:webupd8team/java

sudo apt-get update
sudo apt-get install oracle-java7-installer 

To add the PPA and install Oracle Java 8 in Ubuntu use this: 

sudo add-apt-repository ppa:webupd8team/java
sudo apt-get update
sudo apt-get install oracle-java8-installer 


If you want to see your version of java run the following command in the terminal: 

java -version

It should return something like this 

Java version "1.7.0_51" (version 7) or "1.8.0" (version 8) 
Java(TM) SE Runtime Environment (build 1.7.0_51-b13) - version 7
Java(TM) SE Runtime Environment (build 1.8.0-b132) - version 8
Java HotSpot(TM) 64-Bit Server VM (build 24.51-b03, mixed mode) - version 7
Java HotSpot(TM) 64-Bit Server VM (build 25.0-b70, mixed mode) - version 8 

If the Java version in use is not 1.7.0, you can try to run the following command in the terminal: 

sudo update-java-alternatives -s java-7-oracle 

The installer requires you accept the Oracle license before the installation begins. This is only required once. If you need the installation to be automated, you can run the following command to automatically accept the Oracle license: 

Version 7

echo oracle-java7-installer shared/accepted-oracle-license-v1-1 select true | sudo /usr/bin/debconf-set-selections 

Version 8 

echo oracle-java8-installer shared/accepted-oracle-license-v1-1 select true | sudo /usr/bin/debconf-set-selections 

Setting Java environment variables To automatically set up the Java 7 environment variables, you can install the following package:

sudo apt-get install oracle-java7-set-default 

 If you've already installed oracle-java6-set-default or oracle-java8-set-default, they will be automatically removed when installing oracle-java7-set-default (and the environment variables will be set for Oracle Java 7 instead). Switch back and forth between Java 7 and 8

Switch to Java 7

sudo update-java-alternatives -s java-7-oracle 

 And, switch back to Oracle Java 8 using: 

 sudo update-java-alternatives -s java-8-oracle 

If you get some warnings when running these two commands, ignore them.


How to Remove Oracle Java To remove java on your system and want to go back to OpenJDK or remove java completely, all you have to do is remove the Oracle JDK7 Installer and the previous Java (OpenJDK, etc.) version will be used: 

sudo apt-get remove oracle-java7-installer 

sudo apt-get 
remove oracle-java8-installer    


Special thanks to webupd8.org for their great tutorial for which this is based.

Tuesday, November 18, 2014

Disable Encryption on Ubuntu VNC Server

In Ubuntu starting with 14.04 a change was made in the VINO server (VNC) to have encryption on by default. Of course this breaks many of the VNC Clients on windows, so to allow windows users access to the linux server via VNC there are 2 ways to update the VINO server to disable encryption.


Option 1 - Command Line:

edit ~/.bashrc and on the last line add

dconf write /org/gnome/desktop/remote-access/require-encryption false

save the file and reboot the system

Option 2 - GUI

On the linux server open the terminal and install dconf-editor

sudo apt-get install dconf-editor 

Open the program it Navigate to: 

org  >>  gnome >> desktop >> remote-access and Disable "require encryption"


After doing this your windows VNC client will have no problem connecting to the Ubuntu Server using Screen Sharing.

Troubleshooting Tip:  If your having problems with the screen redraws make sure your using the XORG driver.  Using the proprietary driver can cause redraw issues with VNC

Fix a windows network printer that is offline

How to fix a network printer that get's installed and shows offline. By default SNMP is set to public, so when you are installing a netw...