Showing posts with label storage. Show all posts

Monday, January 25, 2021

Managing VM Storage On A Hyper-V Cluster

Managing storage on a cluster can be pretty dry but it is a challenge to keep your data files from becoming a sprawling mess much like my desktop.  File duplication from copies, backups, even testing VMs can create a confusing mess.  When it comes to your virtual machines and their storage you should make sure that you do everything you can to keep everything together; otherwise your not only asking for trouble. Microsoft has some great tools for managing your virtual machine storage and you should use them otherwise you could easily end up with duplicated virtual disks which could be outdated and can cause you all sorts of issues.

Sprawling Desktop Mess
My Messy Desktop

In my case I want to move several VM's off of a storage server called STORAGE1 and move them to STORAGE2 as shown below.  Now before I go head and move these because I am cautious and paranoid; I make a backup of said VM, in this case let's say it's VM1.  I run a export out of the cluster node to which the VM is on (or you can move it to the node your on) and run a full export to a usb drive I have connected.  

VM File Management

Wanting to keep your File System Organization nice and clean, I highly recommend that you pre-setup your folders where you want to move your VM, so on STORAGE2 I would create a folder called VM2 and inside that folder I created a folder called Virtual Hard Disk.  The Cluster Server Manager will move your files but it won't create the same folders, the cluster storage manager will just put everything in a single directory, and I myself prefer to keep the default structure as much as possible.  So on Storage2 my directory pathing is setup like this.
STORAGE2 -> VM2 -> Virtual Hard Disk


As you can see below I have the Failover Cluster Manager open and I have the roles menu selected.  Here is where you can modify your Clustered Role Storage


Right click on the selected VM and Select Virtual Machine Storage as shown below.


You will get a dialog box showing you where the virtual machine storage resides.  Then you drag and drop the virtual machine storage elements into the folders on the left as shown below.

Once you move all the items to the new storage locations press start.  This will take some time to process which also depends on the VM and the size of the VM disk etc.  Obviously the larger the VM is the longer the process will take.  Unfortunately there isn't any progress bar to tell how where the progress is on the moving of the VM storage, but the text on in the information section will disappear when the process is complete.  You can run this while the VM is live, though I do recommend shutting down the VM then move it; but that is just me being extra cautious.


Once your VM has finished moving the folders on the storage server where the VM was will still be there but will be empty.  I do recommend tiding up after and removing these unused folders as shown below.  This really beats the alternative of removing the role of the VM on the cluster and moving your backed up file to where you want it on the storage and resetting up the role.


Wednesday, April 26, 2017

How to setup Storage Tiers on Server 2012R2 with Powershell and NVMe Drives


I wrote in my blog on April 23 a process for setting up storage spaces on Windows Server 2012R2 and when I went to use it on my production machine for a scheduled reconfiguration I ran into issues because of some differences in the hardware setup.  It just goes to show that no matter how well you try plan, if something is different in your lab vs production it's going to bite you.

However when I went to do to the reconfiguration for Storage Spaces to a Tiered Storage Spaces Configuration to enable Mirroring on the 2 NVMe Drives on the server and configuring 8 HDD Drives in a mirrored setup as well.  So what I did first was a full backup (export) of 3 Hyper-V virtual machines, which took the most time totaling 1TB of Data and took 3 hours to copy off to a NAS (the local backup drive was unavailable).

Once the server reconfiguration started it actually went very well till we got to setting up the Storage Pool.

Detach the current VHD you have setup with storage spaces.  Go to Storage Pools under Volumes and right click on the virtual disk and select Detach Virtual Disk.


Then delete the virtual disk and remove the storage pool.  Once that is done you will need to setup the storage spaces pool and the disk in powershell, My disk list actually had an issue where the MediaType of two of my disks were set as unknown.

The powershell commands I used to create my storage spaces pool.

$pd = (Get-PhysicalDisk -CanPool $True)

This allows me to include the unknown disks in the pool that Storage Spaces doesn't recognize.

New-StoragePool -PhysicalDisks $pd -StorageSubSystemFriendlyName "Storage Spaces*" -FriendlyName "DATA"

***UPDATE for anyone using above 2012R2 use the following***

New-StoragePool -PhysicalDisks $pd -StorageSubSystemFriendlyName "Windows Storage*" -FriendlyName "DATA"

*****************

Once the disks are in the Storage Pool, I need to defined the 2 undefined disks (in this case they are hdd drives) so I used this powershell command.

Set-PhysicalDisk -FriendlyName PhysicalDisk$X -MediaType HDD

Obviously the $X is a variable holder for the number of the physical disk defined in the storage spaces


As you can see storage spaces sees 2 SSD Media Types and 6 HDD Drives.  If you try to use the gui and setup the storage spaces in a Mirror configuration, you will get an error.  For some reason at least on the server I'm working on the GUI only sees one SSD.  So back to Powershell I used the following commands to create the Virtual Disk.

$vd1 = New-VirtualDisk -StoragePoolFriendlyName "Data" -FriendlyNameTieredSpace -StorageTiers @($ssd_tier, $hdd_tier) -StorageTierSizes @(900GB, 1.5TB) -ResiliencySettingName Mirror -WriteCacheSize 1GB

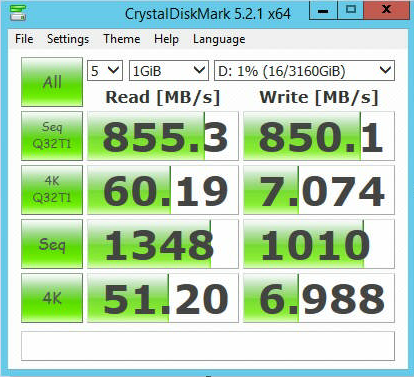
This will create the virtual disk and it will show up in Storage Spaces and then you can attach the disk in Storage Spaces.  You can then expand the Virtual Disk to use the full extent of the Storage Space if you want.  I have a total allocated space of 3.09 TB and according to CrystalDisk Benchmark it sure looks like it's running properly (logging into the virtual servers also is way faster).


As you can see all the drives are in good health it sees all the NVMe SSDs.  I haven't verified what happens when I pull out a drive but am expecting it to work well (I'll have to schedule another test to verify this).

Here is are some benchmarks one REFS and the other NTFS.  I'm going to stay with NTFS for now but when we update to server 2016 I will probably push to use REFS.


REFS Benchmark

NTFS Benchmark

****UPDATE****

If your using Windows 10 and want to setup storage spaces you need to use "Windows Storage*" instead of "Storage Spaces*"


Sunday, April 23, 2017

Enabling and Setting up SSD/HDD Storage Tiers in Hyper-V on Server 2012R2

In this post I am going to cover how to create a storage spaces tiered storage array, format it to use ReFS and have Server 2012R2 Mount the drive after/when the system is restarted.  You will have to have the Server 2012R2 installed with the Hyper-V role added before we begin.

When installed you can see from the GUI 4 disks that you have available in my case I have 4 but only three can be pooled because in this list my OS disk is being shown in here.


This powershell command shows what disks can be pooled.
#List all disks that can be pooled and output in table format (format-table)           

Get-PhysicalDisk -CanPool $True | ftFriendlyName,OperationalStatus,Size,MediaType       

The results of the powershell commands are shown below.


To make our lives easier we create a variable with unspecified disks.
           
#Store all physical disks that can be pooled into a variable, $pd           
$pd = (Get-PhysicalDisk -CanPool $True | Where MediaType -NE UnSpecified)           

#Create a new Storage Pool using the disks in variable $pd with a name of My Storage Pool      

---For 2012R2 and earlier---     
New-StoragePool -PhysicalDisks $pd –StorageSubSystemFriendlyName “Storage Spaces*” -FriendlyName “DATA”         

---For Server 2016 and newer---
New-StoragePool -PhysicalDisks $pd –StorageSubSystemFriendlyName “Windows Storage*” -FriendlyName “DATA”   


#View the disks in the Storage Pool just created           
Get-StoragePool -FriendlyName "DATA" | Get-PhysicalDisk | SelectFriendlyName, MediaType


So we have 2 types of disks shown in our storage pool.  SSD and HDD

We run the following commands to create a tiered storage pool.  This will create a ssd pool and hdd pool

#Create two tiers in the Storage Pool created. One for SSD disks and one for HDD disks           
$ssd_Tier = New-StorageTier -StoragePoolFriendlyName "DATA" -FriendlyName SSD_Tier -MediaType SSD           
$hdd_Tier = New-StorageTier -StoragePoolFriendlyName "DATA" -FriendlyName HDD_Tier -MediaType HDD

Now we can switch to the gui and create our VHD which will mount to the HOST OS.  We will also be able to create a writeback cache.  From here we can start the Wizard in the GUI.


Now here is where we can select the option to create tiered storage spaces and name your virtual disk.


Here is where you can specify what kind of setup you want in my case simple or mirrored. However I could not do mirrored as I did not have enough physical disks available so for the purposes of this post I went with simple.  Though for performance and redundancy I would select mirrored.  StorageSpaces allows for 3 types of resilient storage.


Resilient storage. Storage Spaces provides three storage layouts (also known as resiliency types):
  • Mirror. Writes data in a stripe across multiple disks while also writing one or two extra copies of the data. Use the mirror layout for most workloads – it helps protect your data from disk failures and provides great performance, especially when you add some SSDs to your storage pool and use storage tiers.
  • Parity. Writes data in a stripe across physical disks while also writing one or two copies of parity information. Use the parity layout for archival and streaming media workloads, or other workloads where you want to maximize capacity and you’re OK with lower write performance.
  • Simple (no resiliency). Writes data in a stripe across physical disks without any extra copies or parity information. Because the simple layout doesn’t provide any protection from disk failures, use it only when you require the highest performance and capacity and you’re OK with losing or recreating the data if a disk fails. You can also use the simple layout when your application provides its own data protection.
Once you go forward you will see something like this for the following screen.


You will see an alert about the write-back cache, and I will end up with a 700GB drive 1 x 120 GB SSD and 2 x 320 GB HDD.  Now because this lab is a simple setup (3 drives) and if I wanted any kind of redundancy (which I would want for a production environment) I would want to use a mirror setup for the storage spaces instead of simple for the storage layout.

Update - April 24, 2017

After that you will want to get your storage space volume to auto mount

Open an administrative level PowerShell prompt and type in the following.
Get-VirtualDisk | Where-Object {$_.IsManualAttach –eq $True}
This lists off your virtual disks where the IsManualAttach property is turned on and the disks WILL NOT auto-reattach on restart.
Now run the line again but include the following:
Get-VirtualDisk | Where-Object {$_.IsManualAttach –eq $True} | Set-VirtualDisk –IsManualAttach $False
Now the virtual disk will auto mount after a restart/power cycle.

Update - April 26, 2017

I was unable to use the procedure above to work with NVMe based SAS drives. If you want to know how that was setup see my post How to setup Storage Tiers on Server 2012R2 with Powershell and NVMe Drives I go through step by step on how to setup the storage spaces using powershell.


For more information about storage spaces please refer to the following articles


and for referencing some of the powershell commands I used checkout


Automount Storage Spaces Virtual Disk


You can also view the whole process on my youtube channel. https://www.youtube.com/watch?v=hNhX65DDaT4


Monday, December 29, 2014

Build your own cloud

I've been in the computer industry for over 12 years and the biggest changes I've seen is the move to third party cloud services such as Dropbox, Box, Google Drive, One Drive, etc.  It has never been easier to send and receive files, especially for printing or getting photos from a photographer after a job is finished.  I've been a production manager for a print company and the easiest way we could get large oversized files to us was to try and have a ftp server with a java applet that worked about 70% of the time or a step by step PDF the links to a ftp program and hope the user was techy enough to follow the instructions.  I've help on some projects where I used a web based file manager like extplorer to create something like Dropbox only without someone needing to sign up and become a member of the cloud service but it never really worked quite right and it required more technical knowledge for creating users with proper directories.

I learned about owncloud last year from a google plus post and I found the project interesting and the thought of having my own 500gb cloud storage is pretty awesome.  I did a default install on a Linux php mysql platform, and it had a default limit of 2 GB  per upload.  I have a 50 mbps connection through telus so I have 10 up 50 down a 400 GB bandwidth cap.  This worked really well and it does not require more then basic computer skills to setup users and share files.

The user setup is really straight forward.  After a successful setup you can login and start creating users.  Go to where your name is and click on it; it is an actionable button and select users.  You will then see a screen much like this one.  To create a user simply put in a username and password and hit create;  That is it.  It's that simple.


You can get really crazy and setup different user groups, and have granular control of things on the server.  Some great use cases that I've setup others using the other software would be for submitting content for a contest, gallery or a website, large project collaboration, the list goes on.  Since you have control of the server you don't  have to go though the hassle of having the users create online accounts with Google, Microsoft, Dropbox or any other cloud storage service.  You can login, setup the user, and email them the URL or make a shortened URL via bit.ly and include their username and password.  They do the rest with the web browser and as you can see by the image below it is extremely straight forward.


New lets you create a new file but the main one we are interested in is the upload icon next to the new.  It will upload a file from the computer to your owncloud.


As you can see when you hover over a file in owncloud you get options as to what you want to do with it.  In this case share it.


If the person has your owncloud name in this case "demo" they can share it with you and it will end up in your owncloud, however they can also send it to you via email link and password protect it and set an expiration time for that access.  If you are setting this up as a "file drop solution" the drive that users upload files to could be shared out and accessed by those with the proper share path and username and password to access the files, making it extremely easy to access the files that are uploaded.

This is extremely impressive technology for an open platform, and that the community edition is free, is even better.  The site is also mobile responsive and works well in the browser, but if you want the app it's going to cost you a whole $1.00 on both Android and iOS.  There are also desktop apps for Windows, Mac OS and Linux.  You can also specify whether you want to enforce https or use either http and https depending on what your needs are and how your server is setup.

Wednesday, December 18, 2013

Expanding a FREENAS ZFS volume by drive replacement

Freenas is a great NAS solution especially given the price and the hardware of other NAS solutions; Freenas offers the best performance, expandability, value and flexibility in a NAS solution.  Freenas can provide NFS, Samba and Apple shares so the platform you want to use really doesn't matter what the client machine is.

Just reciently I've found my self down to 100GB of my 6.4 TB NAS and decided it was time to upgrade my storage space.  Now upgrading storage space on freenas isn't as simple as just replacing a bunch of drives; you must replace them one at a time and you wait for the drive to be completely replaced (resilvered) before replacing another drive otherwise you risk data corruption or loss.  By default the auto grow is set to off so if you want to grow the space on your nas you must enable the auto expand feature in freenas.  As always you should have another backup of this data.

So on your FreeNAS server you want to login via SSH or use the shell console provided in the web interface.  Type the following command.

zpool set autoexpand = on {your volume name}

Once that is enabled you may now grow your freenas storage by replacing drives.  As for myself I've replaced 4 320GB drives with 4 1TB drives moving my NAS from 6.4 GB to 8.3GB of storage space and to replace the drives it is a daily process with replacing a drive once a day until they are done.

How to make google calendar more secure

With the rash of spam and phishing attempts lately, I would recommend making the following changes to your google calendar settings to secur...