Showing posts with label recovery. Show all posts

Tuesday, March 01, 2022

Restore a PFSense Backup using the CLI (Command Line Interface)

This tutorial will go though how to restore a PFSense Configuration though the Command Line Interface (CLI).  You will need a few things before we begin.

  1. A usb drive formatted as FAT32
  2. A backup of your PFSense Config File on the thumb drive.


Once that is done, and you have your fresh version of PFSense installed and ready to go.


plug your USB device into the system.


We see the device is da0, but we will run camcontrol with devlist to verify the USB Drive to do that we will need to enter shell mode by selecting option 8


Then we will run the command 
camcontrol devlist


We can see that da0 is our usb drive, so to see all available partitions we will run 

ls /dev/da0*

So we can see a single partition /dev/da0s1 so we need to mount it.  To mount it we will need to make a folder to mount to.  In this case I'm going to make a folder called bak

mkdir /media/bak


then using the following command to mount the usb drive to /media/bak

mount_msdosfs /dev/da0s1 /media/bak


Then we are going to cd into /media/bak and run a ls to see what files we have on the drive

cd /media/bak

LS 


We find our pfsense backup file now we will copy it to /cf/conf/config.xml overwriting the default config file.  If you so choose you can make a backup of the default config by first doing
 cp /cf/conf/config.xml /cf/conf/config.bak

I am just going to overwrite the file. To do that I am going to run

cp /media/bak/mypfsensebackup-20220228051431.xml /cf/conf/config.xml

This will copy/paste the backup file into the /cf/conf directory and rename the file to config.xml overwriting the file that is currently there.


Now we will remove the temp file and reboot the system.

rm /tmp/config.cache


exit shell 

exit

then select option 5 and reboot


Once you have rebooted your configuration should be applied if there were no issues or compatibility issues.


Friday, May 04, 2018

PFSENSE LAGG Modifications and Recovery


My organization had an issue with our firewall, the hard drive died.  It has a 4 port LAGG which is unnecessary but we were troubleshooting some issues (long story).  Anyway we wanted to reduce the LAGG ports from 4 to 2 and took this hard drive failure to do it.


Here is how you start.  Make sure you have an up-to-date backup of your PFSENSE Config.  I know you backup before every time you do an upgrade right… ;)

We want to make the following modifications to the config.xml file.

<laggs>
<lagg>
<members>igb0,igb1,igb2,igb3</members>
<descr></descr>
<laggif>lagg0</laggif>
<proto>lacp</proto>

to this below

<laggs>
<lagg>
<members>igb0,igb1</members>
<descr></descr>
<laggif>lagg0</laggif>
<proto>lacp</proto>

Save your modified config.xml to a thumb drive.  The drive should be formatted for fat32.


You will also want to make sure you have your network documentted. It's good practice but you will need to re-assign the interfaces because of the LAGG modifications.

Here is an example of the network documentation required.

WAN -> LAGG0.40 -> v4: 1.1.1.250/24
LAN -> LAGG0.30 -> v4: 1.1.2.250/24
opt1 -> LAGG0.50 -> v4: 1.1.5.250/24
opt2 -> LAGG0.60 -> v4: 1.1.6.250/24

so on and so forth.  

If you are using OpenVPN you shouldn't need to define that, and you should also not be defining the actual physical interfaces such as igb0, igb1.


I’ve found the easiest way to do the restore is to reinstall pfsense. Once you've either login to the web interface and re-upload the config or put the config in after the install using the console. This procedure is going to use the console.


After install reinstall of PFSense is complete boot off drive.
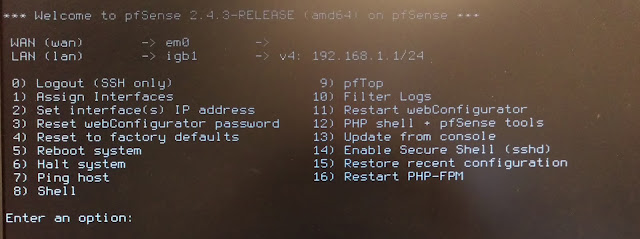

Clean PFSENSE Installation
Plugin usb key with backup config.xml file
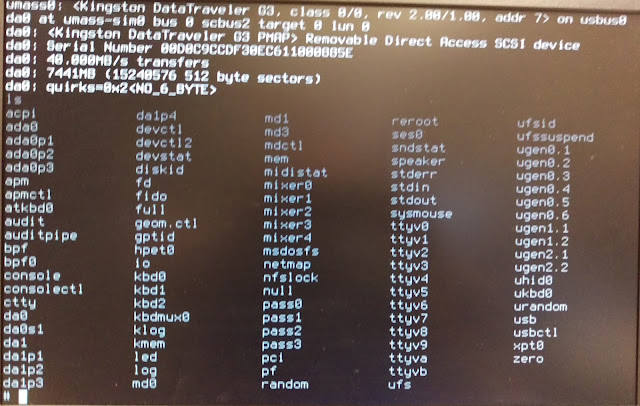
USB Drive is da0
Plugin your usb drive, make note of the drive


In this case DA0; since it’s fat32 we want partition 1 which is S1 and we mount the drive with the following command


Mount -v -t msdosfs -o large /dev/da0s1 /mnt


cd to the /mnt directory and copy the file in this case config-FW2.xml to the /conf folder
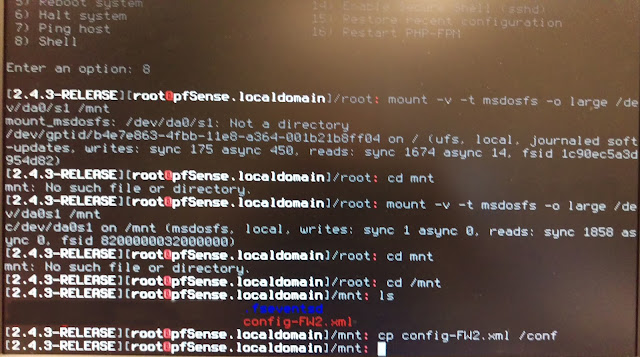
Mount the USB Drive with the modified config file
Copy the config file from the mounted drive to the /conf directory. You could do a complete over write of the config but I am much more cautious. I like to make a backup of the default config first then copy over.

cp /conf/config.xml /conf/config_bak.xml
cp /mnt/config-FW2.xml /conf/config.xml


Change the permissions of the newly copied config.xml to 644

chmod 644 /conf/config.xml


Reboot.

At this point you can reconnect your network connections to the LAGG and CARP interfaces. This will just take a few minutes to boot up and mostly fix our network interfaces.

Now we want to reassign our interfaces as they are slightly messed up.  Note the igb0 and igb1.
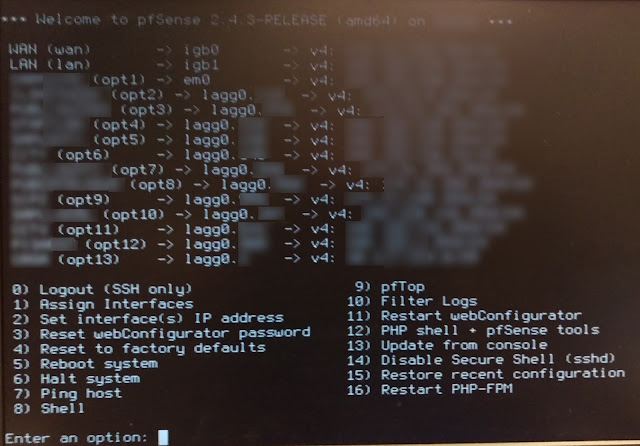

Fix your interfaces igb0 and igb1 are lagged and should not be assigned.


Fix your interfaces igb0 and igb1 are lagged and should not be assigned.  To do this you will want to reassign your interfaces, but DO NOT modify the VLANs, to do that press 1 on the PFSENSE console menu.  I know you have your networks documented right… ;)

Again, here is an example of the network documentation required.

WAN -> LAGG0.40 -> v4: 1.1.1.250/24
LAN -> LAGG0.30 -> v4: 1.1.2.250/24
opt1 -> LAGG0.50 -> v4: 1.1.5.250/24
opt2 -> LAGG0.60 -> v4: 1.1.6.250/24
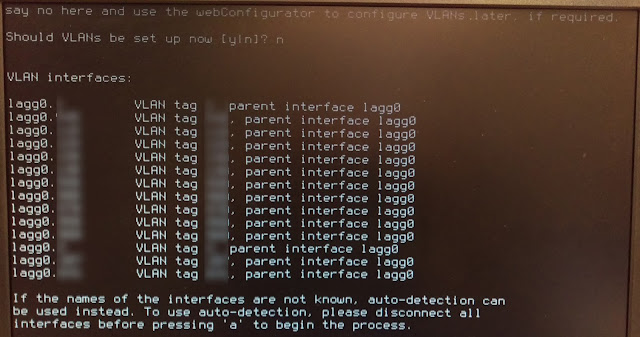

Reassigned network interfaces.


Once done, reboot your pfsense system, you may get something about removing igb because of an IPV6 conflict.  You can ignore this press control c to escape.

IT make take a few minutes for pfsense to get it’s networks sorted out.  If nothing on your switches have changed, you will be able to login to the web interface you can put the firewall back into production. The whole process should take no more then 10 to 20 minutes. Once you've accessed the web interface you will need to re-install any 3rd party extra's you may have installed such as the openvpn-client-export and the FTP_Client_Proxy.  Upon plugging the fixed firewall back into place, I had no issues or internet hiccups from the system coming back online. CARP was just as responsive as ever and failover worked flawlessly on the reconfigured lagg.

Tuesday, May 26, 2015

Veeam Backup and Recovery

If you need to make a name change to the server that is installed with your veeam backup and recovery software there are a couple things you will need to change if you don't want to uninstall and reinstall the software.

For the Backup Service you need to change these two registry keys
Veeam refers to the local computer name in a couple of registry entries and promptly stopped working.
The keys for the backup service are:
HKLM\SOFTWARE\Veeam\Veeam Backup and Replication\SqlServerName
HKLM\SOFTWARE\Veeam\Veeam Backup Catalog\CatalogSharedFolderPath

For the SQL database service it is in
HKLM\SOFTWARE\Microsoft\MSSQLServer\LASTCONNECT

Thursday, December 12, 2013

Backing up your Android Phone's Stock Rom and Recovery

Backing up your Android Phone's Stock Rom and Recovery

Have you ever wanted to mod your new android phone but wanted a way to get back to the factory settings without having to mod the phone first?  It is possible to do but you need a few things, the Android Dev tools, fast boot, and some command line know how.  For this example I will be using a HTC One X on the Telus Network.

With HTC you have to get a developer token which can be obtained from http://www.htcdev.com.  You will have to sign up as a dev to get your developer token.  HTC has a great tutorial on how to unlock your bootloader on the htcdev site.
Once your bootloader is unlocked you can now download a 3rd party rom manager (don't worry we are just going to boot off it; were not installing it yet - also make sure you have enabled USB Debugging in the developer tools).  I used TWRP, it is more compatible with my device then clockworkmod is.  Once downloaded (I renamed the downloaded rom manager to recovery.img) and moved it into my fastboot directory on my computer.


Here is a look at the fastboot directory on my computer

Now the fun can begin; make sure you have all the files you need in the directory your working out of, in my case the fastboot directory.  Your phone should be plugged in via usb to your computer then I used adb to reboot my phone into the bootloader

C:\fastboot>adb reboot bootloader

Then I booted off the recovery.img file in my fastboot directory.

C:\fastboot>fastboot boot recovery.img


Then your phone should boot off the custom recovery rom without installing it.  Then you can make a backup using the recovery rom.  Once done reboot into the phone's system and load a file manager like ES File Explorer to get the files off using dropbox or some other means.

Now you have a backup of your stock phone and you can now mod your phone to your heart's content.

Update:  I forgot to mention that with HTC you also have to update your boot.img file using the commandline interface.  To get the boot.img file you can get it by extracting it from your backup or the zip file from your thrid party rom like cyanogenmod.

C:\fastboot>fastboot flash boot boot.img

Updating your godaddy certs during the G2 intermediate hierarchy to the TLS Root CA - R1 hierarchy

  If you use godaddy TLS certificates you should be aware of some changes during the transition from the G2 certificates to the new R1 Certi...