Showing posts with label setting up storage spaces with powershell. Show all posts

Friday, May 29, 2020

Setting up storage spaces virtual disk with a two disk parity using powershell

On Server 2019 I came across an issue setting up a storage spaces virtual disk in the Server Manager GUI.  You can view the issue and resolution on my YouTube channel https://www.youtube.com/watch?v=l1UEUi3twOg or continue reading the post.  I have an Intel Socket 2011 Board with a Intel E-2620v1 Xeon.  This motherboard has 6 sata ports, and I added in  a Silicon Image 3132 1x PCI-E card (2 ports) for some additional storage ports for a total of 8.  I have a single OS drive, a "scratch/temp" drive, and the rest of the disks I wanted to setup as a single storage disk for setting up and testing VMs.

So in my server manager you can see the 6 disks I am going to use., 2 of them are detected on a raid bus (Si3132 controller) the other 4 are detected as SATA.


Creating the Storage Pool works just fine.


Tasks -> New Storage Pool -> Give it a name and description


Select the disks you want to use


Once you confirm your settings, create your storage pool


Then open up the create a virtual disk wizard


Select the storage pool, in this case DATA


The new virtual disk wizard will then run, give your virtual disk a name


Specify enclosure resiliency (if applicable - in this case it isn't.)


Select your storage layout


Select your provisioning type (in this case fixed)


Define the size of the virtual disk


Create the virtual disk.


At this point creating the virtual disk will fail.  It should have setup the disk as a 6 disk parity with a single drive redundancy, this is how the wizard has been setup requiring a minimum of 7 disks for a 2 disk parity.


So at this point I switched to powershell, to create the storage spaces virtual disk.  I deleted the storage pool, even though it wasn't necessary; but I like starting clean, it helps keeps any issues down to a minimum.

If you haven't already install the latest version of powershell from github.  https://github.com/PowerShell/PowerShell

To make sure I can add all me disks to the storagespaces pool, I ran the following command.

PS C:\Users\Administrator> Get-PhysicalDisk -CanPool $True


Then I put these disks into a variable called $pd and created storage pool called DATA.
PS C:\Users\Administrator> $pd = (Get-PhysicalDisk -CanPool $True)
PS C:\Users\Administrator> New-StoragePool -PhysicalDisks $pd -StorageSubSystemFriendlyName "Windows Storage*" -FriendlyName "DATA"


Now that the storage pool is created we can create or virtual disk.

PS C:\Users\Administrator> New-VirtualDisk -StoragePoolFriendlyName "DATA" -FriendlyName "DATA" -Size 1000GB -ProvisioningType Fixed -ResiliencySettingName "Parity" -PhysicalDiskRedundancy 2


With the virtual disk made we can go into computer management and online the disk, initialize, format and set it up how ever we like.  After running the powershell commands if you want to see things in server manager you may have to do a physical refresh to have it all show up in the dashboard.


Wednesday, April 26, 2017

How to setup Storage Tiers on Server 2012R2 with Powershell and NVMe Drives


I wrote in my blog on April 23 a process for setting up storage spaces on Windows Server 2012R2 and when I went to use it on my production machine for a scheduled reconfiguration I ran into issues because of some differences in the hardware setup.  It just goes to show that no matter how well you try plan, if something is different in your lab vs production it's going to bite you.

However when I went to do to the reconfiguration for Storage Spaces to a Tiered Storage Spaces Configuration to enable Mirroring on the 2 NVMe Drives on the server and configuring 8 HDD Drives in a mirrored setup as well.  So what I did first was a full backup (export) of 3 Hyper-V virtual machines, which took the most time totaling 1TB of Data and took 3 hours to copy off to a NAS (the local backup drive was unavailable).

Once the server reconfiguration started it actually went very well till we got to setting up the Storage Pool.

Detach the current VHD you have setup with storage spaces.  Go to Storage Pools under Volumes and right click on the virtual disk and select Detach Virtual Disk.


Then delete the virtual disk and remove the storage pool.  Once that is done you will need to setup the storage spaces pool and the disk in powershell, My disk list actually had an issue where the MediaType of two of my disks were set as unknown.

The powershell commands I used to create my storage spaces pool.

$pd = (Get-PhysicalDisk -CanPool $True)

This allows me to include the unknown disks in the pool that Storage Spaces doesn't recognize.

New-StoragePool -PhysicalDisks $pd -StorageSubSystemFriendlyName "Storage Spaces*" -FriendlyName "DATA"

***UPDATE for anyone using above 2012R2 use the following***

New-StoragePool -PhysicalDisks $pd -StorageSubSystemFriendlyName "Windows Storage*" -FriendlyName "DATA"

*****************

Once the disks are in the Storage Pool, I need to defined the 2 undefined disks (in this case they are hdd drives) so I used this powershell command.

Set-PhysicalDisk -FriendlyName PhysicalDisk$X -MediaType HDD

Obviously the $X is a variable holder for the number of the physical disk defined in the storage spaces


As you can see storage spaces sees 2 SSD Media Types and 6 HDD Drives.  If you try to use the gui and setup the storage spaces in a Mirror configuration, you will get an error.  For some reason at least on the server I'm working on the GUI only sees one SSD.  So back to Powershell I used the following commands to create the Virtual Disk.

$vd1 = New-VirtualDisk -StoragePoolFriendlyName "Data" -FriendlyNameTieredSpace -StorageTiers @($ssd_tier, $hdd_tier) -StorageTierSizes @(900GB, 1.5TB) -ResiliencySettingName Mirror -WriteCacheSize 1GB

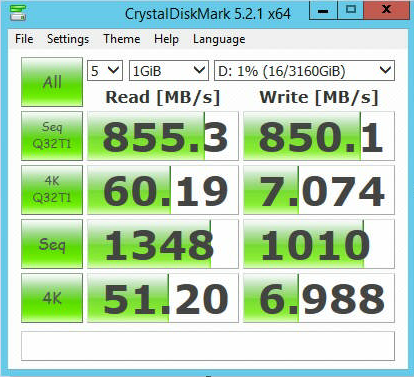
This will create the virtual disk and it will show up in Storage Spaces and then you can attach the disk in Storage Spaces.  You can then expand the Virtual Disk to use the full extent of the Storage Space if you want.  I have a total allocated space of 3.09 TB and according to CrystalDisk Benchmark it sure looks like it's running properly (logging into the virtual servers also is way faster).


As you can see all the drives are in good health it sees all the NVMe SSDs.  I haven't verified what happens when I pull out a drive but am expecting it to work well (I'll have to schedule another test to verify this).

Here is are some benchmarks one REFS and the other NTFS.  I'm going to stay with NTFS for now but when we update to server 2016 I will probably push to use REFS.


REFS Benchmark

NTFS Benchmark

****UPDATE****

If your using Windows 10 and want to setup storage spaces you need to use "Windows Storage*" instead of "Storage Spaces*"


Removing Show Recent History and Recently Open Documents from Windows Explorer

How to remove the Recent History and Recently Open Documents from Windows Explorer Using the Registry Editor Press the Windows Key + R, type...