
The project was to view and monitor a hidden public area where someone was stealing DVD movies; and they were leaving RFID tags in the area that is going to be monitored. A company can spend a few thousand dollars on a security system, but it would also require an additional few thousand dollars worth of setup in the proposed location which was not practical.
Reasons I went with iSPYConnect
- The budget, it almost non-existent
- No wiring required except for power
- Microsoft Hyper-V server for setting up the iSPY Server
They did have a Windows 8 Key and Install Disk for use in the Hyper-V System that was not being used, so I created a basic VM with 8GB of Dynamic Ram, 2 core processor and 120GB drive for the OS and 500GB drive for the video storage. The camera that was selected was a D-Link DCS-2530L for monitoring the location.
Specs on the D-LINK DCS-2530L
- 180° Field of View
- 1080p HD Quality Video
- Unique De-Warping Technology
- Sound and Motion Detection
- Local Recording via SD Card
- Night Vision
 |
| D-Link DCS-2530 Picture Quality |
Configuring the Camera
There are a couple of things to keep in mind at least in this use case. I had to set the camera to a constant 1 constant mbps bit rate at 720p quality. Anything more then that and the camera had disconnection issues with the ispy software and I also used the VLC and setting it to the other setting (excellent) was just compressed so much it was not usable.
 |
| D-Link Home Page |
 |
| RTSP Streams |
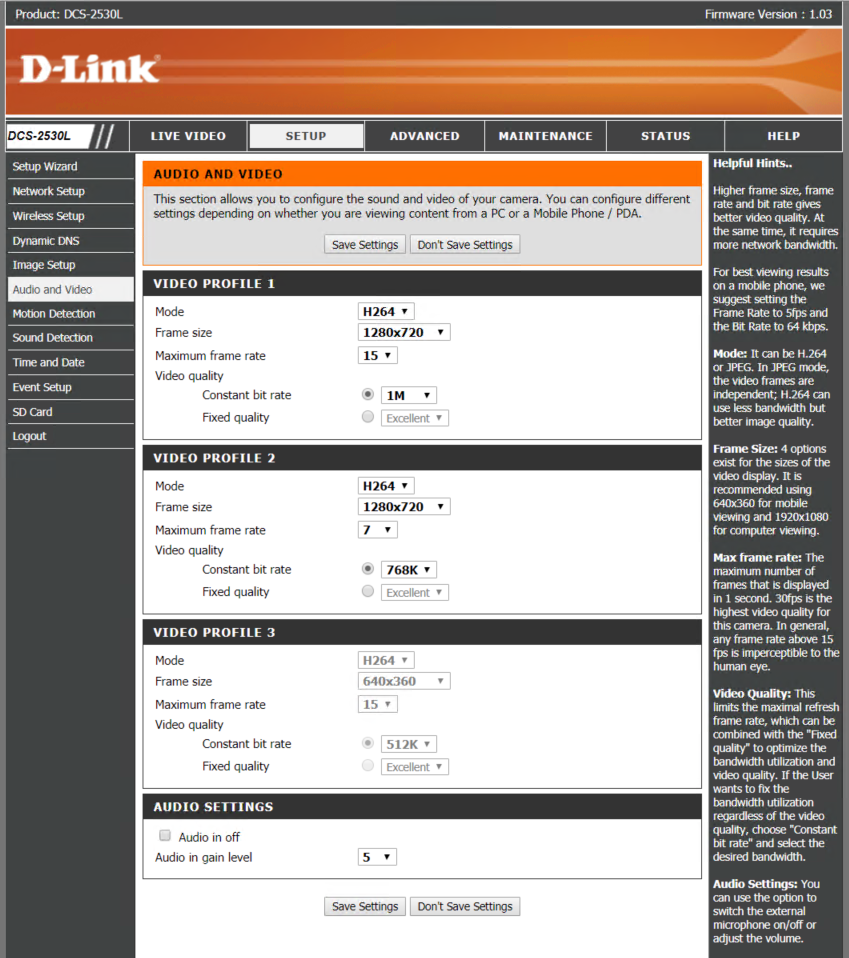 |
| Camera Configuration |
In the setup by default ispy tries to use mjpg for the video capture which is just to slow, I was getting framerates of 0.6 to 0.8. To resolve this problem I used the VLC Stream capture feature in ispy, for this I disabled the basic security features in the camera to access the stream as it seems to break when I turn it on. Then using the VLC plugin, I was getting 7 to 9 FPS which is good enough for what we were looking to get. This camera has 3 possible feeds as you can see by the RTSP streams listed above. You can also test these streams by using VLC Player and open the stream. rtsp://$IPADDRESS:554/live1.sdp
Quality Comparison
 |
| Default Settings Using IP Camera Wizard |
 |
| VLC RTSP Stream |
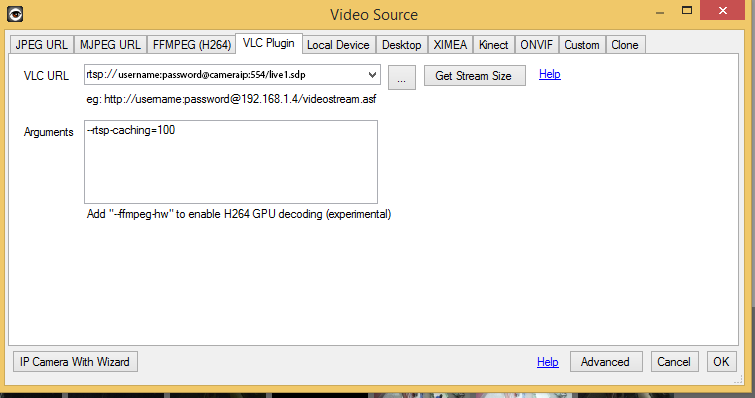
Configuring iSPYConnect to use RTSP Streams
How to setup iSpy to use RTSP with a D-Link 2530L video
With the D-Link 2530L the rtsp stream does not come up using the IP Camera wizard so we need to manually add the RTSP stream to iSpy.
Add a camera and select VLC Plugin in the tab.
With the D-Link 2530L the rtsp stream does not come up using the IP Camera wizard so we need to manually add the RTSP stream to iSpy.
Add a camera and select VLC Plugin in the tab.
Once that is done you can configure the rest of the settings how you like it is very straight forward. By default it keeps the videos for 72 hours before deleting them.
I did this using Hyper-V but you could also do this on a Mac or Linux system using another virtualization system such as virtualbox or kvm, it is up to you what you use and what you have available to you.
I did this using Hyper-V but you could also do this on a Mac or Linux system using another virtualization system such as virtualbox or kvm, it is up to you what you use and what you have available to you.
About iSPYConnect
Started back in 2007 the software has continually evolved and improved to become a robust, feature rich solution.
The number one use of iSpy is small business security, but home monitoring, neighborhood watch, checking in on the kids, desktop monitoring, nanny-watch and mobile access through a iSpyConnect.com are valued features.
Facial recognition and detection of changes in lighting and audio offer the subtleties that set the software apart from competitors.
Getting started with iSpy is easy: all you need is a webcam or IP camera connected to your computer or network.
iSpy connects to the camera and shows the live view. You can then define specific areas of the video that iSpy should watch for movement, and set a threshold value for the amount of motion that would trigger automatic recording. iSpy can also operate in always-recording or manual-recording modes and supports scheduling and remote access (with an iSpyConnect subscription)
iSpy was designed to provide a low-cost alternative to expensive surveillance systems. It has become a highly scalable application that can be tailored to record and take actions on specific incidents as defined by the user either locally or remotely.


