Wednesday, February 24, 2021

Using Ring Central to setup curbside phone queuing


Covid-19 has been a big pain for everyone with many businesses and organizations trying to offer services during the pandemic.  A change for a library was the need for call cueing due to a number of users coming at the same time for pickup.  So in this case the organization wanted a call cue for up to 9 people with no voicemail, and a pre-recorded message they would get when dialing the number.  Also we have to use a cell phone number that is already in use and didn't have account access to at the time.

To use the phone number on the current cell phone is easy; we just enabled call forwarding on the phone but the other features required would be much more challenging.  The organization doesn't have a pbx that they control, and they are only wanting to use the service for a few months.  I knew that ring central could do lots of the things that were desired but I didn't know if it could do it in the process they wanted it.

Here is how they organization wanted it to work.  A single phone/user that could have the option of transferring the call to a lan line or another user.  The call cue should be able to handle up to 9 users and answer them sequentially also NO VOICEMAIL!  The phone would only work during operating hours.  It has to be easy to use.  I am going to go over and show the settings I used to get it working the way they wanted.

It is worth noting that ring central does have a 15 day trial which I had signed up for then realized that the trial did not do the call queuing; the call queuing is only available on a non trail basis.  I dealt with a helpful rep Jace Henderson, he was able to help us out with what was needed.  I had originally setup a trail account which did not do any of the call queuing features that I was looking for.

Once your setup you have to go through and make some changes so it comes in line with what you want for your business.  The login is simple get an email asking you to activate your account, once activated you get an email with a temporary password.  Then you login.  The login allows you to use your phone number or email address you used to setup the account.


Once your logged in a wizard starts and you can follow it to fill out the information required by ring central.  I skipped most of the wizard with the exception of the E911.  This account was setup for use at a single location.  After the initial setup the UI is pretty simple but I did find myself going around in circles occasionally looking for some of the recorded call settings.


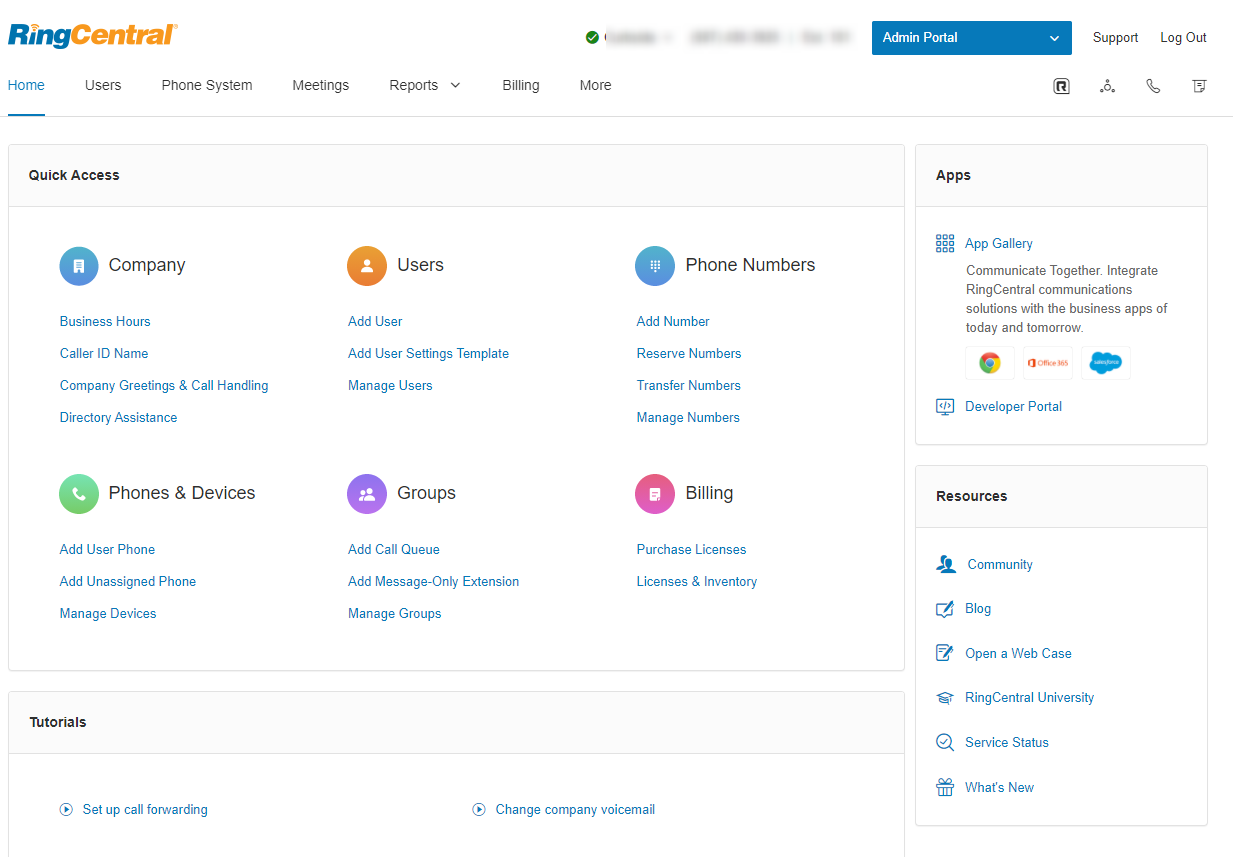
From the quick access menu we adjust the business hours to the hours we want or are defined by the organization.

You may want to change your caller id as there is a limit of 15 characters.  The name of the organization was being cut off so they changed the caller id to a shortened version of the name.

The real settings for the call queuing is in the groups settings.  Once you create a group, you can then assign a number or numbers to the group to handle the queued calls.


When you click on the group you have a number of settings you get to setup.  We will be going through all of the settings starting with Call Queue Details


Call Queue Details - General Settings

In this situation the organization is only using one user and they happen to be the manager.

Call Queue Details - Settings

In the settings, I setup the business hours and changed the regional settings.

Direct Numbers

I made no change to the Direct Numbers options.


Greeting and Hold Music

Here is where I made lots of changes to the settings.  Using audacity and a good microphone I had pre-recorded some scripted text with some good voice talent.  The organization changed the Call Queue Greeting, the Interrupt Prompt and the After Hours Call queue greeting.


To upload or record a new greeting you select the edit then hit the record button


Then when you hit the record button you will have three options for changing the audio.  You can get a phone call where ring central will record the call, using your computer microphone or importing which accepts .wav or .mp3.  I chose to use the last option.  You will need to do this process for any audio you want to customize or change from the preset defaults provided by ring central.


Call Handling & Members

For the call queue you need to add a member, in this case the default user as we only have one user.  


Auto-Receptionist

The auto receptionist settings were pretty simple, I just make sure that zero dialing went to the user extension and company hours were set with the general company hour settings we set before.

User Settings

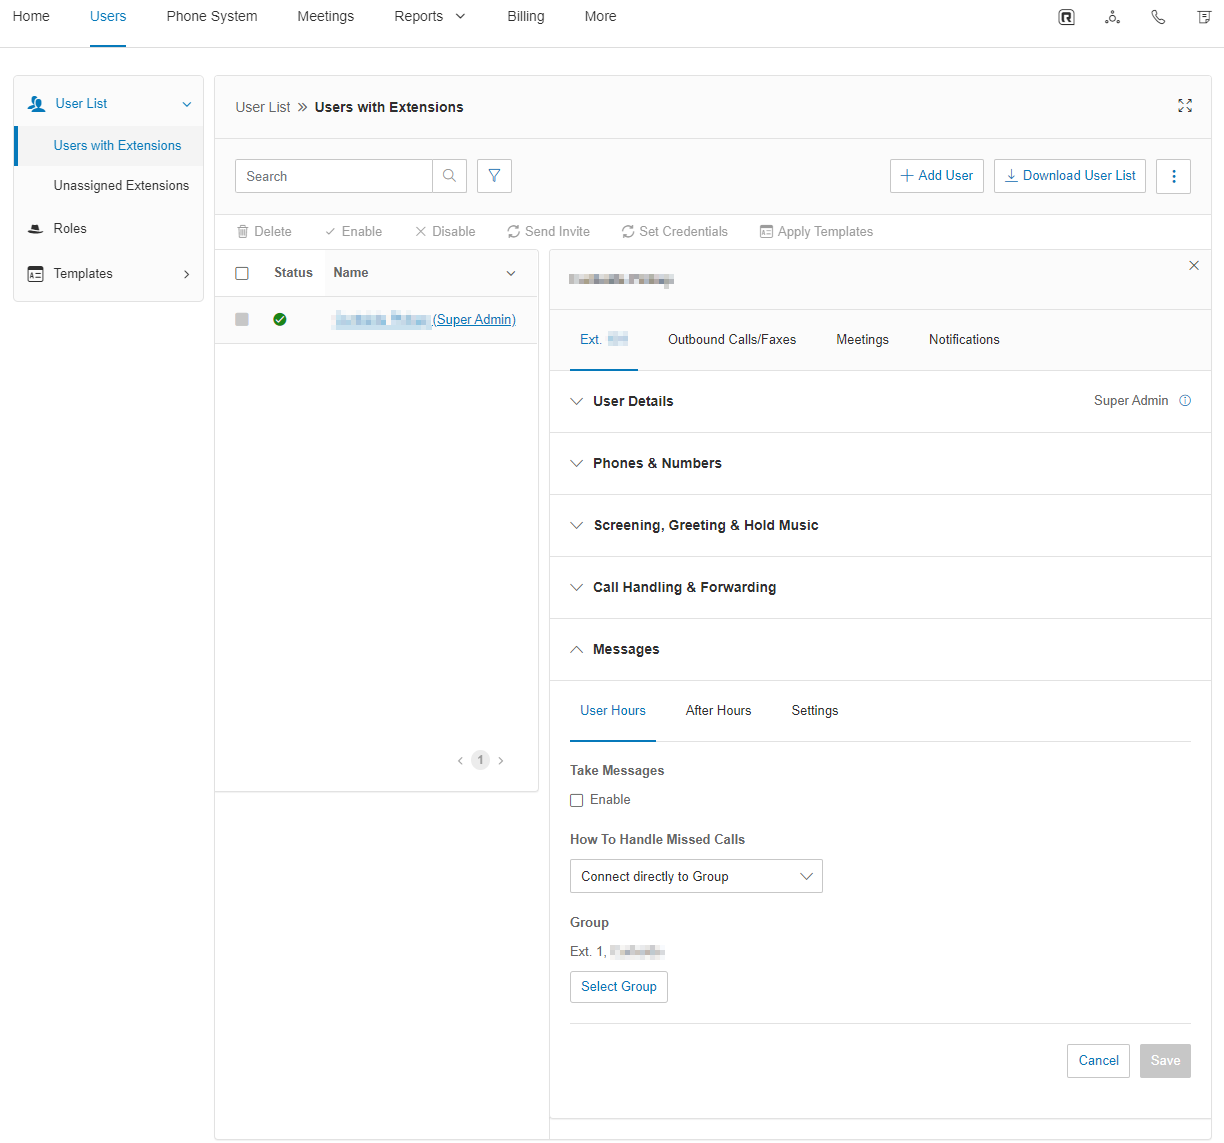
This is where you can disable voicemail, you need to edit to user and go to messages.  Uncheck Take Messages, then change the How To Handle Missed Calls to connect directly to Group and select the group.


You also need to make changes to the Call Handling and Forwarding, changing the incoming calls to a sequential order and I changed the ring for 15 Rings and enabled a 30 second break between calls.


Along with Screening, Greeting & Hold Music


Users with Extensions

There is one more place that you can add business hours and it is in the Settings & Permissions section of the Users with Extensions.  So when a user should be off they no longer get phone calls and can have different hours from the phone group and the business.


This setup has the following process.  During operating hours the user calls the cell phone number which is then forwarded to the Ring Central Account Mainline, where they press 0 or are automatically forwarded to the default extension.  Where the call is then answered or put into a queue if the phone is busy where they stay in the queue until the phone is available.  The caller is not able to leave a voice message, so must stay in queue or hang up and try again.  If they call during non-operational hours they the user gets a message saying that the organization is closed, the user gets the operating hours then disconnects.  If there are more then 10 users in the queue the user will get a message saying there is higher than expected call volume and to try again later.  It's not pretty but it does work.

Thursday, February 18, 2021

Acrobat Update Breaks Office Save As PDF Button


Acrobat update 17.011.30175 breaks the com add-in for office 2016.  Doing a fresh install of acrobat 2017 without the update the com add-in works as you would expect but upon installation of the update you get the error shown below.

You can view the full video here.  https://youtu.be/WIP6EQsKsQo

while I don't have a fix for this you can mitigate any issues by users by disabling the add-in in your office applications by going File -> Options -> Add-ins -> select manage COM Add-ins and press go


Then uncheck the offending add-in which is Acrobat PDFMaker Office COM add-in and hit ok


This will remove the Save as PDF option from the file menu, though it doesn't fix the issue users will not encounter the error because the menu option is not available.

Adobe Acrobat 

https://docs.microsoft.com/en-us/office/troubleshoot/third-party-add-ins/incompatibilities-between-office-and-adobe

https://www.adobe.com/devnet-docs/acrobatetk/tools/Labs/cleaner.html

https://community.adobe.com/t5/acrobat/unable-to-find-quot-adobe-pdf-quot-resource-files/td-p/8749598

Remove Acrobat Plugin

https://support.microsoft.com/en-us/office/add-or-remove-add-ins-in-excel-0af570c4-5cf3-4fa9-9b88-403625a0b460

Monday, January 25, 2021

Managing VM Storage On A Hyper-V Cluster

Managing storage on a cluster can be pretty dry but it is a challenge to keep your data files from becoming a sprawling mess much like my desktop.  File duplication from copies, backups, even testing VMs can create a confusing mess.  When it comes to your virtual machines and their storage you should make sure that you do everything you can to keep everything together; otherwise your not only asking for trouble. Microsoft has some great tools for managing your virtual machine storage and you should use them otherwise you could easily end up with duplicated virtual disks which could be outdated and can cause you all sorts of issues.

Sprawling Desktop Mess
My Messy Desktop

In my case I want to move several VM's off of a storage server called STORAGE1 and move them to STORAGE2 as shown below.  Now before I go head and move these because I am cautious and paranoid; I make a backup of said VM, in this case let's say it's VM1.  I run a export out of the cluster node to which the VM is on (or you can move it to the node your on) and run a full export to a usb drive I have connected.  

VM File Management

Wanting to keep your File System Organization nice and clean, I highly recommend that you pre-setup your folders where you want to move your VM, so on STORAGE2 I would create a folder called VM2 and inside that folder I created a folder called Virtual Hard Disk.  The Cluster Server Manager will move your files but it won't create the same folders, the cluster storage manager will just put everything in a single directory, and I myself prefer to keep the default structure as much as possible.  So on Storage2 my directory pathing is setup like this.
STORAGE2 -> VM2 -> Virtual Hard Disk


As you can see below I have the Failover Cluster Manager open and I have the roles menu selected.  Here is where you can modify your Clustered Role Storage


Right click on the selected VM and Select Virtual Machine Storage as shown below.


You will get a dialog box showing you where the virtual machine storage resides.  Then you drag and drop the virtual machine storage elements into the folders on the left as shown below.

Once you move all the items to the new storage locations press start.  This will take some time to process which also depends on the VM and the size of the VM disk etc.  Obviously the larger the VM is the longer the process will take.  Unfortunately there isn't any progress bar to tell how where the progress is on the moving of the VM storage, but the text on in the information section will disappear when the process is complete.  You can run this while the VM is live, though I do recommend shutting down the VM then move it; but that is just me being extra cautious.


Once your VM has finished moving the folders on the storage server where the VM was will still be there but will be empty.  I do recommend tiding up after and removing these unused folders as shown below.  This really beats the alternative of removing the role of the VM on the cluster and moving your backed up file to where you want it on the storage and resetting up the role.


Thursday, January 21, 2021

Fix For Kaspersky Security Center 11 Error Opening localhost:13291


Kaspersky Security Center Error Failed to establish connection with the
remote device (location: http://localhost:13291) connection has failed

Kaspersky Security Center 11 Error

SQL express is great if you have to run or install programs such as Kaspersky Security Center, however if you don't turn on your Database maintenance scripts you can have a problem with your database getting to large and it will run out of space.  This will cause security center to stop working which is a problem.  As you can see the SQL database only has .64 MB of space available, which is why Kaspersky Security Center crashes and won't launch


Below is how I came to fix my issue with Kaspersky Security Center when my SQL express database got to full.  If your looking for the really quick fix, using SQL management Studio run 

TRUNCATE TABLE dbo.wus_upd_metadata

on your Kaspersky Security Center Database mine is called KSC then shrink your database in sql management studio.  This will get your Kaspersky management studio back up and working, however my process to getting to the fix is below so enjoy!


I started the troubleshooting process by making a copy of the av server, in this case since it is a VM, I did an export and set it up on a different host and setup the virtual switch to be an Internal switch so I can transfer files using the VM host.

With the database being SQL Express and it being completely full I had to upgrade the edition of SQL server to a trial or developer database.  You will also need SQL Management Studio.  Since this is a copy of the production system, I upgraded the database to sql 2016 dev edition from 2014 express edition to run a shrink database script.  Since I am using SQL Server Express 2014 we will be upgrading to SQL Server 2016 developer edition to get Kaspersky Security Center to load so we can shrink the database.  You will need a myvisualstudio account to download the iso, in my case for SQL Server 2016

Run the installer and select Installation -> Upgrade from a previous version of SQL Server


Select The edition, I am changing from express to developer edition


Accept the terms of use


If your offline, you will get an error about not being able to contact Windows Update Service.  You can continue


Then you will get a list of checks for upgrade rules and warnings/errors if there are any


Select your sql server instance you want to upgrade


Select the features you want to upgrade


Select your instance configuration


Then upgrade your sql server


Now that the system is upgraded we need to reboot to enable the changes


After our reboot Kaspersky Security Center will now run because the dev version give you more space then express so I used this to do some checking on the database and to see if Kaspersky could shrink the database enough to go back to express.


Now we can run the script to shrink the database.  Under Administration Server go to tasks and database maintenance.  You can view this article on Kaspersky's support website


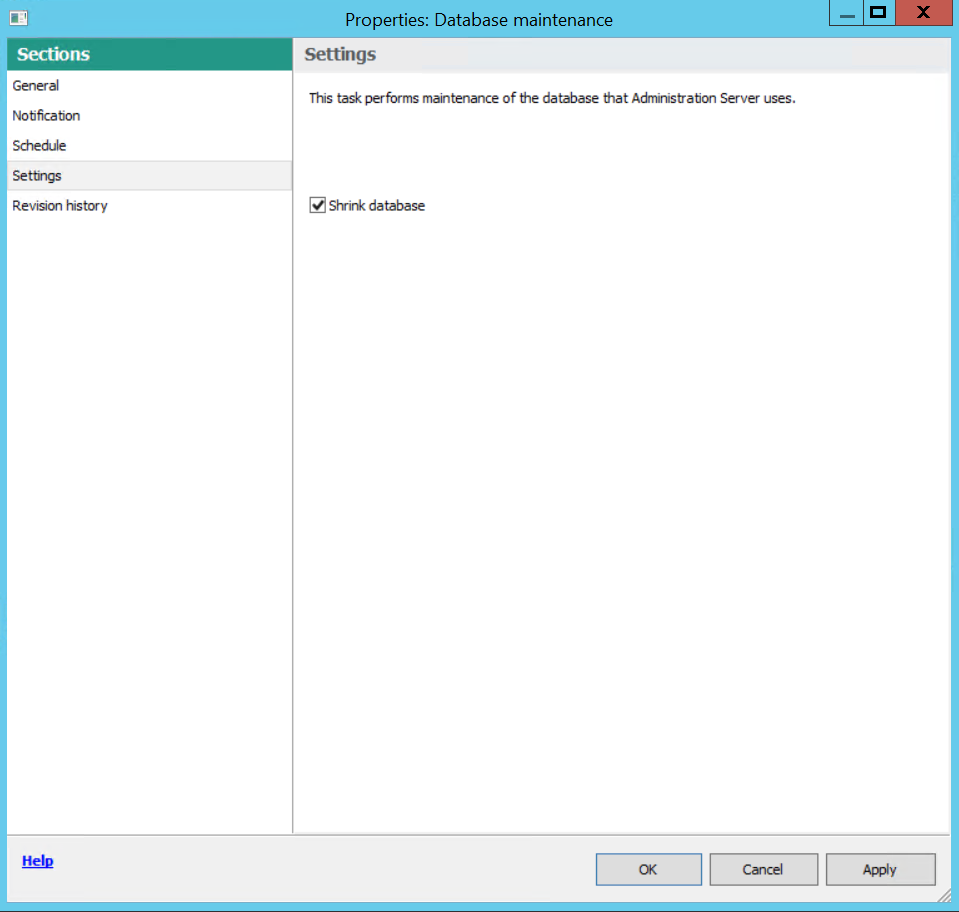
To enable shrinkage on the database right click on Database Maintenance -> go to properties -> Settings and make sure shrink database is checked.


then hit apply and ok.

Now we will run a maintenance script which was provided by Kaspersky, which can be downloaded from my server here.  However if you do want to get a hold of this I recommend opening a ticket with Kaspersky at support.kaspersky.com

In an administrator cmd prompt

go to the extracted folder path in commnad line, I put the script in C:\Users\Administrator\Desktop
run start.cmd


After running the script our database is now down to 9925.44 Mb with 2.66 MB of available space not much but it should be able to run on our system now.  However I do think that this problem will come up again so I needed to find a way to prune some of the data in the database.


The next set of processes you will need Microsoft SQL Server Management Tools.

What I did was run a sql query to find our largest tables.  Here is a great script from https://dataedo.com/kb/query/sql-server/list-10-largest-tables which I used to find the largest table.

select top 10 schema_name(tab.schema_id) + '.' + tab.name as [table], cast(sum(spc.used_pages * 8)/1024.00 as numeric(36, 2)) as used_mb, cast(sum(spc.total_pages * 8)/1024.00 as numeric(36, 2)) as allocated_mb from sys.tables tab join sys.indexes ind on tab.object_id = ind.object_id join sys.partitions part on ind.object_id = part.object_id and ind.index_id = part.index_id join sys.allocation_units spc on part.partition_id = spc.container_id group by schema_name(tab.schema_id) + '.' + tab.name order by sum(spc.used_pages) desc;


We see that the table dbo.wus_upd_metadata is our largest table with 4 gig of data being stored there.  Now I don't work for Kaspersky but I would guess that wus has probably something to do with Windows Update Services and I would bet it isn't critical to running Kaspersky Security Center

Table Nameused_mballocated_mb
dbo.wus_upd_metadata4270.234271.41
dbo.wus_upd_prerequisite1907.661907.79
dbo.ev_event1399.921402.85
dbo.wus_upd_driver1178.421178.52
dbo.wus_upd_revision489.21489.78
dbo.wus_upd_file123.76124.68
dbo.wus_upd_product118.73119.44
dbo.wus_upd_digest73.4173.72
dbo.wusx_upd_revision41.9143.09
dbo.wus_upd_superseded41.2842.24

Then I ran a new query TRUNCATE TABLE dbo.wus_upd_metadata, then I shrank the database using sql management studio.


After that we can see our database is now about 6Gb in size and to reclaim the space by right clicking on the database (KSC) and selecting Tasks -> Shrink -> Database


Once the database was finished shrinking you can see the properties on the database.


Now I don't want to run into this problem again, so I am going to go into Files and change the Autogrowth/Max Size to 1% and 8192MB for storage.


Now this process will work for fixing you Kaspersky Security Center if you happen to run out of database space, however it has a great side effect of upgrading your version of SQL server.  In this case going from 2014 to 2016.

Truncating the database table dbo.wus_upd_metadata and shrinking the database did not seem to have any major effect on our AV software, as now we can now go in and manage Kaspersky Security Center.


Thursday, January 07, 2021

Giving User and Group Management Permission in Google Workspaces


Google workspaces has made it much easier to delegate tasks or give users such as HR administrators and personnel permissions for creating users and email groups.  

This can be handy in a small or large organization and has be done with Microsoft using snap-ins for Active Directory for a long time.


Some basic permission for a user to be able to do this they need essential four rolls.

  • User Management Admin
  • Help Desk Admin
  • Groups Reader
  • Groups Editor

Once given permission to the users and the groups, a user can then add and remove users, add and remove users to groups, create and rename groups without being able to access any other area in google workspaces such as organizational units, machine and domain management etc.

Microsoft SQL Management Studio Connection Parameters

Connecting to an SQL server remotely is pretty easy but occasionally you might need some additional help, such as if your sql database uses a non standard port.  You have a couple of options for logging into your sql server but I'm going to cover 2 ways of connecting using the Database Engine login method.


As shown if you change the server type to Database Engine then you can put either the machine name or IP address (I have ipaddress because it's easy) with a comma then the port; if your database uses a NON-STANDARD Port (something other then 1443) make sure there are no spaces before or after the comma as shown above.  Set the Authentication method to SQL Server Authentication, put in your database username and password, then connect.

The second method is using the "Additional Connection Parameters".  You must have the database hostname or ip in the server name, then select options.


You will see a number of tabs that will be displayed and you want to select "Additional Connection Parameters" but be warned this is sent in clear text.


You can then put in your connection parameters in the box displayed above.  You can't just put in the connection string you do have to put in the server name or ip in the server name field on the login tab; once that is done the Connection string overrides the GUI settings.

below is a sample connection string:

SERVER=$IP,$PORT;USER=$DBUSER;PASSWORD=$DBPASSWORD

A successful connection will then be displayed in the Object Explorer as shown below.


Wednesday, January 06, 2021

iTiva import error from Horizon ILS generated notices file

illion i-tiva automated phone software is pretty good but it is quirky.  After disabling the Phone Holds in the iTiva software we started getting import errors; but it wasn't a consistent failure.  As shown in the activity log shown below there was a successful import then 2 failures.


After further investigation by looking at the past notices located in the i-Tiva archive folder, I determined that i-Tiva requires a 1:1 mapping for the notices export from the ILS (in this case Horizon) to the notice.csv file.  When is imported into itivia.   With the covid-19 shutdown it was decided that we would disable the software from making calls when holds were available.  This was not disabled in the ILS and was being included in the generated notices.csv file. With the holds block "$HOLDSBLOCK" being included in the file, the import fails.


"V","","$HOLDSBLOCK","$HOLDSBLOCK","2222200*******","","Frist Name","Last Name","780-***-****","","**","Library Location","3222200*****","13/1/2021","Book Title.","*****-******"

After testing if the the file only had the block "$OVERDUEBLOCK" the import was successful.

"V","","$OVERDUEBLOCK","$NOTICEBLOCK1","2222200*******","","First Name","Last Name","780-***-****","","**","Library Location","3222200*******","19/12/2020","Book Title /","*****-*****"

To fix the export you have to make an edit in the Horizon Table Editor on the Telephone Messaging Control Block.


To apply the fix disable the For: hold notice.  It should appear unchecked as shown below.  That will fix your issue.


A special thanks to Mary Schmidt at SirsiDynix who worked with me as we determined the cause of the issue.

Tuesday, January 05, 2021

AD Time drift - and how to fix it


Over a period of time and windows updates especially if your using a virtualized ad controller or a mix of hardware and vm controllers, time can start to drift.  If your maintaining your own time server good on you but most of us don't; we sync to a time server and occasionally it needs to be resynced.  

After four years and several power outages this happened to a physical and virtual active directory controller, they had a time drift of over 2 minutes and it was causing issues with DNS and DHCP.


To check your current timesync settings open regedit and go to 

\HKEY_LOCAL_Machine\SYSTEM\CurrentControlSet\Services\W32Time\Parameters

You will find a parameter called NTPServer


As you can see in the image above, the ntpserver value is set to time.windows.com. 

The following command will update your server time and set your NTP server to timerserver1 and timeserver 2 which can be any valid time servers you want it to be.

C:\Windows\system32>w32tm /config /syncfromflags:manual /manualpeerlist:"0.time.timeserver1.com 1.time.timerserver2.com"

This will update your NTPServer value with the time servers you specify in timeserver1 and timeserver2.

You can check your windows task scheduler to see if you have had any issues with running the time sync by go to.

Task Scheduler -> Microsoft ->Windows -> Time Synchronization

You will want to run this on both Active Directory controllers and it should fix your time sync issue.

Tuesday, December 08, 2020

Setting up email activesync using SAGE


I was asked to lend a hand with an IT project a friend had.  They were having some trouble getting email syncing to work the way the client wanted.  They are younger and had started their own IT business to I thought I'd lend a hand and help them thought this one small job.  To be completely fair their client wasn't exactly forth right with their setup.

The client insisted that they were running everything off office 365 and they had configured their sage email to pull from O365 along with outlook.com, their iPhones and outlook desktop client; and were having sync issues.  This was not the case.

They had signed up for Office 365, but were using sage as their email server.    They had configured their mx record on their domain to be the sage email servers much like I had setup for a client when they setup their shopify site; they had setup a DNS alias on their domain host and had their MX records pointing to SAGE.  Since they were on the non-premium tier they had a limited amount of email space (compared with O365) with only 5GB


The web based outlook accounts were setup to be personal email accounts and would have to be dealt with or transfered to use the O365, but only once the mx records were changed to be O365.  The DNS TTL is set to 60 minutes so that should be updated before the DNS change so that any update that is done happens quickly such as 600 and changed back after the migration.  I recommend that happen after the email syncing got sorted out.

The easiest thing to do was to The first thing that was done was to make sure email was working on the email clients.  Email clients on the web, phones and desktop outlook were configured to be POP3 with the phone and web client configured to leave messages on the server.  My friend had already tried to change the emails over to imap by SAGE's own email documentation and was unsuccessful.  The email would not refresh in acceptable period of time or did not sync at all which is why he asked for  my help.  After checking and trying the imap accounts again and verifying there was something causing it not to sync or be accessed.

Since imap was not an option, on the web or email clients, we moved the client over to activesync which did work but the client no longer had web email for a time.  I recommended that they setup a time to do the email migration to O365 after they had updated the TTL for the domain to 600 seconds.  

I explained that to avoid email interruption it would probably be best to setup another email account for this users and alias the accounts to the new O365 emails.  Since the TTL would be set to a low time when the DNS record got changed there would be a 5 minute window where email could "be lost" but was unlikely if it is done in an "off hours time".  

I also recommended setting up new email inboxes and aliasing the current emails to the new 365 accounts, that way email forwarding could be setup on the SAGE servers and if some providers were caching the DNS record it would then catch the email in two places and send the email over to the new email address and then decommission the sage email after about a week.

The activesync setup for iOS and Desktop client were working perfectly.  We left the email for the web client (outlook.com) configured for POP3 but it did not appear to be working.  It also didn't help that the accounts for outlook.com were all setup as personal accounts but would be fixed when the email migration to 365 was complete.

Additional Information for SAGE Integration with Exchange Server

https://support.na.sage.com/selfservice/viewContent.do?externalId=23758&sliceId=1

Removing Show Recent History and Recently Open Documents from Windows Explorer

How to remove the Recent History and Recently Open Documents from Windows Explorer Using the Registry Editor Press the Windows Key + R, type...