Thursday, October 05, 2023

Upgrading a Veeam Backup Server Running Windows 2012R2

How to do an in place upgrade of server 2012R2 to 2016 and then upgrading Veeam from Version 11 to version 12.

Step 1 - Downloaded the software below.

  • Server 2016 Standard Edition, With Key on Hyper-V host
  • Veeam Backup and Replication V12, - on VM
  • Veeam Data Platform Essentials,  -on VM
  • Veeam Licience - on VM
I did the upgrade in the following order
  1. Upgrade to server 2016
  2. Upgrade Veeam backup and Replication
    1. Upgrade Enterprise Manager
    2. Upgrade Veeam

 Step 2 - Disable all backup and replication jobs


Step 3 - Backup the System

Since this is a VM I shutdown the system and did a full export, incase I have to roll back.


Step 4 - Upgrade to server 2016.  Since this VM is on a cluster I will need to remove it from the cluster roll first.


Once removed I can add the server 2016 disk to the VM


Now I can startup the machine and start the upgrade process


Mount and run the DVD and start the upgrade process.


I selected server 2016 Desktop experience


Select keep personal files and apps otherwise it will remove Veeam.


Once the system is ready, you will have to confirm the upgrade as it recommended to do a clean install of the system.  However for this system we need to do a in place upgrade.


When the install is successful, you will see it is upgraded to server 2016.  You may need to activate your system again so have your windows key ready.


Activate Windows - Change the product Key and Activate


After the upgrade Veeam should be horribly broken.   We can however proceed with the upgrade.


Mount the Veeam ISO and begin the upgrade.  We need to upgrade Enterprise manager first and we may need up run the installer a couple times rebooting after installs.  Click through until you start the install process.


Once the system has installed and rebooted we will update.  Re-Run the Veeam 12 installer and update anything else that needs to be updated as shown below.  

After the upgrade the SQL Server agent may have been set to disabled because of the server 2016 upgrade.  You will have to change it back to automatic or manual depending on how you want to run your system.  Then run the Enterprise Manager and finish the setup.


Proceed to upgrade the Enterprise Manager


After the upgrade we are now able to access the Enterprise Manager


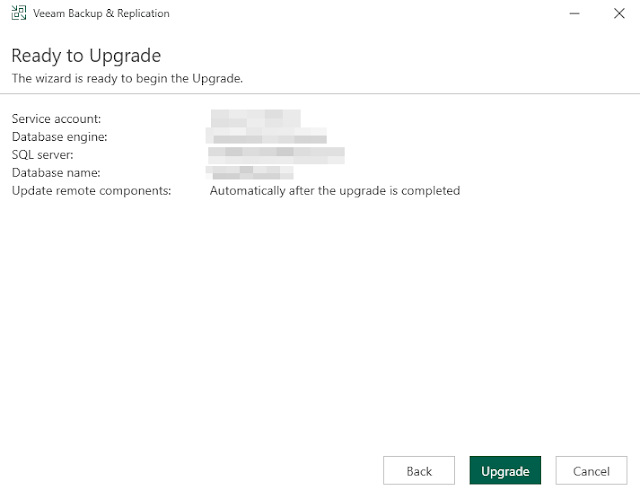
Now we will upgrade the Backup & Replication part of Veeam


Once the installer finishes launch the backup & replication console; re-enable your backup jobs and update the clients on any systems you are running backups.


After launching the software 
you may encounter a permission error when trying to access the Veeam storage server and replication server.  This is due to some hardening Microsoft did to mitigate an exploit.
Access Denied. (Exception from HRESULT: 0x80070005 (E_ACCESSDENIED))

After looking into the error I found that this was caused by a security update in Windows 

https://www.veeam.com/kb4185

https://forums.veeam.com/veeam-agent-for-windows-f33/dcom-hardening-on-windows-server-june-cu-t81317.html

It turned out to be a DCOM error and to fix the issue you need to add a registry key on the Hyper-V Hosts using Veeam.  In regedit go to the following path:

Path : HKEY_LOCAL_MACHINE\SOFTWARE\Microsoft\Ole\AppCompat

add the following key as a dword 32bit (without the quotes): 

"RequireIntegrityActivationAuthenticationLevel" and set the value to 0

Once that is done the update to Server 2016 and Veeam 12 is complete.


The backups will start working like it has always been running server 2016 and Veeam 12.

Saturday, September 02, 2023

Fixing Windows Network Connection when nothing appears to be wrong

How to fix a network connection on Windows when nothing appears to be wrong.

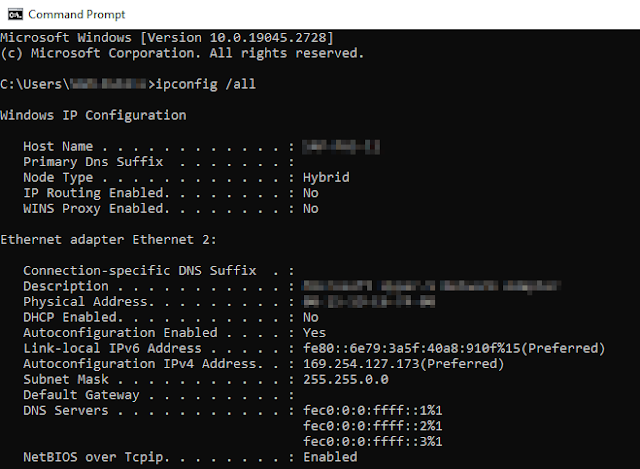
So recently a system running Windows 10 22H2 just lost it's network connection on boot up.  The PXE boot worked fine but when the system got into windows it would just get a 169.X.X.X address when running a ipconfig


Upon further investigation it appears the RPC Server has stopped working


While there are a number of reasons why this can happen, the fix that worked for me was restarting the services in order.

Restart Services

  • Application Layer Gateway Service – Manual Triggered
  • Network Connections – Manual
  • Network Location Awareness  –  Manual
  • Plug and Play – Manual
  • Remote Access Auto Connection Manager – Manual
  • Remote Access Connection Manager – Automatic
  • Remote Procedure Call (RPC) – Automatic
  • Telephony – Manual

After that run these command as administrator though powershell or cmd prompt

net localgroup administrators localservice /add

net localgroup administrators networkservice /add

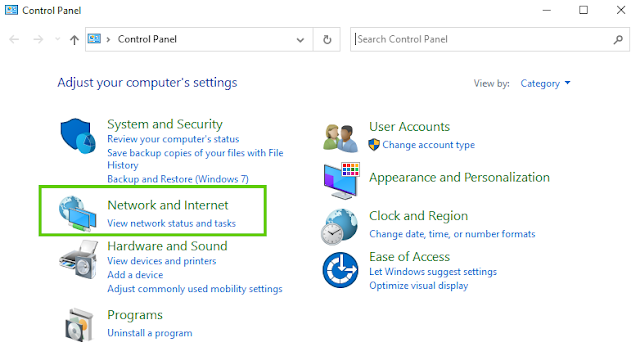
Then in explorer go to the networking settings in control panel


Then go to Network connections and run the diagnose and repair.


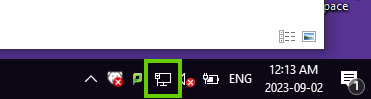
Once that has been run, and the system is rebooted you should get an ip address and the network icon should be showing up in the taskbar.


Sources

https://www.thewindowsclub.com/the-dependency-service-failed-to-start-on-windows-10#google_vignette

Monday, August 21, 2023

How to setup postfix on Ubuntu Server as a SMTP Email Relay

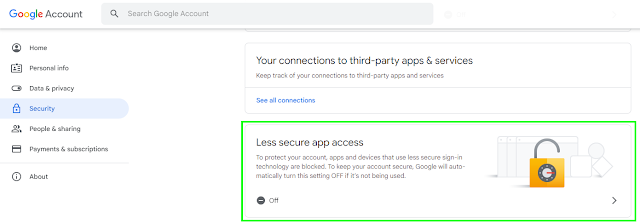
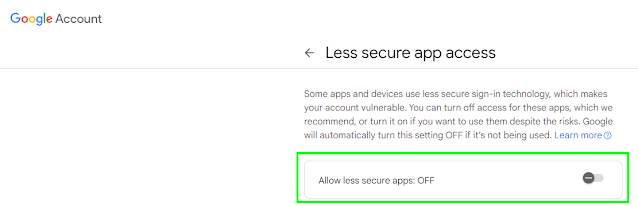
Setting up an SMTP Email Relay or Email Forwarder are used in organizations where applications that need to send email can where it is not dependent on an individual being logged in.  The typical example would be for email marking, but it can also be for the Photocopier in the office or any other number of commonly used devices that people use where it sends email.  The relay service allows you to use a generalized email setup by the organization.  Most commonly these are setup as "no-reply" or something to that effect.  To facilitate the setup of the mail forwarder/relay we will be using a Google Non-Profits email account.  The first thing you will need to do is setup the account, then login to the account and setup the account for use with "less secure app access".

Create the account, and set the password.  In this case I am using something called myemailservice


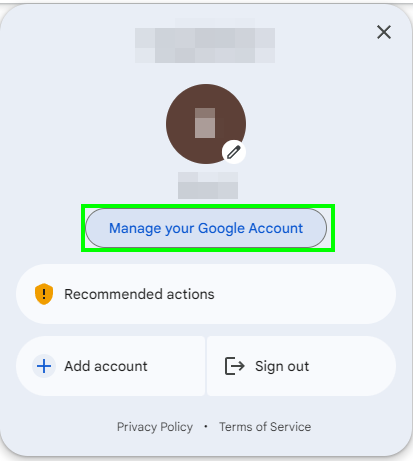
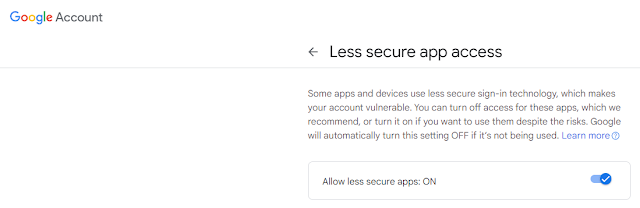
Then login to the account and setup "less secure app access" you can do this by using this link https://myaccount.google.com/lesssecureapps or by managing your Google Account as shown below.


Once that is done we can now do the setup for our relay server.  I am setting it up on Hyper-V using Ubuntu 22.04LTS.  I have given it 2 cores, a min 2GB Ram with dynamic memory management up to 8GB and a 40GB drive.  Obviously, networking, etc, etc, etc.  Also because it is linux don't forget to change the security boot setting to Microsoft Cert Authority.


When installing Ubuntu Server I am going to do my typical setup; minimized, no GUI, Live patching, vim, Powershell and ssh access for the default install.

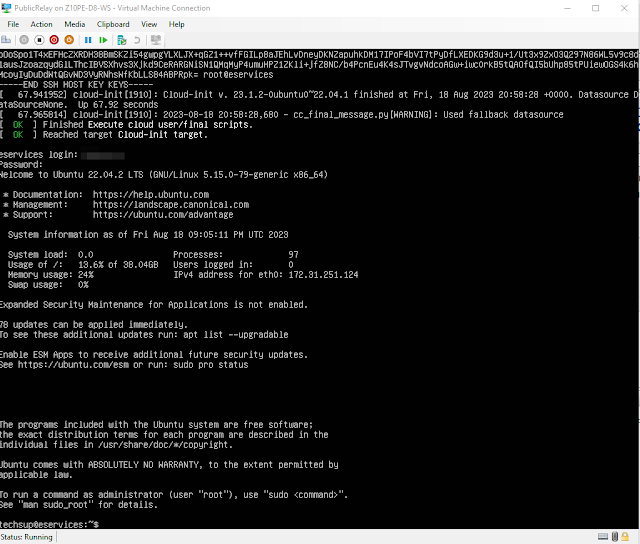
After installation login and update the system, and set your timezone.  By default ETC is typically used.  If you know your timezone like I do you can manually specify it.  

sudo timedatectl set-timezone America/Edmonton


To verify the setting use the command timedatectl or ls -l /etc/localtime


Now we will install our postfix smtp relay

Install Postfix

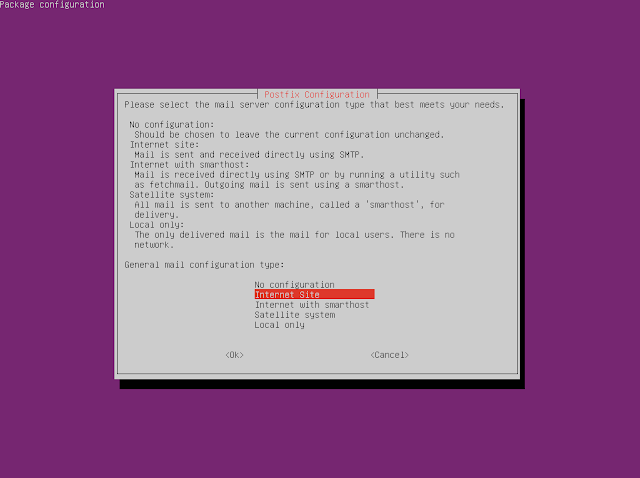
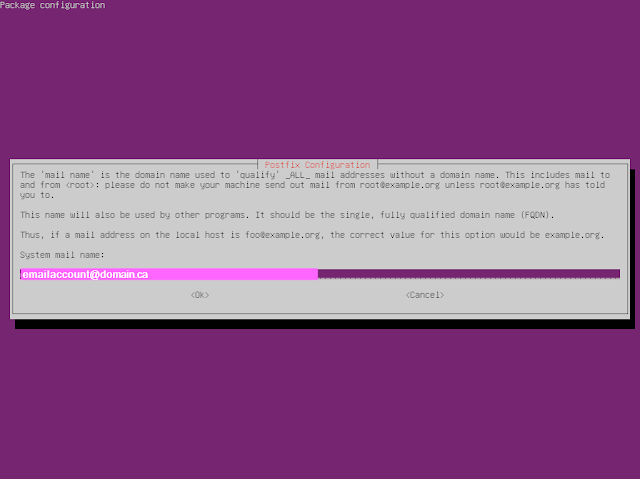
sudo apt-get install postfix and set the mail configuration to "Internet Site"


Postfix doesn't natively support SASL authentication so we must install a module for SASL authentication support.  You can read more about it here

https://www.postfix.org/SASL_README.html

 sudo apt-get install libsasl2-modules postfix mailutils


Once installed we need to configure post fix.

sudo vi /etc/postfix/main.cf and set myhostname to the FQDN


Then we need to add the following

relayhost = [smtp.gmail.com]:587

smtp_sasl_auth_enable = yes

smtp_sasl_password_maps = hash:/etc/postfix/sasl_passwd

smtp_sasl_security_options = noanonymous

smtp_use_tls = yes


Also don't forget to add any networks you want to be able to send email from via smtp.  You will have to add the host or network range to the mynetworks variable as shown below.


Now we need to make our password map.  This will allow us to connect to the google account we are going to use to send the emails via smtp.  The file will be located in /etc/postfix/sasl_passwd

sudo vi /etc/postfix/sasl_passwd

in the file put the following

[smtp.gmail.com]:587 $youremailaccount:$accountpassword

and save and exit.

Change the permissions of the file so it is only readable by root

sudo chmod 600 /etc/postfix/sasl_passwd

restart postfix to apply our changes.

sudo systemctl restart postfix

To test our setting use the following 

echo "This is a test email body." | mail -s "Subject" -a "From: $fromemail@yourdomain.ca" youremail@domain.ca

I also use this depreciated powershell command for testing as well

Send-MailMessage -From '$fromemail@domain.ca' -To '$toemail@domain.ca' -Subject '$SomeSubject' -smtpserver 'DNS or IP to relayserver' -port '25'

Here are some important commands you will want to keep when using the relay server

postqueue - p

run all messages 

sendmail -q

get mail queue

postqueue -f 

flush the mail queue


Sources

https://support.google.com/accounts/answer/6010255?hl=en#zippy=%2Cif-less-secure-app-access-is-on-for-your-account

https://www.faqforge.com/linux/how-to-relay-email-from-postfix-mail-server-to-gmail-on-ubuntu/

https://www.cyberciti.biz/faq/how-to-configure-postfix-relayhost-smarthost-to-send-email-using-an-external-smptd/

https://www.tutorialspoint.com/configure-postfix-to-use-gmail-smtp-on-ubuntu

https://blog.iron.io/how-to-flush-a-postfix-mail-queue/

Tuesday, August 15, 2023

Fixing windows that has slow desktop loading after restart or cold boot

Fixing windows that has slow desktop loading after restart or cold boot


I've recently encountered an odd issue where a laptop would boot up and be on be stuck on the "Please Wait" Screen when booting.  It would eventually get to the desktop but only after a time range of 30 minutes to 3 hours of waiting.  Running repair utilities such as sfc, chkdsk, and a variety of 3rd party tools did not do anything to resolve the issue.  In fact the tools were saying the drive was just fine; the drive is an SSD and the utilities reported the drive to be in good condition.  So I removed the drive from the laptop and connected it to my workstation where I ran disk utilities on the SSD, and it passed all tests; so I re-imaged the SSD to a new SSD, with the same boot result.  I did a test with adding a new ssd and doing an install of windows; the performance was better but it still took about 4 minutes to get to the desktop.


Being unsatisfied with this result, while not wanting to deal with this issue a few months down the road I thought I would try one thing before going the route reinstalling windows and all the default apps route, I opened the laptop, left the SSD installed on the laptop.  I re-installed the original ssd with all the user's data on it, unplugged the power to the laptop and the laptop battery.  I then pressed the on button for the laptop and kept holding it for 30 seconds (just to be safe) to discharge the laptop's capacitors.  Once I discharged the capacitors on the laptop and reconnected the laptop battery and turned on the laptop the system booted to the windows desktop in about 10 seconds.  So not only did this save me from having to reinstall windows, all the default organization applications and transfer the users data, the system performed better then it had in months.  The next time your having slow boot times, try discharge the capacitors it might save you a lot of time.

Monday, July 31, 2023

Using powershell to get the status a a machine using Faronics Deep Freeze


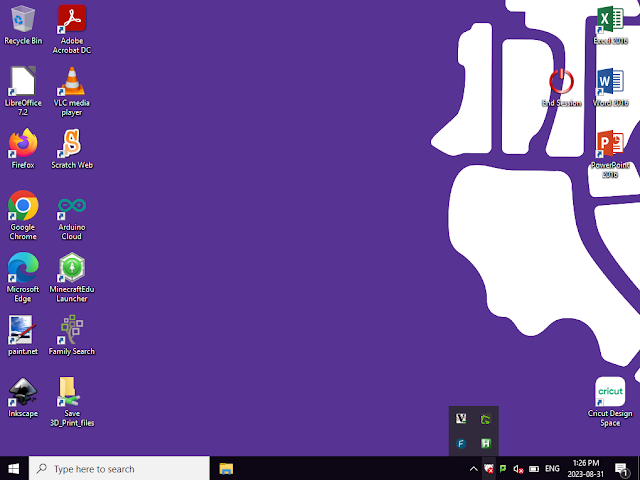
I work with a few organizations that use Steady State software and most of them use Faronics Deep Freeze.  Deep freeze works pretty well for the use case which is securing publicly available computers. So not keeping any passwords, resetting software etc.  However one problem hat has come up with using the software is when doing updates you have "un-freeze" the computer, and even with deepfreeze cloud (at least my experience has been) there is a delay in the system updating if a machine is frozen or thawed.  In some cases taking up to 30 minutes; however that was some time ago and Faronics may have improved that.  However due budget cuts at a few of the organizations I work with they are just using Deep Freeze on Prem with no cloud service.  The only notification you get as to the status of deep freeze is a little bear head on the task bar.


The Bear head with out the X means the system is Frozen (steady stated)  The bear with the X means the system is unfrozen and changes can be made to the system.

There has been more then one occasion that a system has been worked on and left in a un-frozen state after the work has been updated.  So to remedy this problem I created this powershell script 

Freezestatus.ps1

#Get the latest deep freeze log

$event = Get-WinEvent -LogName Application | Where-Object {$_.ProviderName -Match 'Deep Freeze'} | select -first 1

#write the status to an xml file

$event.ToXML() | Out-File -FilePath C:\comptools\status.xml

#wait 3 seconds before you get the item status

Start-Sleep -s 3

#Load the XML file

[XML]$xmlfile = Get-Content C:\comptools\status.xml

#Check the value of the XML file see if it is "Thawed"  If it is send an alert to the IT Department

if ($xmlfile.Event.EventData.Data -eq 'Thawed'){

#Put any alert/code you want to use here in this example I have a window popup; I would recommend sending an email or updating some sort of dashboard with the system status.

Add-Type -AssemblyName PresentationFramework

[System.Windows.MessageBox]::Show('Thawed')

}

Friday, July 28, 2023

How to setup a ITC 5400 Paystation (Coin-Op) for use with papercut


I've recently just setup a new Coin-Op and printer to use with papercut. It is very fancy taking debit, credit bill and coins. This post will guide you though the settings for configuring the Coin-Op for use with Papercut and the settings for using credit/debit.

To start there is a config file from the vendor ITC.  It should be located in the “root/extensions/credit-sources” folder.  The filename is X5400CreditSource.properites. The papercut print release system communicates to the coin-op using a USB to Serial cable. I've had very good success with the FTDI chipset for these cables.


It has all the setting for communicating with the Coin-Op

##########################

## DEVICE CONFIGURATION ##

##########################


#

# Serial port identifier

#

port=COM3


###############################

## SERIAL PORT CONFIGURATION ##

###############################


#

# Baud rate to use on serial port

#

baud-rate=9600


#

# Data bits to use on serial port

#

data-bits=8


#

# Stop bit to use on serial port 

#

stop-bits=1


#

# Parity to use on serial port. Options are: 

#    [0] none 

#    [1] odd

#    [2] even

#    [3] mark

#    [4] space

#

parity=0


############################################

## ADVANCED CONFIGURATION; AVOID ALTERING ##

############################################


#

# Maximum number of write attempts to serial port (if the first should happen to fail)

#

retries-write=10


#

# Maximum number of read attempts to serial port (if the first should happen to fail)

#

retries-read=10


#

# Maximum number of tries to receive a valid response from the device

#

retries-valid=5


#

# Timeout for connecting to serial port

#

timeout-connect=750


#

# Timeout for reads/write to serial port

#

timeout-device-response=1000


#

# Timeout for receiving a valid message from device

#

timeout-messenger-receive=1500


#

# Time to wait for controller thread to finish 

#

interval-wait-end-session=750


#

# Time to wait before reading response once signaled its available

#

interval-wait-read=100


#

# Time to wait for RMI server to start

#

interval-wait-rmi=250


#

# Polling interval for response availability

#

interval-poll-messenger=25


#

# Polling interval for available credit

#

interval-poll-controller=50


#

# Interval for retrying read/writes

#

interval-retry=25


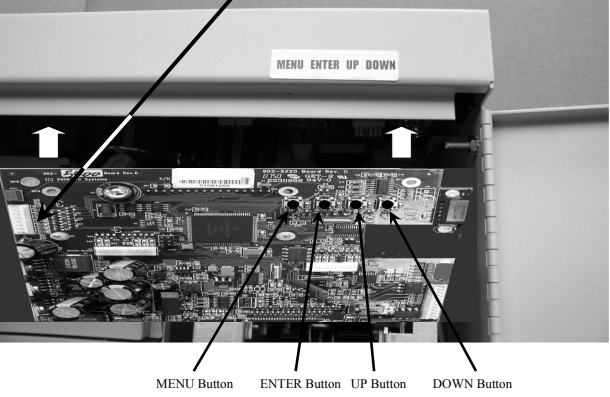
Ensuring thatOn the coin-op there are 4 buttons moving and modifying settings as shown below.


The MENU button moves you back a menu if you're in a level deeper than the first level; Enter will take you down the levels of the menu and UP/DOWN with cycle you though the menu or allow you to change options.  Below are what some typical settings could look like for the coin-op to operate properly and are what the costs are. You will note I have the cash and the credit price set as the same.  You can make these prices different for the different types of payment formats. It depends on what you want. In this case I want the price to be the same if you are paying with either cash or credit. Please note these settings can only be modified when the Coin-Op is in bypass mode and making changes to these settings require rebooting the Coin-Op.  This is done by pulling the power cable.


System Setup -> Com3 Parity -> Set to NONE

Print Type -> Set to Protocol 1 (Papercut Connection)

Prices Cash -> line 1 Cash cost -> $1.00 (black and white)

Prices Cash -> line 2 Cash cost -> $2.00 (colour)

Prices Credit -> line 1 Credit cost -> $1.00 (black and white)

Prices Credit -> line 2 Credit cost -> $2.00 (colour)

Coin Changer -> Return Escrow -> Anytime (cash return - coins)

Print Setup -> Com Port? -> Com 1 (Printer Connection)


Papercut communicates with the Coin-Op though COM 3 any printer setup to charge for coping would typically use COM 1.  The papercut communication is enabled though the Print Type-> Protocol 1 which uses the COM 3 port for this post.


If you are setting up a new coin-op that you are charging people for copying/printing this should get you up and going.


Tuesday, July 04, 2023

How to upgrade a graphics card.

I had setup a computer about 12 years ago to be used as a cad station.  I had just recently updated it's hard drive from a 500GB SATA HDD to a 1TB SSD. 

Here are the Specs


The video card being replaced is an ATI V4800 Fire Pro with 1 GB of Video Ram

https://www.techpowerup.com/gpu-specs/firepro-v4800.c572

With updated system requirements Revit 2023 Video card requirements are

Video AdapterBasic Graphics:
Display adapter capable of 24-bit color

Advanced Graphics:
DirectX® 11 capable graphics card with Shader Model 5 and a minimum of 4GB of video memory

https://www.autodesk.com/support/technical/article/caas/sfdcarticles/sfdcarticles/System-requirements-for-Autodesk-Revit-2023-products.html

The Fire Pro is being replaced with a Nvidia 1630 which is about 80% faster or almost 5X Faster; dispite the 1630 being a 64bit Videocard vs the 128bit V4800.


So the first step is to remove any software before uninstalling the driver in this case we need to remove the CCC (Catalyst Control Center) then we can remove the display driver for the system.


You will want to removal ALL AMD Software


Uninstall All Versions


Once the uninstaller has finished I selected no because I also want to ensure the software driver was removed.  

Once verified I shutdown the system.  Replaced the V4800 with the Nvidia 1630.  Installed the driver and verified Revit could see the card. 


If you are replacing a Nvidia videocard with an AMD videocard; follow the same process but make sure all the Nvidia software is removed before you install the AMD Videocard.


Fix a windows network printer that is offline

How to fix a network printer that get's installed and shows offline. By default SNMP is set to public, so when you are installing a netw...