Showing posts with label SMTP. Show all posts

Monday, August 21, 2023

How to setup postfix on Ubuntu Server as a SMTP Email Relay

Setting up an SMTP Email Relay or Email Forwarder are used in organizations where applications that need to send email can where it is not dependent on an individual being logged in.  The typical example would be for email marking, but it can also be for the Photocopier in the office or any other number of commonly used devices that people use where it sends email.  The relay service allows you to use a generalized email setup by the organization.  Most commonly these are setup as "no-reply" or something to that effect.  To facilitate the setup of the mail forwarder/relay we will be using a Google Non-Profits email account.  The first thing you will need to do is setup the account, then login to the account and setup the account for use with "less secure app access".

Create the account, and set the password.  In this case I am using something called myemailservice


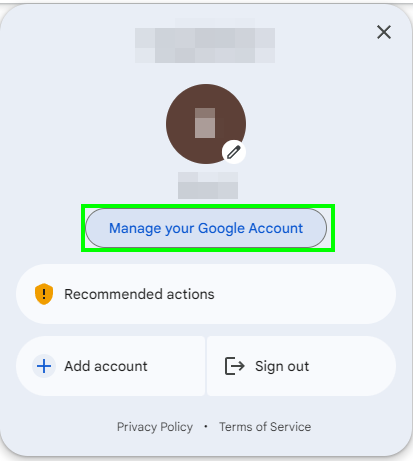
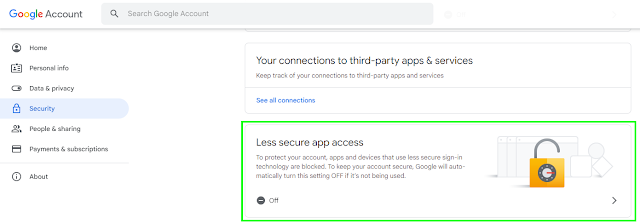
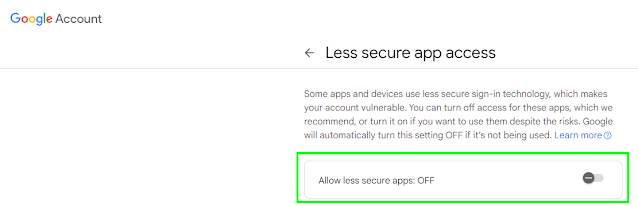
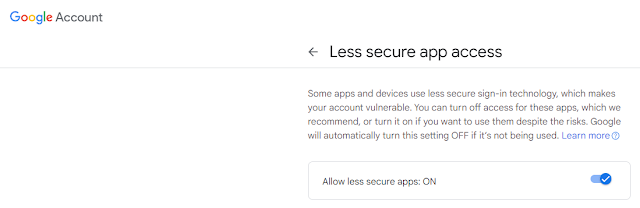
Then login to the account and setup "less secure app access" you can do this by using this link https://myaccount.google.com/lesssecureapps or by managing your Google Account as shown below.


Once that is done we can now do the setup for our relay server.  I am setting it up on Hyper-V using Ubuntu 22.04LTS.  I have given it 2 cores, a min 2GB Ram with dynamic memory management up to 8GB and a 40GB drive.  Obviously, networking, etc, etc, etc.  Also because it is linux don't forget to change the security boot setting to Microsoft Cert Authority.


When installing Ubuntu Server I am going to do my typical setup; minimized, no GUI, Live patching, vim, Powershell and ssh access for the default install.

After installation login and update the system, and set your timezone.  By default ETC is typically used.  If you know your timezone like I do you can manually specify it.  

sudo timedatectl set-timezone America/Edmonton


To verify the setting use the command timedatectl or ls -l /etc/localtime


Now we will install our postfix smtp relay

Install Postfix

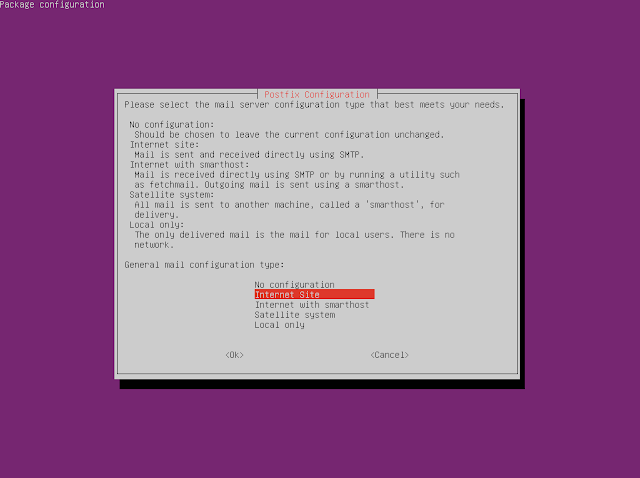
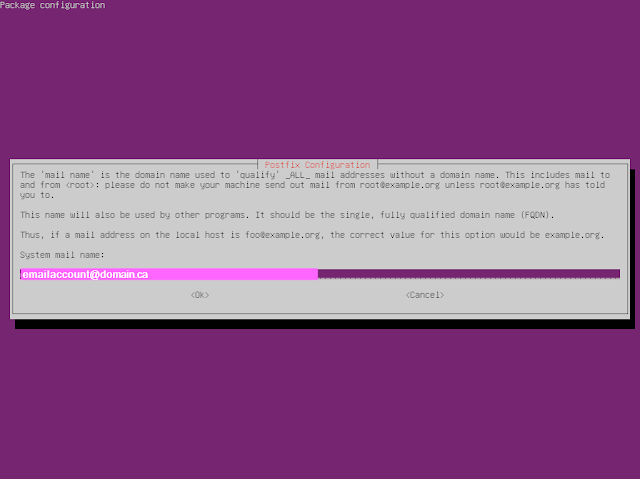
sudo apt-get install postfix and set the mail configuration to "Internet Site"


Postfix doesn't natively support SASL authentication so we must install a module for SASL authentication support.  You can read more about it here

https://www.postfix.org/SASL_README.html

 sudo apt-get install libsasl2-modules postfix mailutils


Once installed we need to configure post fix.

sudo vi /etc/postfix/main.cf and set myhostname to the FQDN


Then we need to add the following

relayhost = [smtp.gmail.com]:587

smtp_sasl_auth_enable = yes

smtp_sasl_password_maps = hash:/etc/postfix/sasl_passwd

smtp_sasl_security_options = noanonymous

smtp_use_tls = yes


Also don't forget to add any networks you want to be able to send email from via smtp.  You will have to add the host or network range to the mynetworks variable as shown below.


Now we need to make our password map.  This will allow us to connect to the google account we are going to use to send the emails via smtp.  The file will be located in /etc/postfix/sasl_passwd

sudo vi /etc/postfix/sasl_passwd

in the file put the following

[smtp.gmail.com]:587 $youremailaccount:$accountpassword

and save and exit.

Change the permissions of the file so it is only readable by root

sudo chmod 600 /etc/postfix/sasl_passwd

restart postfix to apply our changes.

sudo systemctl restart postfix

To test our setting use the following 

echo "This is a test email body." | mail -s "Subject" -a "From: $fromemail@yourdomain.ca" youremail@domain.ca

I also use this depreciated powershell command for testing as well

Send-MailMessage -From '$fromemail@domain.ca' -To '$toemail@domain.ca' -Subject '$SomeSubject' -smtpserver 'DNS or IP to relayserver' -port '25'

Here are some important commands you will want to keep when using the relay server

postqueue - p

run all messages 

sendmail -q

get mail queue

postqueue -f 

flush the mail queue


Sources

https://support.google.com/accounts/answer/6010255?hl=en#zippy=%2Cif-less-secure-app-access-is-on-for-your-account

https://www.faqforge.com/linux/how-to-relay-email-from-postfix-mail-server-to-gmail-on-ubuntu/

https://www.cyberciti.biz/faq/how-to-configure-postfix-relayhost-smarthost-to-send-email-using-an-external-smptd/

https://www.tutorialspoint.com/configure-postfix-to-use-gmail-smtp-on-ubuntu

https://blog.iron.io/how-to-flush-a-postfix-mail-queue/

Wednesday, August 02, 2017

Creating a GMAIL SMTP Relay Server Using Ubuntu On Hyper-V

Encrypted Email
You can view my video on how to Setup an Encrypted GMAIL Relay Server using Sendmail here.  There is also a great blog post found here but I had to make some modifications to get it to work properly on my lan for other systems.

More and more we are moving to secure services that were never intended to be secure; E-Mail is one of those challenges.  Not every body supports it but we are moving to it, along with our push for https on all websites.  This post will deal with a couple of things to setup a Linux Sendmail SMTP Relay server on a Hyper-V Host using a corporate Google Apps account.  The reason for the SMTP Relay is because of an ancient piece of software that does not do SMTP Authentication so we have to setup something that can be mostly secured.


To start your going to need a google apps account, I'm using Microsoft Server 2012R2 for the Hyper-V host and Ubuntu 16.04.2 for the virtualized sendmail relay server.


To start we need to make sure we have TLS setup in our Google Apps Account.  When you login to your google account It can be found in APPS -> GSUITE -> Settings for Gmail -> Advanced Settings.  Scroll down to just above routing.


Edit Secure Transport Compliance
Now for this setup I've applied TLS to all outgoing traffic for one email address no_reply; that is the email I'll be using for the relay server.


TLS Settings
TLS Settings

Once that is all setup we can start working on our virtualized Ubuntu server.  This is a 16.04.2 LTS running on Hyper-V.  Of course verify that you have all your Hyper-V guest tools installed and enabled.  Then we are going to want to install sendmail, mailutils, and sendmail-bin


sudo apt-get install sendmail mailutils sendmail-bin
Once installed we will be working out of the /etc/mail directory.


/etc/mail directory
First make a directory call authinfo this is where we are going to create and save our file for our gmail authentication.  Inside the folder we are going to create a file called gmail-auth

inside gmail-auth we are going to have the following.

AuthInfo: "U:root" "I:youremail@domain.com" "P:PASSWORD"
so for the purposes of this example.

AuthInfo: "U:root" "I:no-reply@domain.ca" "P:ThisISmyPASSWORD"


Now we make our hash.


my location is /etc/mail/authinfo

sudo makemap hash gmail-auth < gmail-auth
/*------This is not necessary any more unless your making a------*/
secure sendmail relay for your own domain.

Now we need to make a relay-domains file edit the sendmail.mc and access files so we can do a cd ../ or /etc/mail

We will start with the relay-domains file and are going to put the domains you want to relay, just like the sample below with each domain on a separate line. more information can be found at http://www.sendmail.org/~ca/email/doc8.12/cf/m4/anti_spam.html

domain1.com
domain2.com

/*------Continue After This Point------*/

Save the file and now edit sendmail.mc


my location is /etc/mail - editing sendmail.mc

You will want to go to lines 57 and 59 in the sendmail.mc file and comment them out.


Before Commenting

After Commenting
Now we want to enable access to our access control database to blacklist networks we don't want to have access to our Sendmail relay (If there is any firewall rules allowing it which there shouldn't be)
FEATURE(`access_db'), `hash -T /etc/mail/access')dnl
We're going to come back to this guy later and blacklist the networks we don't want to have access to the relay.  You could also blacklist everything but the host you want to allow to forward.  This must be set if we are going to use relay_hosts_only.

then We are going to specify some special resolver options
https://docstore.mik.ua/orelly/other/Sendmail_3rd/1565928393_ch24-46068.html


define(`confBIND_OPTS', `WorkAroundBrokenAAAA -DNSRCH -DEFNAMES')dnl

We are going to open up our sendmail server to allow relaying of mail from other machines on our network.

UPDATE

After coming back to this after the weekend to put into production, I discovered that having the relay_hosts_only option only allows for internal emails, which it didn't when I was putting this together but it doesn't work to domains outside the organization anymore which doesn't work for what I need it to do so I had to enable FEATURE(`promiscuous_relay')dnl

I did not want to do this but I need to be able to send emails out to other addresses then my own domain.  However blacklisting in the access file does still blockout networks you don't want to access the 

/*------This is not necessary any more unless your making a------*/
secure sendmail relay for your own domain.

***/---I've made the sendmail server more secure using relay_hosts_only---/***

define(`confCR_FILE', `-o /etc/mail/relay-domains')dnl << - $=R
FEATURE(`relay_hosts_only')dnl


More information on relay_hosts_only

FEATURE(relay_hosts_only) Normally domains are listed in /etc/mail/relay-domains; any hosts in those domains match. With this feature, each host in a domain must be listed.

FEATURE(access_db) This enables the hash database /etc/mail/access to enable or disable access from individual domains (or hosts, if FEATURE(relay_hosts_only) is set).

for more options and details go to http://www.sendmail.org/~ca/email/doc8.12/cf/m4/anti_spam.html


define(`confCR_FILE', `-o /etc/mail/relay-domains')dnl << -$=R
FEATURE(`relay_hosts_only')dnl 

/*------Continue After This Point------*/

/***-----------------------------   Put the following in your sendmail.mc   -----------------------------***/

FEATURE(`promiscuous_relay')dnl 
define(`SMART_HOST',`[smtp.gmail.com]')dnl
define(`RELAY_MAILER_ARGS', `TCP $h 587')dnl
define(`ESMTP_MAILER_ARGS', `TCP $h 587')dnl
define(`confAUTH_OPTIONS', `A p')dnl
TRUST_AUTH_MECH(`EXTERNAL DIGEST-MD5 CRAM-MD5 LOGIN PLAIN')dnl


define(`confAUTH_MECHANISMS', `EXTERNAL GSSAPI DIGEST-MD5 CRAM-MD5 LOGIN PLAIN')dnl

FEATURE(`authinfo',`hash -o /etc/mail/authinfo/gmail-auth.db')dnl

Your sendmail.mc file should look something like this 
SENDMAIL.MC

Now save your file and edit your access file.  I changed the local connection access to reject so the server itself can't send email.

Reject Localhost


At the bottom of the access file the networks I want to blacklist.


###Custom###


Connect:192.168.1                    REJECT
Connect:172.16.4                      REJECT
Connect:172.31.248                  REJECT
Domain.com                              RELAY


Save your access file


Run sudo sendmailconfig.  This will recompile sendmail, access and restart the sendmail service.  If you get no errors then test your configuration computer on your lan that has a sendmail program like Cobian Backup.  When it successfully sends an email you should see something like the result below.


Encrypted Email Via Sendmail


Fixing error 401 Unauthorized IP: $IPADRESS when running apt-get on Linux

 I have a very dated VM that works as a mail forwarder for my organization, it is a Ubuntu Server VM running 20.04 LTS which connects to goo...