Showing posts with label Windows 11. Show all posts

Tuesday, September 22, 2026

Fix a windows network printer that is offline

How to fix a network printer that get's installed and shows offline.

By default SNMP is set to public, so when you are installing a network printer; you need to ensure you have all the information about the printer.  If you don't configure the SNMP of your print driver to the same as the printer it installs but shows up offline.  It also takes forever to install.

There are two ways to approach a resolution to this problem.  Install the driver then change the SNMP in the driver or setup the port and add the printer.  In my case I added the printer first so then I'm going to update the port.


Get the properties of the printer you want to edit in my case the 2525AC and go to ports select the port in use and configure port


Change the SNMP Status from public to what it you need it to be


Hit OK and close the printer properties.  It will take a few seconds but then the printer status will change from offline to ready.


Tuesday, January 13, 2026

Allowing Windows 11 Access to Unauthenticated Shares

Windows 11 prevents you from accessing open SMB shares because they are a security risk.  However sometimes you need to access these unauthenticated shares for a variety of reasons.  Here is how you do that.


Method 1: Use the Local Group Policy Editor 
  1. Open the search menu and type gpedit.msc, then select "Edit group policy" to open the Local Group Policy Editor.
  2. Navigate to Computer Configuration > Administrative Templates > Network > Lanman Workstation.
  3. Find and double-click the policy named "Enable insecure guest logons".
  4. Select "Enabled," click "Apply," and then "OK".
  5. Restart your computer for the changes to take effect. 

Method 2: Use the Registry Editor 
  1. Open the search menu, type regedit, and press Enter to open the Registry Editor.
  2. Navigate to the following path: HKEY_LOCAL_MACHINE\SYSTEM\CurrentControlSet\Services\LanmanWorkstation\Parameters.
  3. In the right-hand pane, find the AllowInsecureGuestAuth value. If it doesn't exist, right-click in an empty space, select New > DWORD (32-bit) Value, and name it AllowInsecureGuestAuth.
  4. Double-click AllowInsecureGuestAuth, set the "Value data" to 1, and click "OK".
  5. Close the Registry Editor and restart your computer. 


Method 3: Powershell Commands

Run the following powershell commands in an elevated powershell window.

Set-SmbClientConfiguration -RequireSecuritySignature $false

Set-SmbClientConfiguration -EnableInsecureGuestLogons $true


Monday, October 27, 2025

Enabling Java Virtual Console on Windows 11 and Windows Server

I wrote a post about bypassing Java MD5 to run Java KVM viewer, well now to get it to run on the latest version of java and Windows you need to disable it completely or have an alternative to using the iKVM Viewer.

With the MD5 algorithm disabled with the new java, you get an application error attempting to launch the iKVM Viewer as shown below.


To resolve the issue you need to open a text editor program as administrator on windows and browse to your JAVA directory a typical default example is 

"C:\Program Files (x86)\Java\jre-1.8\lib\security\"

Open java.security

an go to line 694 and disable the jdk.jar.disabedAlgorithms by putting a # in front of the line as shown below.


You will then be able to run the iKVM viewer as shown below.


Sunday, March 30, 2025

Windows 11 auto login - Updated for 2024


Quick guide: Automatic login in Windows 10

  1. Open the Registry Editor using [Windows] + [R] and “regedit”.
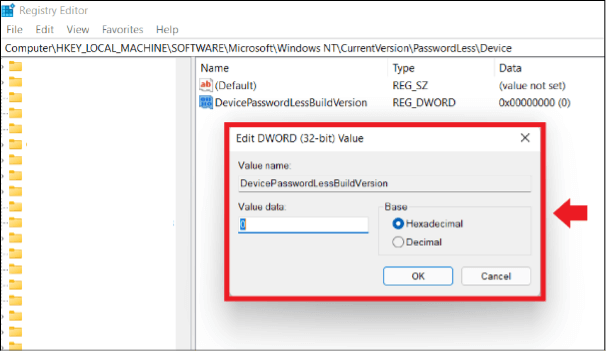
  2. Enter HKEY_LOCAL_MACHINE\SOFTWARE\Microsoft\WindowsNT\CurrentVersion\PasswordLess\Device.
  3. Double click on “DevicePasswordLessBuildVersion”.
  4. Set the value from “2” to “0”.
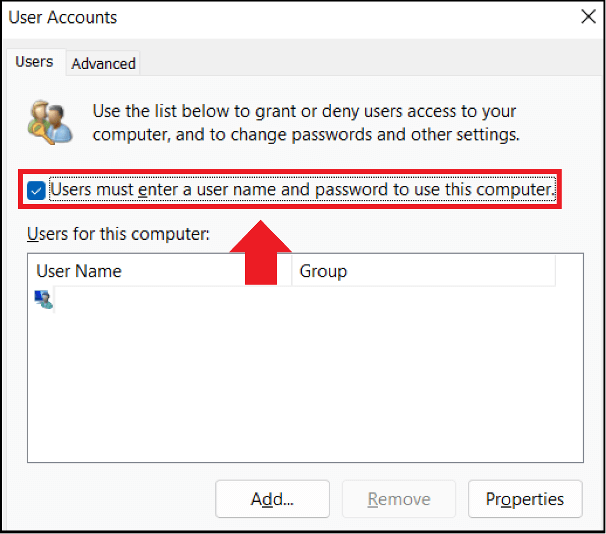
  5. Open User Accounts using [Windows] + [R] and the CMD command “netplwiz”.
  6. Uncheck the box beside “Users must enter a user name and password to use this computer”.

How to set up an automatic login in Windows 11

Follow these steps to set up an automatic login in Windows 11 and remove the password prompt. The steps to set up an automatic login in Windows 10 are identical.

Enable automatic login in Windows 11

Firstly, you must set up the automatic login feature.

Step 1: Open the “Run” dialog box by entering the shortcut [Windows] + [R] and enter the CMD command “regedit”. This will open your system’s Registry Editor.

 Note

Proceed with caution when making changes to the Registry Editor. Unintended changes may permanently alter the system and could permanently damage it in a worst-case scenario.

Step 2: Enter the path HKEY_LOCAL_MACHINE\SOFTWARE\Microsoft\WindowsNT\CurrentVersion\PasswordLess\Device.

Step 3: Double click on “DevicePasswordLessBuildVersion” and change the value from “2” to “0” in the Value data menu.

Disable the password prompt in Windows 11

You can disable the password prompt once you completed the following steps.

Step 1: Open the “Run” dialog box again with the shortcut [Windows] + [R] and enter “netplwiz”.

Step 2: The “User accounts” menu will open. Uncheck the box beside “Users must enter a user name and password to use this computer”.

Step 3: Enter the current password to confirm changes and click “OK”.

Automatic login after stand-by/energy-saving mode

It is even easier to disable the password prompt after waking the device from standby mode. This option is possible without changing anything in the Registry Editor.

Step 1: Open “Settings” with the shortcut [Windows] + [i].

Step 2: Go to the “Accounts” menu and select “Never” in “Login options”. The password prompt will not appear anymore after the device has been woken from power saving mode.


Computer\HKEY_LOCAL_MACHINE\SOFTWARE\Microsoft\Windows NT\CurrentVersion\Winlogon
Find the following entries we will need to edit them

AutoAdminLogon

DefaultPassword

DefaultUserName

if you don't have them we will need to make these entries and set the following values, these are all string entries and will need the following values


AutoAdminLogon and set the Value data to 1


DefaultUserName and set the Value data to $domainuser


DefaultPassword and set the Value data to $userpassword


Add the user in this case "guest" to our guest group on the local machine.

Local Users and Groups


Friday, January 12, 2024

Setting up and Customizing a Windows 11 Start Menu without Microsoft Intune

This post will give you everything you need to customize the windows 11 start menu.  Now typically this is done with intune and Microsoft decided to significantly change the way it handles the start menu and changed it from using an xml file to using a JSON file which is to be used with intune.  Now if you don't use intune; you have a problem.  However this post will go though the options and making a start menu for your Windows 11 clients.  A plus for this is that you don't have to make changes or worry about how it will affect your windows 10 clients.

If your looking at wanting to make a custom Windows 10 start menu you can find that info here https://optionkey.blogspot.com/2018/02/upgrading-active-directory-for-windows.html

In Windows 11 to change to position of the start menu you can do with with a registry entry.

Add a registry Entry called "TaskbarAl" the key goes here 

HKEY_CURRENT_USER\Software\Microsoft\Windows\CurrentVersion\Explorer\Advanced

Value name = "TaskbarAl" the l is a L

It is a DWORD 32bit setting, where 0 is aligned to the left and 1 is centered.


Now for customizing the start menu you setup it up like you would for Windows 10.  Customize it up as a single user then run the powershell command.  Now this has been designed to work specifically with intune and making it work without intune takes some work but here is how you do it.

Export-StartLayout -Path "C:\Layouts\Win11Layout.JSON"

 The result is the following JSON:

{"pinnedList":[{"desktopAppLink":"%ALLUSERSPROFILE%\\Microsoft\\Windows\\Start Menu\\Programs\\Google Chrome.lnk"},{"desktopAppLink":"%ALLUSERSPROFILE%\\Microsoft\\Windows\\Start Menu\\Programs\\Microsoft Edge.lnk"},{"desktopAppLink":"%ALLUSERSPROFILE%\\Microsoft\\Windows\\Start Menu\\Programs\\Firefox.lnk"},{"desktopAppLink":"%ALLUSERSPROFILE%\\Microsoft\\Windows\\Start Menu\\Programs\\Horizon 7.5.6.lnk"},{"desktopAppLink":"%ALLUSERSPROFILE%\\Microsoft\\Windows\\Start Menu\\Programs\\Adobe Acrobat.lnk"},{"desktopAppLink":"%ALLUSERSPROFILE%\\Microsoft\\Windows\\Start Menu\\Programs\\Word.lnk"},{"desktopAppLink":"%ALLUSERSPROFILE%\\Microsoft\\Windows\\Start Menu\\Programs\\Excel.lnk"},{"desktopAppLink":"%ALLUSERSPROFILE%\\Microsoft\\Windows\\Start Menu\\Programs\\PowerPoint.lnk"},{"desktopAppLink":"%ALLUSERSPROFILE%\\Microsoft\\Windows\\Start Menu\\Programs\\Publisher.lnk"},{"desktopAppLink":"%ALLUSERSPROFILE%\\Microsoft\\Windows\\Start Menu\\Programs\\OneNote 2016.lnk"},{"packagedAppId":"Microsoft.WindowsCalculator_8wekyb3d8bbwe!App"},{"desktopAppLink":"%APPDATA%\\Microsoft\\Windows\\Start Menu\\Programs\\File Explorer.lnk"},{"desktopAppLink":"%ALLUSERSPROFILE%\\Microsoft\\Windows\\Start Menu\\Programs\\VideoLAN\\VLC media player.lnk"},{"desktopAppLink":"%ALLUSERSPROFILE%\\Microsoft\\Windows\\Start Menu\\Programs\\paint.net.lnk"},{"desktopAppLink":"%ALLUSERSPROFILE%\\Microsoft\\Windows\\Start Menu\\Programs\\Notepad++.lnk"}]}

Open windows explorer and paste the following URL in the explorer

%LocalAppdata%\Packages\Microsoft.Windows.StartMenuExperienceHost_cw5n1h2txyewy\LocalState

It will take you to a folder and copy the start2.bin to a location where you can apply it with your ad controller; I put it in the NETLOGON folder on my AD Controller, if you need it to be local put it in a folder that is local.


Now we are going to have AD add a registry entry on our clients and there are two of them, we are going to add them to the User Configuration section of group policy.


The first one we are going to make is called "ConfigureStartPins_ProviderSet"


HKEY_LOCALMACHINE\SOFTWARE\Microsoft\PolicyManager\current\device\Start

It is a DWORD 32 bit value and the value should be set to 1.

Now we need to make a new Registry entry called "ConfigureStartPins"

Here is where we will be adding the JSON we got from the start menu.


HKEY_LOCAL_MACHINE\SOFTWARE\Microsoft\PolicyManager\current\device\Start

In the value data we paste the JSON we exported out earlier.

{"pinnedList":[{"desktopAppLink":"%ALLUSERSPROFILE%\\Microsoft\\Windows\\Start Menu\\Programs\\Google Chrome.lnk"},{"desktopAppLink":"%ALLUSERSPROFILE%\\Microsoft\\Windows\\Start Menu\\Programs\\Microsoft Edge.lnk"},{"desktopAppLink":"%ALLUSERSPROFILE%\\Microsoft\\Windows\\Start Menu\\Programs\\Firefox.lnk"},{"desktopAppLink":"%ALLUSERSPROFILE%\\Microsoft\\Windows\\Start Menu\\Programs\\Horizon 7.5.6.lnk"},{"desktopAppLink":"%ALLUSERSPROFILE%\\Microsoft\\Windows\\Start Menu\\Programs\\Adobe Acrobat.lnk"},{"desktopAppLink":"%ALLUSERSPROFILE%\\Microsoft\\Windows\\Start Menu\\Programs\\Word.lnk"},{"desktopAppLink":"%ALLUSERSPROFILE%\\Microsoft\\Windows\\Start Menu\\Programs\\Excel.lnk"},{"desktopAppLink":"%ALLUSERSPROFILE%\\Microsoft\\Windows\\Start Menu\\Programs\\PowerPoint.lnk"},{"desktopAppLink":"%ALLUSERSPROFILE%\\Microsoft\\Windows\\Start Menu\\Programs\\Publisher.lnk"},{"desktopAppLink":"%ALLUSERSPROFILE%\\Microsoft\\Windows\\Start Menu\\Programs\\OneNote 2016.lnk"},{"packagedAppId":"Microsoft.WindowsCalculator_8wekyb3d8bbwe!App"},{"desktopAppLink":"%APPDATA%\\Microsoft\\Windows\\Start Menu\\Programs\\File Explorer.lnk"},{"desktopAppLink":"%ALLUSERSPROFILE%\\Microsoft\\Windows\\Start Menu\\Programs\\VideoLAN\\VLC media player.lnk"},{"desktopAppLink":"%ALLUSERSPROFILE%\\Microsoft\\Windows\\Start Menu\\Programs\\paint.net.lnk"},{"desktopAppLink":"%ALLUSERSPROFILE%\\Microsoft\\Windows\\Start Menu\\Programs\\Notepad++.lnk"}]}

Next we need to make a file to copy the start2.bat to the user profile when you login; I called the file startmenu.cmd and I am running it from the same location from the start2.bat which is in the NETLOGON folder, and we are going to put in the following code which we will run at logon.

copy "\\$DOMAIN\netlogon\start2.bin" "%LocalAppdata%\Packages\Microsoft.Windows.StartMenuExperienceHost_cw5n1h2txyewy\LocalState" /Y

This will replace the default start2.bat file with the configured one.

In group policy I am putting the following in the Scripts section of User Configuration


\\$domain\SysVol\$domain\folder\startmenu.cmd

Now on login your windows 11 clients will have a custom start menu.
References:

How to make google calendar more secure

With the rash of spam and phishing attempts lately, I would recommend making the following changes to your google calendar settings to secur...