This week we have seen two major processor flaws one dubbed "Meltdown" (which is intel only) the other called "Spectre".
The Details.
Meltdown (CVE-2017-5754)
This is an Intel only security flaw and it affects intel's branch prediction technology. This means that someone figured out how to get the processor to get what they want from your active memory in what was suppose to be a clear and secure separated memory space between the user memory and the Kernel. This fix could cause a performance hit in some cases up to 30%
Spectre (CVE-2017-5753, CVE-2017-5715)
This flaw affects most modern processors made by a variety of manufacturers, including Intel, AMD and those designed by ARM. The flaw potentially allows hackers to trick otherwise error-free applications into giving up secret information. Spectre is harder for hackers to take advantage of but is also harder to fix and would be a bigger problem in the long term. This could be the source for multiple problems in the years to come.
What you can do to protect yourself.
Update to the latest version of Chrome (version 64 or later on January 23rd). You can also enable Strict Site Isolation which will use 10 - 20% more memory, and cross-site iframes will not work properly when printing. FireFox is patched in version 57.0.4 and later. Firefox has a feature called enable First-Party Isolation which you can enable for additional privacy protection. The Strict Site Isolation in chrome and the First Party Isolation in FireFox may break functions that some sites use on the internet. Enabling these features is a good idea but not necessary.
Windows:
Check Windows Update and ensure KB4056892 is installed for Windows 10, Windows 7 and 8 patches are expected by Patch Tuesday. If your having difficulty installing the patch you may have to disable your anti-virus software before you install. The patch may have issues with third party anti-viruses although some AV vendors have already issued fixes. Kaspersky issued its fix Dec. 29 in anticipation of a Microsoft fix to be issued Jan. 9 on the regular Patch Tuesday. McAfee has a page with products tested so far that are compatible. ESET said it has released Antivirus and antispyware scanner module 1533.3 for all consumer and business users that is compatible with the Microsoft patches.
Be sure to check your PC OEM website for support information and firmware updates and apply any immediately.
Apple:
Is working on a patch and is expected to release one soon. Mac OS 10.13.2/10.13.3 and iOS 11.2 with have patches for these flaws - There are no known exploits at this time.
Apple Watch OS is unaffected.
Android:
Users running the most recent version released on January 5 as part of the Android January security patch update are protected according to Google. So, if you own a Google-branded phone, like Nexus or Pixel, your phone will either automatically download the update, or you'll simply need to install it. However, other users will have to wait for their device manufacturers to release a compatible security update.
Please note that at this time there is no known successful exploitation of either Meltdown or Spectre on ARM-based Android devices.
Linux:
Kernel fixes are out depending on which version of linux you are using so patch! - Ubuntu will be patched by January 9th!
Cloud:
Google, Amazon, Microsoft, and others are working on and implementing patches for these issues.
The only real fix for these flaws are new computers (silicon) but there won't be any fix in this or the next generation of processors. The actual fix requires an architectural redesign in the processor hardware which is now at 10nm. Most likely your looking at least 3 computer generations from now before these issues might be fixed properly.
Sources:
https://www.itworldcanada.com/article/microsoft-warns-patches-for-meltdown-spectre-may-clash-with-av/400394
https://arstechnica.com/gadgets/2018/01/meltdown-and-spectre-heres-what-intel-apple-microsoft-others-are-doing-about-it/
https://www.theverge.com/2018/1/4/16848976/how-to-protect-windows-pc-meltdown-security-flaw
https://support.microsoft.com/en-us/help/4056892/windows-10-update-kb4056892?ranMID=24542&ranEAID=nOD%2FrLJHOac&ranSiteID=nOD_rLJHOac-rHBsEiLKiJeizUaBQunMbw&tduid=(a75271ab760fabc657cfb32450f17075)(256380)(2459594)(nOD_rLJHOac-rHBsEiLKiJeizUaBQunMbw)()
http://www.zdnet.com/article/windows-meltdown-spectre-fix-how-to-check-if-your-av-is-blocking-microsoft-patch/
https://www.theguardian.com/technology/2018/jan/05/apple-mac-spectre-meltdown-iphone-ipad-hackers
http://www.zdnet.com/article/how-linux-is-dealing-with-meltdown-and-spectre/
https://www.cyberciti.biz/faq/patch-spectre-vulnerability-cve-2017-5753-cve-2017-5715-linux/
http://www.creativebloq.com/news/should-you-be-worried-about-meltdown-and-spectre
Friday, January 05, 2018
Tuesday, January 02, 2018
How to setup Horizon Web Services
This post will go over the setup and install of Horizon Web Services software by SirsiDynix, and it will be connecting to a Microsoft SQL based Database. There are few things you will need before we begin.
- A SQL database user, with proper permissions
- A windows based OS (2012 or better recommended) for the software installation
- The Java Development Kit (I'm using Java SE Development Kit 8u151)
- I recommend a third party browser (I'm using firefox)
- The SirsiDynix Horizon Web Services Software (you need an account to download it)
Horizon Web Services requires a connection to the ILS database for access to Tomcat access. So before I began with the software install on the Windows 2012 Essentials I created a new SQL database user with the proper permissions based on one that we were using for a different web service that SirsiDynix created.
Create a database User to access the database for Horizon Web Services
Login to the database -> Security -> Logins | Right Click and select New Login
Here is where you will fill out all the information for connecting to the SQL Database. Proper permissions are required otherwise Horizon Web Services will give you 404 errors.
Here is where you will fill out all the information for connecting to the SQL Database. Proper permissions are required otherwise Horizon Web Services will give you 404 errors.
 |
| Be sure to make the default database your ILS or Training Database, otherwise you will have issues connecting |
Here is where you specify any specific roles for the SQL User. All that is required is the public server role.

For the User Mapping select what database you want the user to login to. Typically this would be your primary ILS database, but it could also be your training database
 |
| Note the required security group that is required. This is not visible until you edit the user and default schema This will have been setup by SirsiDynix. Make sure it is enabled or you won't have sufficient permissions. |

PLEASE NOTE - If you create a user or use an existing one with not enough permissions on the database you will get a 404 Error.
When you get your SQL user configured you can go a head and get all the software required for Horizon Web Services (HWS)
You can view my video of the install on my YouTube Channel
The Horizon Web Services Software (SirsiDynix Account Required)
Java SDK (I'm using version 8u151)
A third party browser FireFox or Chrome (not required but recommended)
I'm going to recommend that all files be downloaded first, based on this we will go thought the install process.
Step 1 - Install the Java SDK

When installing Java, I just used the default settings, though the installation of java here is not as important but must come first as we have to specify the path for the Java Virtual Machine.
Step 2 - Install Horizon Web Services
Here is where we can specify settings for the Tomcat Software.
The defaults are
Now comes the configuration for connecting to the ILS. This is typically an IP address such as 192.168.x.x or something like that with a predefined port like 4400. This would have been setup by SirsiDynix when the ILS was installed.

Everything you see below is pretty much default. Allow Patron Search and you DO NOT allow access to the administrator settings, unless you want that in my case I don't.


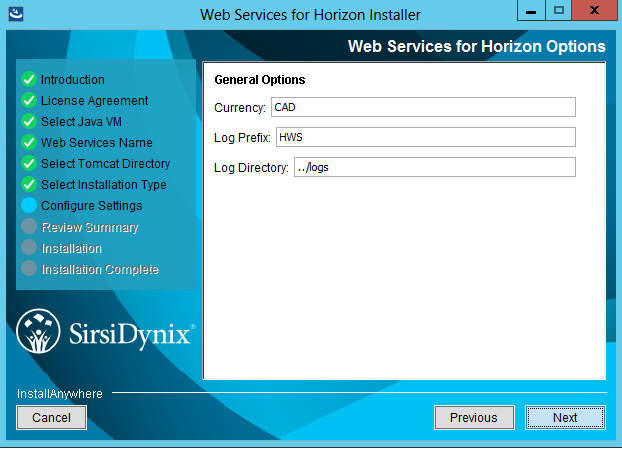
Log File Prefixes and Location

This is optional. You DO NOT need to add the hip server if you don't want to. If you choose to not use the hip server with your Horizon Web Services just leave the fields blank.


Now if you already have Horizon web services you can move your settings and licence file by simply copy/pasting from your old Web Services directory. If you want to set it up fresh you will need to move your .lic file into the Horizon Web Services Install directory and save it in
You can also edit all your ILS connection settings by editing the hz-spring.properties file.
I also recommend changing the default startup for your tomcat server from manual to automatic or delayed automatic.
Now that everything is configured and your Database user is correctly configured with the proper permissions you will see this page when you go to login to Horizon Web Services.
Here you can see what a successful login looks like.
Step 1 - Install the Java SDK

When installing Java, I just used the default settings, though the installation of java here is not as important but must come first as we have to specify the path for the Java Virtual Machine.
Step 2 - Install Horizon Web Services
 |
| Select the Path to the JAVA.EXE |
 |
| Specify The Horizon Web Services Instance Name |
 |
| The Location for Apache Tomcat |
The defaults are
- Service Name - tomcat7
- http port - 8080
- https port - 8443
- tomcat shutdown port 8009
 |
| Tomcat Configuration Settings |

Everything you see below is pretty much default. Allow Patron Search and you DO NOT allow access to the administrator settings, unless you want that in my case I don't.


Log File Prefixes and Location

Timezone

This is optional. You DO NOT need to add the hip server if you don't want to. If you choose to not use the hip server with your Horizon Web Services just leave the fields blank.


webapps\"YourHorizonWebServicesInstanceName"\WEB-INF\classes
You can also edit all your ILS connection settings by editing the hz-spring.properties file.
 |
| Horizon Web Services Classes Directory |
I also recommend changing the default startup for your tomcat server from manual to automatic or delayed automatic.
 |
| Change the startup type from manual to automatic or automatic (delayed) |
 |
| You can change the startup type by getting the properties of the service |
 |
| Horizon Web Services Admin Login Page |
Here you can see what a successful login looks like.
 |
| Horizon Web Services Status after a successful login |


Wednesday, December 13, 2017
How to deploy a Printer with Active Directory and Group Policy
How to use Active Directory and Specifying Printers to Specific Workstations

- The network printer is on a completely different network then the workstation
- The workstation is on a managed domain
- We only want the one workstation to have access to the printer on the domain
- Power location is a problem
- Network location is a problem
The printer is on a network that is 172.31.x.x and has a IP reserved via PFSense firewall, the workstation is on a 192.168.x.x network on an Active Directory Domain that is assigned via DHCP and the network is controlled by a different PFSense firewall.
Now I realize that I could setup a route in the firewall to the printer allowing the domain account to access the printer, but to keep the complexity down on the firewalls (and that we would have to do a failover to make appropriate rule changes on our failover firewall) we decided not to add routes to the printer. I did have a virtual machine (not on the domain but in a workgroup) which was being used as a print release station with software from Envisionware for print and release printing from public workstations. The public workstations are just in a workgroup and on a 172.31.x.x network and our staff network is on a 192.168.x.x network. Our staff however can remote into the print release workstation to release jobs etc so it seemed to be the most elegant solution.
Step 1 - Make sure your print server is prepped.

Once the printer is shared out we use the Additional Drivers feature to add our 32 and 64 bit drivers so when our clients connect they know what driver to use and if they don't have it it automatically installs it if they have the proper permissions.

 |
| 32 and 64 bit drivers ready to automatically install |
STEP 2 - Setup your OUs and Group Policies
So as you can see in the image below I have a ROOT GP Policy, an OU called Group1 with a Group 1 GP and an OU called Workstation with a GP called LocalPrinter. I have other GP settings which are applied on a global basis and I am using OUs to have a greater finite control of what Group Policies I want to apply which is why this policy is three levels down. In this case the GP settings I want to have finite control over is the printer we just shared. I only want this printer to show up on this workstation when the user login and remove it when they logout.
 |
| Group Policy Management |
So we put our Workstation (Public1) in the workstation OU, and we apply the following GP settings
User Configuration -> Policies -> Windows Settings -> Scripts
 |
| Create Powershell Script in the Login/Logoff |
When you get the properties of the logon script you want to select the powershell tab and hit add
Script Name: Add Workstation Printer
Script Parameter:
Add-Printer - ConnectionName \\Reference01\CRC Printer
 |
| Powershell Script for adding the printer in GP |
and similarly we want to do the same thing to remove the printer from the user profile if they roam to another machine. So the logoff powershell script is the same with the Remove Switch instead of the Add
Script Name: Remove Workstation Printer
Script Parameter:
Remove-Printer - ConnectionName \\Reference01\CRC Printer
STEP 3 - Add the Shared Printer to Active Directory Print Management
Now that we have our GP and OUs all setup we can move forward and add the printer to our AD Printer Management Server. We want to add the Workstation Printer Server to work with our AD. Right click on print management and select add/remove servers
 |
| Server 2012R2 AD Print Management |
 |
| Add the shared printer from the Workstation |
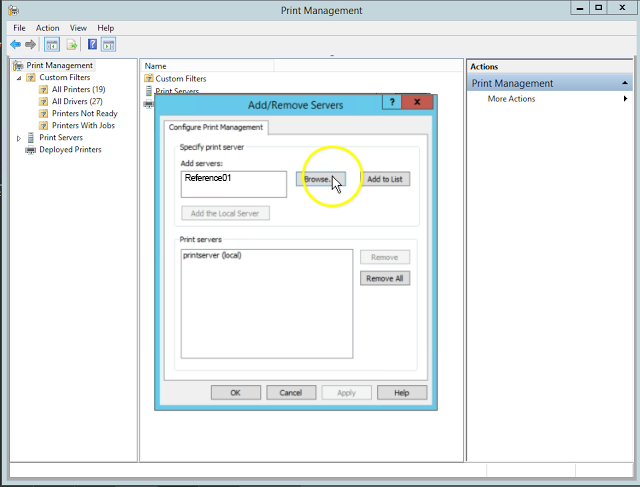 |
| Browse/Add the new workstation printer (Reference01) |
 |
| List of Print Servers |
 |
| Deploy with Group Policy |
 |
| Deploy with Group Policy Settings |
 |
| Browse UI for finding GPO Name |
 |
| A successfully deployed printer |
A successfully deployed printer via AD using OUs and GPs. All users should have no problem connecting on that machine with the current GP settings we have setup unless you have other restrictions in your group policy.
STEP 4 - Test and Verify.
Always best practice to test and verify anything you do and works the way you expect.
Wednesday, November 29, 2017
Create a USB Bootable Disk on OS X
 To create a bootable USB Disk in Mac OS X, You must have the Application of the version of Mac OS X that you want to install downloaded and extracted. Please make sure you have a mac and root access before proceeding.
So for this example we are going to use macOS Sierra. You must have the "Install macOS Sierra.app" and if your looking for step by step instructions it must be downloaded into your Applications Folder.
To download an older version of MacOS from Yosemite to Catalina, you can download the MacOS App using this url https://support.apple.com/en-us/HT211683
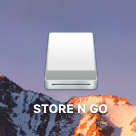
sudo /Applications/Install\ macOS\ Seirra.app/Contents/Resources/createinstallmedia --volume /Volumes/STORE \N \GO --applicationpath /Applications/Install\ macOS\ Seirra.app --nointeraction
You can modify this command line to use with any previous version of OS X if you can get a copy of the Install.app and replace the bolded text with the previous version of the OS X install.app for example "Install\ OS\ X\ El\ Capitan" and you must put \ $text so the mac can recognize spaces in the name. The \ is an "escape" and tells the OS that there is a "space" character.
***UPDATE***
You can find this on apple's knowledge base for the issue but they removed the application path for the USB installer.
sudo /Applications/Install\ macOS\ High\ Seirra.app/Contents/Resources/createinstallmedia --volume /Volumes/STORE \N \GO
https://support.apple.com/en-us/HT201372
***Pre High Seirra***
sudo /Applications/Install\ macOS\ Seirra.app/Contents/Resources/createinstallmedia --volume /Volumes/STORE \N \GO --applicationpath /Applications/Install\ macOS\ Seirra.app --nointeraction
Below is the log from my terminal screen. This could take up to 10 - 30 minutes depending on your system, and if may have to make adjustments if your file system is case sensitive or not.
At the end of this you will have a bootable USB device that you can do a system recovery, disk image, or a fresh install of your mac with.

Plugin a Flash Drive; I'm going to use a Verbatim 16GB USB Flash Drive. Open /Applications/Utilities/Terminal.app
sudo /Applications/Install\ macOS\ Seirra.app/Contents/Resources/createinstallmedia --volume /Volumes/STORE \N \GO --applicationpath /Applications/Install\ macOS\ Seirra.app --nointeraction
You can modify this command line to use with any previous version of OS X if you can get a copy of the Install.app and replace the bolded text with the previous version of the OS X install.app for example "Install\ OS\ X\ El\ Capitan" and you must put \ $text so the mac can recognize spaces in the name. The \ is an "escape" and tells the OS that there is a "space" character.
***UPDATE***
You can find this on apple's knowledge base for the issue but they removed the application path for the USB installer.
sudo /Applications/Install\ macOS\ High\ Seirra.app/Contents/Resources/createinstallmedia --volume /Volumes/STORE \N \GO
https://support.apple.com/en-us/HT201372
***Pre High Seirra***
sudo /Applications/Install\ macOS\ Seirra.app/Contents/Resources/createinstallmedia --volume /Volumes/STORE \N \GO --applicationpath /Applications/Install\ macOS\ Seirra.app --nointeraction
Below is the log from my terminal screen. This could take up to 10 - 30 minutes depending on your system, and if may have to make adjustments if your file system is case sensitive or not.
sudo /Applications/Install\ macOS\ Sierra.app/Contents/Resources/createinstallmedia --volume /Volumes/STORE\ N\ GO --applicationpath /Applications/Install\ macOS\ Sierra.app --no interaction
Erasing Disk: 0%... 10%... 20%... 30%...100%...
Copying installer files to disk...
Copy complete.
Making disk bootable...
Copying boot files...
Copy complete.
Done.
At the end of this you will have a bootable USB device that you can do a system recovery, disk image, or a fresh install of your mac with.
Monday, November 27, 2017
ENETUNREACH FTP Error in Filezilla caused by Kaspersky Security Center 10
Server/client security software is annoying at best but it is even more annoying when things are not clear how to fix a problem much like I had with Kaspersky Security Center 10 and Filezilla. After a server update a new policy was made and all FTP access was denied from our clients and they needed access for us to continue to do our business. Here is how to fix the ENETUNREACH Error that you will get if your trying to use Filezilla with Kaspersky.
If your using Kaspersky Security Center 10 and Filezilla for any FTP services you may require if you don't have a proper policy in place you will encounter the following error
To resolve the error and allow your users to FTP again you need to make the following changes in your policy.

Right click on the policy and go Properties.
Go to Anti-Virus Protection -> General Protection Settings -> Monitored Ports Settings

De-select/uncheck the FTP port as shown in the image below.

Hit OK then go to Firewall Settings -> Configure Rules for Network Packets and Data Streams
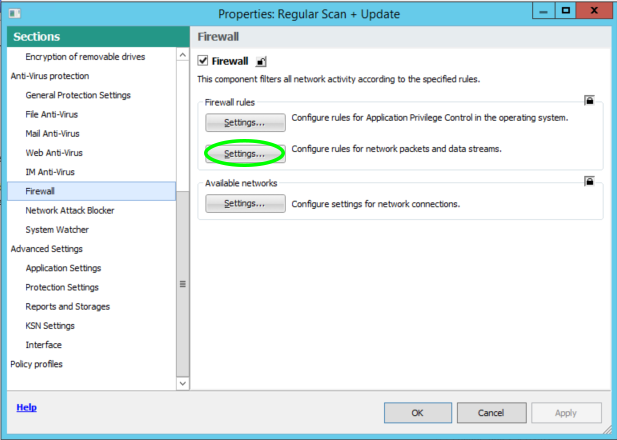
Add a new Network Packet Rule


After you add the rule you can move it to the top of the list to ensure it doesn't get blocked by another rule. You can also limit this to particular IP addresses if you only want specific users to have access.

Hit Ok -> Hit Apply -> Hit Ok
That's it your done.
Special thanks to Pavel Labanov and his great YouTube video also documenting how to fix this issue.
 |
| Filezilla FTP ENETUNREACH Error caused by Kaspersky Security Center 10 |
If your using Kaspersky Security Center 10 and Filezilla for any FTP services you may require if you don't have a proper policy in place you will encounter the following error
Error: The data connection could not be established: ENETUNREACH - Network unreachable
To resolve the error and allow your users to FTP again you need to make the following changes in your policy.

Right click on the policy and go Properties.
Go to Anti-Virus Protection -> General Protection Settings -> Monitored Ports Settings

De-select/uncheck the FTP port as shown in the image below.

Hit OK then go to Firewall Settings -> Configure Rules for Network Packets and Data Streams
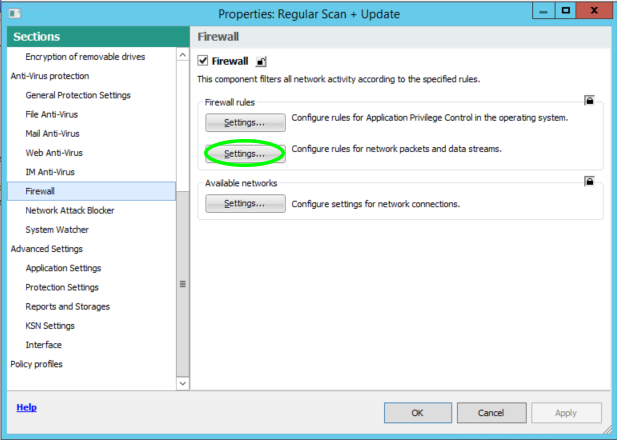


After you add the rule you can move it to the top of the list to ensure it doesn't get blocked by another rule. You can also limit this to particular IP addresses if you only want specific users to have access.

Hit Ok -> Hit Apply -> Hit Ok
That's it your done.
Special thanks to Pavel Labanov and his great YouTube video also documenting how to fix this issue.
Thursday, November 23, 2017
Hyper-V Virtual Switch Settings
Back in September I got a message from the facebook group VMware vSphere and Microsoft Hyper-V I am a part of and I got asked for some help with an issue with Hyper-V Switches.
The Issue:
Internal
Internal virtual networks are used where you want to allow communications between
Dedicated
Dedicated switches are a physical Network Card on the host just for use just by virtual machines.
They allow communication between:
Virtual machine to virtual machine on the same physical server
Virtual machine to externally located servers (and visa-versa)
The prevent the VM Host from using the adapter
A dedicated switch is just an external network switch that doesn't allow the host OS from using the adapter.
According to the what we know the firewall being off and having a DHCP server setup everything should have been working unless we didn't have the DHCP server running on the right network. The IP range on the host internal network adapter and the VM internal network adapters appeared to be getting different 169 addresses so the DHCP server was not running on the internal network. Changing the IP address to STATIC IP addresses on the same subnet resolved the issue. So it was an issue with the DHCP server on the internal network.
I did a full video of the 3 mail virtual network options down below.
https://youtu.be/zI3p1AjZkPU
Sources
https://blogs.technet.microsoft.com/jhoward/2008/06/17/hyper-v-what-are-the-uses-for-different-types-of-virtual-networks/
https://www.altaro.com/hyper-v/the-hyper-v-virtual-switch-explained-part-1/
The Issue:
The host machine is Server 2012R2 With the Hyper-V Role Enabled. Then a client VM was made on the host and connected it to virtual switch to communicate with my host.
The host operating system is pinging vm but i am unable to ping my host OS from VM .
host and guest vm and virtual switch created in host are all on same subnet and the firewall is off on both systems
So some simple questions about the setup.
Q: What type of virtual switch?
A: Virtual switch is internal
Q: DHCP Server Setup?
A: Yes on Host
So lets review our Hyper-V virtual switch Types:
External
A Hyper-V virtual switch in external mode allows communications between virtual adapters connected to virtual machines and the management operating system. It uses single or teamed physical adapters to connect to a physical switch, thereby allowing communications with other systems.
External virtual networks are used where you want to allow communications between
Q: What type of virtual switch?
A: Virtual switch is internal
Q: DHCP Server Setup?
A: Yes on Host
So lets review our Hyper-V virtual switch Types:
External
A Hyper-V virtual switch in external mode allows communications between virtual adapters connected to virtual machines and the management operating system. It uses single or teamed physical adapters to connect to a physical switch, thereby allowing communications with other systems.
External virtual networks are used where you want to allow communications between
- VM to VM on the same VM Host
- VM to VM Host (and visa-versa)
- VM to externally located servers (and visa-versa)
- (Optional) VM Host to externally located servers (and visa-versa)
 |
| External Virtual Switch |
Internal
A Hyper-V virtual switch in internal mode allows communications only between virtual adapters connected to virtual machines and the management operating system (VM Host).
Internal virtual networks are used where you want to allow communications between
- VM to VM on the same physical server
- VM to VM Host (and visa-versa)
 |
| Internal Virtual Switch |
Private
A Hyper-V virtual switch in private mode allows communications only between virtual adapters connected to virtual machines.
A Hyper-V virtual switch in private mode allows communications only between virtual adapters connected to virtual machines.
Private virtual networks are used where you want to allow communications between
- Virtual machine to virtual machine on the same physical server
 |
| Private Virtual Switch |
 |
| Host Network Adapters |
Dedicated switches are a physical Network Card on the host just for use just by virtual machines.
They allow communication between:
Virtual machine to virtual machine on the same physical server
Virtual machine to externally located servers (and visa-versa)
The prevent the VM Host from using the adapter
A dedicated switch is just an external network switch that doesn't allow the host OS from using the adapter.
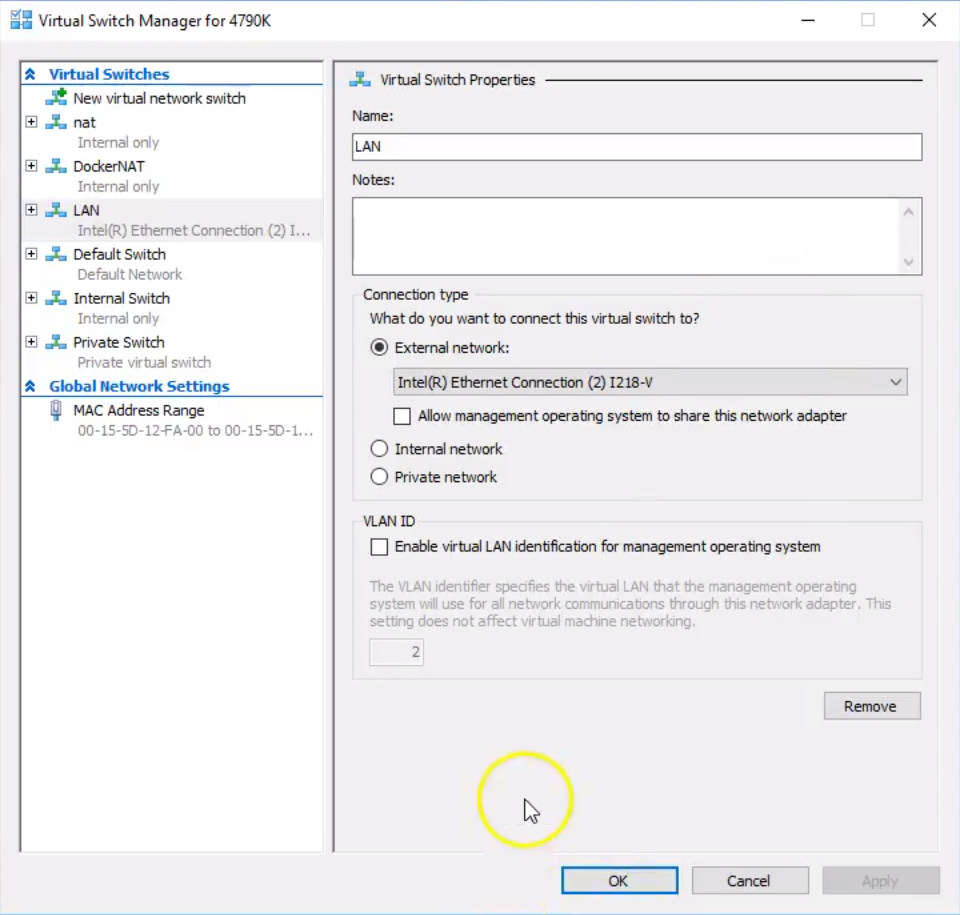 |
| Dedicated Virtual Switch |
According to the what we know the firewall being off and having a DHCP server setup everything should have been working unless we didn't have the DHCP server running on the right network. The IP range on the host internal network adapter and the VM internal network adapters appeared to be getting different 169 addresses so the DHCP server was not running on the internal network. Changing the IP address to STATIC IP addresses on the same subnet resolved the issue. So it was an issue with the DHCP server on the internal network.
Video
I did a full video of the 3 mail virtual network options down below.
https://youtu.be/zI3p1AjZkPU
https://blogs.technet.microsoft.com/jhoward/2008/06/17/hyper-v-what-are-the-uses-for-different-types-of-virtual-networks/
https://www.altaro.com/hyper-v/the-hyper-v-virtual-switch-explained-part-1/
Subscribe to:
Posts (Atom)
Updating your godaddy certs during the G2 intermediate hierarchy to the TLS Root CA - R1 hierarchy
If you use godaddy TLS certificates you should be aware of some changes during the transition from the G2 certificates to the new R1 Certi...

-
 When working in a test environment you don't exactly want something to have internet access; so you need to be able to download files in...
-
 To see a video of the Rustdesk installation visit https://www.youtube.com/watch?v=t7UobpjDsRY and if you like the content please like and s...
-
Quick guide: Automatic login in Windows 10 Open the Registry Editor using [Windows] + [R] and “regedit” . Enter HKEY_LOCAL_MACHINE\SOF...

