This post will go over the setup and install of Horizon Web Services software by SirsiDynix, and it will be connecting to a Microsoft SQL based Database. There are few things you will need before we begin.
- A SQL database user, with proper permissions
- A windows based OS (2012 or better recommended) for the software installation
- The Java Development Kit (I'm using Java SE Development Kit 8u151)
- I recommend a third party browser (I'm using firefox)
- The SirsiDynix Horizon Web Services Software (you need an account to download it)
Horizon Web Services requires a connection to the ILS database for access to Tomcat access. So before I began with the software install on the Windows 2012 Essentials I created a new SQL database user with the proper permissions based on one that we were using for a different web service that SirsiDynix created.
Create a database User to access the database for Horizon Web Services
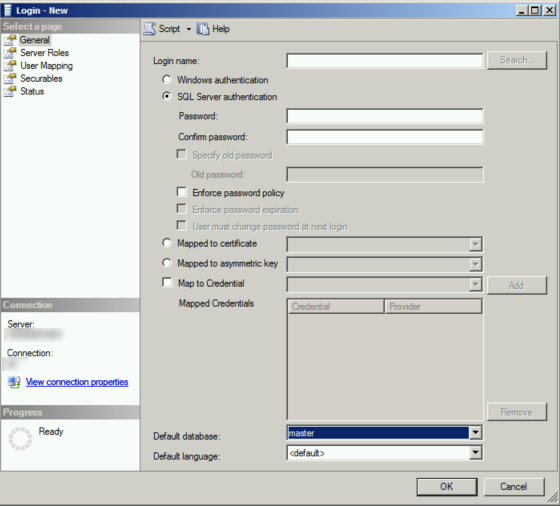
Login to the database -> Security -> Logins | Right Click and select New Login
Here is where you will fill out all the information for connecting to the SQL Database. Proper permissions are required otherwise Horizon Web Services will give you 404 errors.
Here is where you will fill out all the information for connecting to the SQL Database. Proper permissions are required otherwise Horizon Web Services will give you 404 errors.
 |
| Be sure to make the default database your ILS or Training Database, otherwise you will have issues connecting |
Here is where you specify any specific roles for the SQL User. All that is required is the public server role.
For the User Mapping select what database you want the user to login to. Typically this would be your primary ILS database, but it could also be your training database
Make sure you grant permission to the database and login access to the user.
PLEASE NOTE - If you create a user or use an existing one with not enough permissions on the database you will get a 404 Error.
When you get your SQL user configured you can go a head and get all the software required for Horizon Web Services (HWS)
You can view my video of the install on my YouTube Channel
The Horizon Web Services Software (SirsiDynix Account Required)
Java SDK (I'm using version 8u151)
A third party browser FireFox or Chrome (not required but recommended)
I'm going to recommend that all files be downloaded first, based on this we will go thought the install process.
Step 1 - Install the Java SDK
When installing Java, I just used the default settings, though the installation of java here is not as important but must come first as we have to specify the path for the Java Virtual Machine.
Step 2 - Install Horizon Web Services
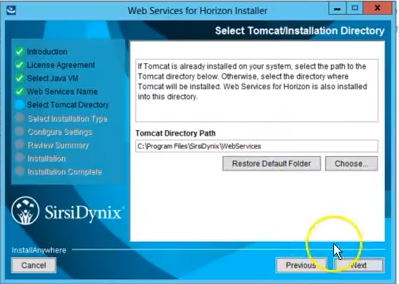
Here is where we can specify settings for the Tomcat Software.
The defaults are
Now comes the configuration for connecting to the ILS. This is typically an IP address such as 192.168.x.x or something like that with a predefined port like 4400. This would have been setup by SirsiDynix when the ILS was installed.
Everything you see below is pretty much default. Allow Patron Search and you DO NOT allow access to the administrator settings, unless you want that in my case I don't.
Log File Prefixes and Location
This is optional. You DO NOT need to add the hip server if you don't want to. If you choose to not use the hip server with your Horizon Web Services just leave the fields blank.
Now if you already have Horizon web services you can move your settings and licence file by simply copy/pasting from your old Web Services directory. If you want to set it up fresh you will need to move your .lic file into the Horizon Web Services Install directory and save it in
You can also edit all your ILS connection settings by editing the hz-spring.properties file.
I also recommend changing the default startup for your tomcat server from manual to automatic or delayed automatic.
Now that everything is configured and your Database user is correctly configured with the proper permissions you will see this page when you go to login to Horizon Web Services.
Here you can see what a successful login looks like.
Step 1 - Install the Java SDK
When installing Java, I just used the default settings, though the installation of java here is not as important but must come first as we have to specify the path for the Java Virtual Machine.
Step 2 - Install Horizon Web Services
 |
| Select the Path to the JAVA.EXE |
 |
| Specify The Horizon Web Services Instance Name |
 |
| The Location for Apache Tomcat |
The defaults are
- Service Name - tomcat7
- http port - 8080
- https port - 8443
- tomcat shutdown port 8009
 |
| Tomcat Configuration Settings |
Everything you see below is pretty much default. Allow Patron Search and you DO NOT allow access to the administrator settings, unless you want that in my case I don't.
Log File Prefixes and Location
Timezone
This is optional. You DO NOT need to add the hip server if you don't want to. If you choose to not use the hip server with your Horizon Web Services just leave the fields blank.
webapps\"YourHorizonWebServicesInstanceName"\WEB-INF\classes
You can also edit all your ILS connection settings by editing the hz-spring.properties file.
 |
| Horizon Web Services Classes Directory |
I also recommend changing the default startup for your tomcat server from manual to automatic or delayed automatic.
 |
| Change the startup type from manual to automatic or automatic (delayed) |
 |
| You can change the startup type by getting the properties of the service |
 |
| Horizon Web Services Admin Login Page |
Here you can see what a successful login looks like.
 |
| Horizon Web Services Status after a successful login |


