Thursday, July 20, 2017

How to create a Webclip using Cisco System Manager for Meraki

Meraki SM Dashboard
View my video for Making a webclip using Cisco System Manager for Meraki

Making a webclip is even easier then adding an app, though there is no way to have the webclip modified in the home screen layout.  If you haven't read my last post on how to install an iOS app using the Meraki SM, I definitely suggest you check it out before moving on in this post.

Now we're going to add that app to our tagged iOS devices.  The ipad had been tagged with CSPublic.  To do that we are going to first edit the "Profile and Settings".  

This can be found under System Manager -> Settings, and for this we are going to Pick CSPublic because we named the profile the same as the tag.  The Tag and the Profile name can be independent of each other.


So for making a webclip

  • Label will be the name of the app
  • url is the site/page your going to
  • the icon needs to be 144px by 144px if you intend on using a custom icon.  
  • Removable -> User can remove webclip
  • Full Screen (is it full screen)
  • Precomposed -> Icon will be displayed with no added effects
The settings I used for the webclips I made were Full Screen, and Precomposed.  I also added a custom logo.

You can see below the third app is actually a webclip called Tumblebooks.

iPad with Webclip

How to add an iOS app using Cisco Meraki MDM

Meraki SM Dashboard
You can view my video for Adding an iOS app using Meraki SM

We last left off having purchased Mozilla Firefox from the Apple VPP store; now we're going to add that app to our tagged iOS devices.  The ipad had been tagged with CSPublic.  To do that we are going to first edit the "Profile and Settings".  

This can be found under System Manager -> Settings, and for this we are going to Pick CSPublic because we named the profile the same as the tag.  The Tag and the Profile name can be independent of each other.


MDM Edit Profiles and Settings

So what we need to do is because our profile is setup for white listing apps, we need to add the app in 3 different sections.

1.  Under Restrictions -> iOS show/hide apps (supervised)
Show/hide Apps

Home Screen Layout

3.  Tag the app in what profiles it is allowed to be deployed to

Systems Manager -> Apps

Firefox iOS App

Here we would add our tag CSPublic to the Scope, we make sure that VPP Device assignment is set, and all applicable options for all other management is setup.  Once done when the iPad syncs it's configuration it will install the app and put it where you put it on the home screen, in this case we put it on the iPad dock as shown below.

iPad with Firefox Deployed

Monday, July 10, 2017

How to Set Up Meraki MDM for iOS Management

Setting up iOS using Cisco Meraki MDM
View my video for Setting up Apple VPP for use with Cisco System Manager for Meraki

Finding a good way to manage iOS devices so they are secured and continue to receive updates is a major pain.  Cisco Meraki SM helps to alleviate much of that pain.  My organization just got six brand spanking new Meraki AP's and they have been working magnificently.  Management and monitoring of our wifi networks has never been easier.  The next beast we needed to tackle was an issue with some iPads our organization was using for training and other uses.  We originally went with Apple Configurator 2 because of the low cost  for the management and it seemed to work ok, not great but ok and we had access to some free Youtube training and documentation for the use of Apple Configurator 2.  However the use of Apple Configurator seemed to be inadequate as the number of apps use used got larger, iOS got bigger, and the ipads got older; it took longer and longer to do updates and secure the devices properly.  The last update to 6 ipads connected to a MacPro Laptop had taken 2 days and was still working on doing updates so we had to do something otherwise this was going to be unusable as it was taking too much staff time to manage these devices.


Since we had these new Meraki WiFi APs, I had read and seen in the settings that it was suppose to work pretty good for managing iOS, so I did some more digging and signed up for a SM trial.  I did some more digging as to what was required and got in touch with Apple about their VPP (Volume Purchasing Plan) and DEP (Device Enrollment Program).  There a couple of things you need to keep in mind when your setting this up.

VPP can not be an account that is already in use with the iTunes store or iCloud.  Any purchases under those accounts will have to be re-purchased.  To be authorized by the DEP program you must by your iOS devices directly from apple otherwise they are ineligible to be used with the DEP but they will still work with the VPP and can still be managed through the SM console.  All the ipads we had were all in use with iTunes and iCloud accounts, some were supervised some were not.  To use the iPads with the Meraki MDM I had to reset all the iPads and set them up as supervised under the account we are going to use for the VPP.


Setting up Apple MDM

When you first get going on the MDM you need to setup a Apple MDM Push certificate under the address we're going to use for the VPP account.  https://appleid.apple.com/
for the purposes of this blog post lets call it merakivpp@orgdomain.ca.  Apple will make you use 2 Factor SMS authentication with this account.

Once done you download the MDM_Meraki Inc_Certificate.pem and upload it to the apple Push Certificate Portal and Download the token certificate and upload it to the Meraki MDM


Apple Push Certificate for VPP/DEP


APPLE MDM Meraki


Once that is all setup and configured we will add our the iPads to our MDM.  To do that we have to make the ipad Supervised with Apple Configurator 2.  With Apple Configurator 2, all you have to do is set the device to supervised and decide if you want it to sync with other computers.  For this I set it to disallow the syncing with other systems.  You can add the ipad via profile setting in the Apple Configurator 2 or by going to a link on your network provided by the Meraki MDM page.


Once done, you will see your clients in the dashboard.  To differentiate the clients add tags, in this case I have iPad1, iPad2, iPad3. 


Once the ipads are assigned to get apps you have to buy them from the VPP.  If your not logged in, sign into the Apple VPP https://vpp.itunes.apple.com/store?cc=CA&l=en


Once that is setup purchase your apps, you will get an email with any receipts and you will also get notified when you can start using your VPP Purchase, this usually takes about 1 to 3 minutes.

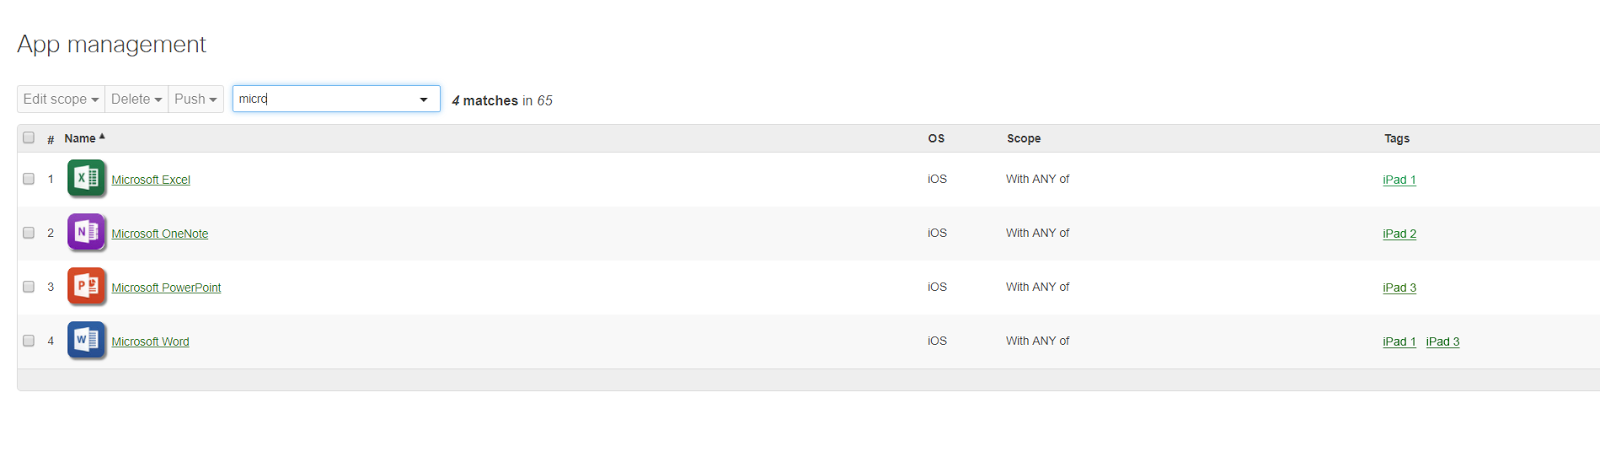
Then you assign the apps via tags.  as you can see below, iPad 1 gets Excel, iPad 2 gets One Note, iPad 3 gets PowerPoint and iPad 1 and iPad 3 both get Word.  Unless the device has the tag where the app is assigned they will not get that app.  I am using the scope with Any as I don't have a large number of restrictions that are required.


***IMPORTANT***

There are a few scopes for restricting apps

WIth Any (will assign to devices with a minimum of one of the tags)
with ALL (must have all the tags)
All Devices
without any (without the tag)
without all (without all the tags)

Now for the settings, I used the Meraki managed profile.  This gives you access to the different configuration settings in Apple Configurator with a nice web front end.  With the ipad connected to our Meraki MDM with a cert to get updates when we make changes, we don't really have to sync these ipads with a computer gain unless there is a major issue with the iOS device.


From here you can add and remove apps as required, web clips and arrange home screen icons, wall paper etc.  The MDM costs may vary but in the amount of time savings it is well worth it.


Sunday, July 09, 2017

Windows Update Error code C8000266

I have a few Windows 7 and Windows 2008/2008R2 VMs that occasionally take a while to do windows updates.  If it does this then the first thing you should do is go to the Microsoft download site (www.microsoft.com/download) and search for KB947821.  Download the correct version for your version of Windows Server and run it.  This is non trivial in size (about 170M), and repairs issues it finds with the Windows update database.

This may or may not fix your windows update errors.  The troubleshooter often doesn't work for me for fixing issues with Windows update but manually stopping and starting the services does fix Windows update for a time.  I tried to follow the procedure in the link below but it fails to rename the software distribution folder.  You can also delete the contents of the software distribution folder if it won't rename


However manually stopping and restarting the services does seem to fix windows update for a time.  To do this follow the steps below.

Stop the BITS, Cryptographic, MSI Installer and the Windows Update Services. Type the following commands in the Command Prompt for this. Press the ENTER key after you type each command.

net stop wuauserv

net stop cryptSvc

net stop bits

net stop msiserver

Restart the BITS, Cryptographic, MSI Installer and the Windows Update Services. Type the following commands in the Command Prompt for this. Press the ENTER key after you type each command.

net start wuauserv

net start cryptSvc

net start bits

net start msiserver


After that windows update seems to come back for a while, I am actually using a scheduled task .vbs script found on the MSDN library and am looking into a way of doing it from the Hyper-V host to the clients.  For right now I am doing windows updates via the vbs script and have it setup as a scheduled task.  It works great; just make sure you have cscript setup before the file name to execute, otherwise it will fail.

ie. cscript windowsUpdate.vbs

Thursday, June 29, 2017

Microsoft Hyper-V Integration Services Error 1603

In Hyper-V if you try do an upgrade of Integration services and you get error 1603 or says that it is successful in updating but Hyper-V is still saying that your integration services are out of data here is what you do.
Hyper-V Integration Services Requires and Upgrade and will not Upgrade

Error Code on Server 2003

First you need to remove Hyper-V integration services from the VM, yes this could break stuff so have a backup or have your settings for your network adapter, etc.


Once removed you will need to restart your system


Once your rebooted re-install Integration Services


Integration services may come up with a few errors while installing if you experience this it is best to continue and ignore the errors and fix the drivers after the fact once you get your network card reinstalled.


Once you have restarted and Windows has auto detected your Hyper-V integration services you will be up-to-date and ready to continue running.


Wednesday, June 21, 2017

Setting Up Fog Project On Hyper-V and using PFSense

This post is how to setup the FOG Cloning Project on Hyper-V.  This post is going to show you how to setup Fog On Ubuntu 16.04, on a Hyper-V host and how to redirect the TFTP for saving images and set the pxe boot settings in PFSense so the client machines can boot off the virtualized FOG Server.  The FOG server will also be setup with 2 Hard disks.  One for the OS and Fog Project which will include an apache webserver and mysql database the other a larger virtual drive where we will store the images that you will be saving and using to restore (clone) the other client machines.  This is how we are going to configure our setup.


  • DHCP/DNS: Will be handled by PFSENSE
  • Hyper-V: Will run Fog, handle the backups etc.
  • Fog:  2 Disk VM 80GB for OS and 500GB for Storage.
    Will run the fog services and TFTP Server.


The first thing we're going to do is go through some settings we need to setup PFSense so we don't need to setup a DHCP and DNS server on our virtualized fog.  Were going to let PFSense handle that because if we want to add another PFSense firewall and enable carp, this would give us a failover for our DHCP and DNS Server if we were to lose one of the firewalls.  These settings are for a multi-network setup with different VLANs.  If you're going to set this up on a single SMB network there will be some modification involved (which I will document later)

PFSENSE Settings

For PFSENSE we really just need to modify some settings in the DHCP Server.  The FOG server is going to take care of the network booting and the TFTP server as we stated earlier but we need PFSENSE to point to the FOG Server.  Besides the IP range, mask and gateway the settings we are going to set are the TFTP and Network Booting.  Make sure your DNS is set to your PFSENSE Firewall first.  We set the TFTP server to the IP address of our FOG Server (192.168.1.4) and we enable netbooting with the FOG IP address again.  We make the Default BIOS file name "undionly.kpxe"


That is all that is required for configuring PFSENSE


Configuring Ubuntu 16.04 Server in Hyper-V

For running A fog Server on Hyper-V we are going to use a Gen1 Hyper-V Guest.  We have the network were going to use FOG on VLAN 9.  I have a network LAGG setup it the network adapter shows up as a team, the settings setup though will be very similar if your using a LAGG or not.  


So we create our vlan in the Intel driver in this case vlan9.


Then we create our virtual switch in the virtual switch manager.  This is a tagged VLAN.


Here are our virtual machine settings for our FOG Server.


As you can see we have our Integration Services Enabled, 2 VHDX Files 1 80GB the other 500GB and we are using a the standard network adapter.  I have the FOG Server configured with non-dynamic Disks for better though put performance, 8GB of non-dynamic ram and 2 virtual processors.

Configure The FOG Server

For FOG I am going to be using 16.04 LTS, I am going to be installing a GUI with it so once all that is setup and configured.  The only thing installed on the server version of Ubuntu is the OS and the GUI.  You may want to double check your settings and ensure you remove the unattended-upgrades packages as there have been issues with fog.

Now we want to automount our "images" drive (our send vhdx) so when you do updates and reboot we don't have to remount the drive.  We edit the fstab file sudo vi /etc/fstab

Shown in the image below we add our 500GB vhdx is /dev/sdb1 and below we have what we are mounting the drive as.

/dev/sdb1         /images     ext4     defaults         0         1

Now you may need to play with permissions depending on what your needs are, if your looking for quick and dirty you can go with 777 but you should never go with 777.


The FOG installer will do the rest and it can be downloaded at https://fogproject.org/


Enabling the Hyper-V Integration Services for Linux Distributions that Ship with LIS Drivers and Services Already Installed

First we edit the "modules" file located in /etc/initramfs-tools using this command: 

sudo vi /etc/initramfs-tools/modules

and enter the following lines: 
hv_vmbus 
hv_storvsc 
hv_blkvsc 
hv_netvsc

Save and exit the file.  Run sudo update-initramfs –u then reboot the virtual machine.

Once the guest virtual machine is rebooted, the LIS drivers and services will be registered in the system.

You can verifying Hyper-V Linux Integration Services by running the following command

lsmod or lsmod | grep hv

The above command should list the Hyper-V LIS drivers and services. You'll need to look for hid_hyperv, hv_netvsc, hv_utils, hv_storvsc and hv_vmbus for the successful activation of LIS


Now we install Fog.

It is recommended that you move the extracted fog file to the /opt directory and execute the installer from there.  You can read more about Installing FOG from the project Wiki and I have done a tutorial on how to install Fog Server on my YouTube page.

So we download and fog and extract it.  The current version of Fog Project as of this writing is 1.4.3.  I renamed the folder from fog_1.4.3 to fog after extracting moved the fog folder to the opt directory by sudo mv fog /opt

then cd /fog/bin and sudo ./installfog.sh


The FOG installer will get and setup all required packages.  By default it leaves mysql with no password so I would suggest securing it by installing it before, or after and modifying the fog setting in the fog settings file located in your fog install directory in this case /opt/fog/.fogsettings.


FOG INSTALLER
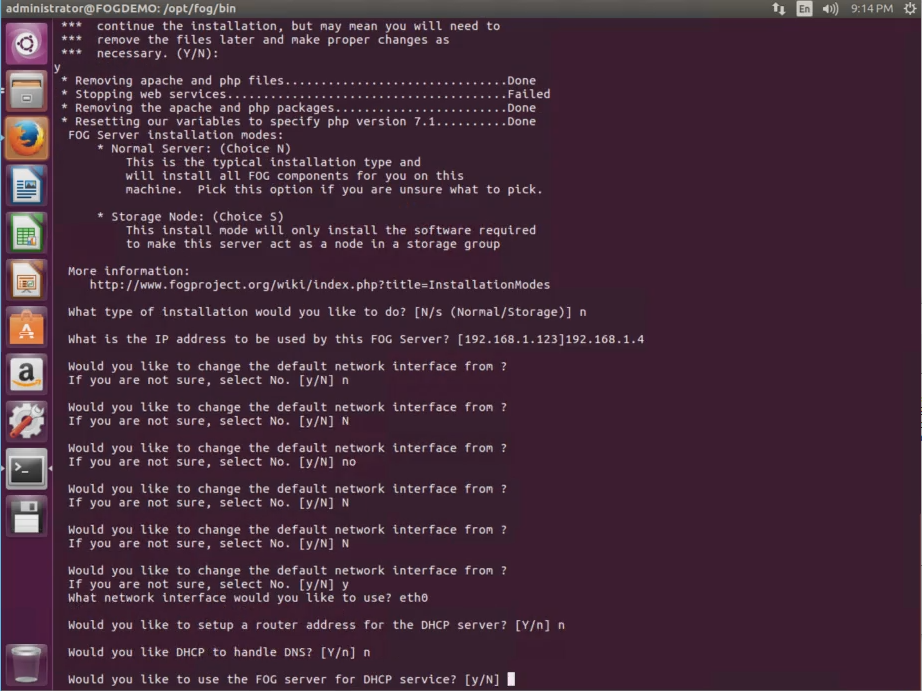
This is a Ubuntu virtual machine running on Hyper-V so we select choice 2 and we want a Normal Server Install.  I want my IP to be 192.168.1.4 so in PFSENSE you can statically assign the IP before hand or you can do it after but it is best to have what you want planned out before hand.


Now unless your using multiple interfaces you want to keep your default interface in this case eth0.


Then we get asked again if we want FOG to handle DHCP and DNS and since PFSENSE is handling this we say no to both.  Then we get asked for internationalization and for this I selected no.


Fog then goes and get all required packages and installs them.


Here we get asked about the MySQL password and for the purposes of this post it is blank but as will all things you should secure it with a password.


Once all the installs for the database are done, we need to open the browser and verify the schema is up to date, otherwise this can cause us problems and it is easier to reinstall then to try fix the problem.


After updating the Schema, we can finish our install


Updating MySQL Schema in the browser before continuing the fog install.

Here is the screen after the setup is complete.


Remember the default username is fog and the password is password and you should change the GUI login at minimum.


Now that we have this all setup we can start imaging.  I pulled an image from a client machine and I got 4.35GB/min transfer rate on a 1 gig lan connection.  As you can see to pull an image took 10 minutes and to push one took about 20 minutes.


The progress also shows up in the tasks menu in the web based GUI with all the same information as shown below.


Fog Image Capture (Pull)

FOG Image Deploy (Push)

Crontab changes in Linux 26.04 vs previous versions

I use a small Linux server to control the turning on and shutting off our client stations with crontab.  The system I typically use is Ubunt...