Friday, March 31, 2017

Setting Up PFSENSE with OPENVPN using User Authentication

PFSense is a great firewall solution.  It is flexible, easy to customize and comes with built in VLAN and VPN support.  Now I am going to document this for setting up a User Authenticated Open VPN Server in PF using the local database that is in PFSENSE.  This will have to be modified for larger organizations; but would be great for smaller and mid-range shops.  This is the least secure way to set this up but is the easiest to setup.

A couple of things to note.

The PFSense OPENVPN client wizard automatically makes the routing for the WAN which is what is used in most setups as most organizations use one firewall.  If you re-run the export wizard and if you made a change to the rule it will reset any changes you made to the WAN.

If you are using PFSENSE with CARP FAILOVER, you must select the CARP address and change any firewall ports/forwards and NAT/Outbound rules.  On your OPENVPN Server make sure the interface is set to your CARP address as well.

Before you proceed you should install the openvpn-client-export package as seen below.


What this tool does is it adds a client export utility which really just allows you to download a .ovpn of your firewall connection for the Open VPN client.  It makes it really easy to make the .ovpn file you need to use with the Open VPN client.


PFSense supports 3 Server Modes for OPENVPN


The OpenVPN Server Mode allows selecting a choice between requiring Certificates, User Authentication, or both. The wizard defaults to Remote Access (SSL/TLS + User Auth). The possible values for this choice and their advantages are:
  • Remote Access (SSL/TLS + User Auth)
    • Requires both certificates AND username/password
    • Each user has a unique client configuration that includes their personal certificate and key.
    • Most secure as there are multiple factors of authentication (TLS Key and Certificate that the user has, and the username/password they know)
  • Remote Access (SSL/TLS)
    • Certificates only, no auth
    • Each user has a unique client configuration that includes their personal certificate and key.
    • Useful if clients should not be prompted to enter a username and password
    • Less secure as it relies only on something the user has (TLS key and certificate)
  • Remote Access (User Auth)
    • Authentiation only, no certificates
    • Useful if the clients should not have individual certificates
    • Commonly used for external authentication (RADIUS, LDAP)
    • All clients can use the same exported client configuration and/or software package
    • Less secure as it relies on a shared TLS key plus only something the user knows (Username/password)

More in depth documentation can be found here at https://doc.pfsense.org/index.php/OpenVPN_Remote_Access_Server#Authentication

This tutorial will help you setup a Remote Access (User Auth) setup.  There are a few things you need to setup before you begin.
  1. Have a user setup that you plan on using for OPENVPN
  2. Setup up a Certificate
  3. Run the OPEN VPN Wizard
  4. Open Your Firewall ports and setup your routing properly.

STEP 1.  Create a OPENVPN User

I would highly recommend using something separate from the built in account; not only is it best practice it would be stupid to use default account.  Depending on your setup if your using groups etc, you will need to add permissions for what you want.  To just access the network you don't need to have the user setup as a member of the Admins group.  Now you can restrict their access to gui controls in the firewall etc. Just remember this user has access to the firewall so lock it down as best you can.  PFSense supports LDAP and Radius as well as local database.  We will be using the local database installed in PFSense which is used for user management.


STEP 2 - Create your Certificate

You could setup letsencrypt though there is no really good way of automating the renewal of the TLS Certificate every 90 days yet.  For our purposes we are going to use a self-signed certificate.  Create a internal Certificate Authority which is used for self signing.  I used the default a 2048 bit key length with a sha256 digest.  We are creating the Certificate (which is shared for all remote user access) so that the tunnel is encrypted.  The default lifetime of the Cert is 10 years.


Here is a sample of what the cert should look like.


And you should create an internal Certificate Revocation List.  This will allow you to revoke the certificate incase you lose control of the private key.


STEP 3 - OPENVPN Wizard

This is basically a fill in the blank wizard.  When you finish it will generate a OPENVPN server and exported client settings.  This is the easiest way to create the .ovpn file and recommend using it and making changes to the .ovpn file after the fact.


The tunnel network is the network that the client is using to connect to the network you want to access.  An example is the client using the OpenVPN client would have an ip address on the virtual network 192.168.2.0/24 and is trying to the actual LAN network of 192.168.1.0/24.  So the client would get an IP of 192.168.2.3 and would be able to access the NAS on 192.168.1.50.  You may need to add the push "route 192.168.1.0 255.255.255.0" in the advanced section otherwise the routing may not work as expected.  I have found for the most part this is required and further down if your using this to VPN into an Active Directory Network and want to access DFS shares you will also have to push out DNS settings.


After the wizard is completed you will see your VPN Server like in the image below.


You will want to go into the settings and make a few changes.


You will want to make sure that the server mode is set to Remote Access (User Auth) and your interface is what it needs to be WAN or CARP Typically.

You will then want to go to the client Export option. (This is a plugin in PFSense so make sure you install it first.)
Here you can download all your OPENVPN Config Options


4. Confirm your Firewall Ports and Routing are working properly.

Your firewall rules should look something like this.


The exported OpenVNC settings file looks something like this.


persist-tun


persist-key

cipher AES-256-CBC

auth SHA256

tls-client

client

remote X.X.X.X YYYYY udp

lport 0
auth-user-pass
ns-cert-type server
comp-lzo adaptive

-----BEGIN CERTIFICATE-----

-----END CERTIFICATE-----
setenv CLIENT_CERT 0
#
# 2048 bit OpenVPN static key
#
-----BEGIN OpenVPN Static key V1-----

-----END OpenVPN Static key V1-----
key-direction 1


UPDATE:

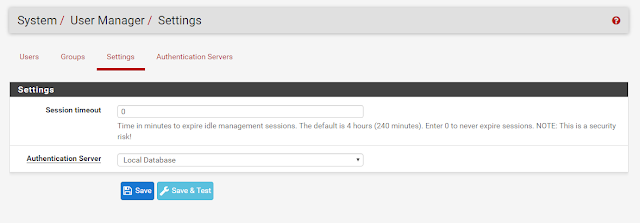
If you want access to DFS Shares though AD, you will want to push all traffic through the VPN.  Check the Redirect Gateway.  The default is 10 Concurrent Connections.

I've also set the DNS Server Enable pointing to the DNS for the AD Controllers and I've also enabled Block Outside DNS, and Force DNS cache update.

I've also added a few additional options for custom options for the DNS Server.

push "route xxx.xxx.xxx.0 255.255.255.0"
push "dhcp-option DNS xxx.xxx.xxx.xxx"

You may also have to update your Active Directory settings to enable slow-link mode. (see below)


Once you connect to your VPN you will be working in offline mode because your not connected to the domain right away.  If you click the work online on the client the DFS shares will come right up.


Friday, March 03, 2017

Screensaver Lockscreen using GPEdit

You will need to be an administrator on the local machine or in AD to make these changes.

Open GPEDIT.msc
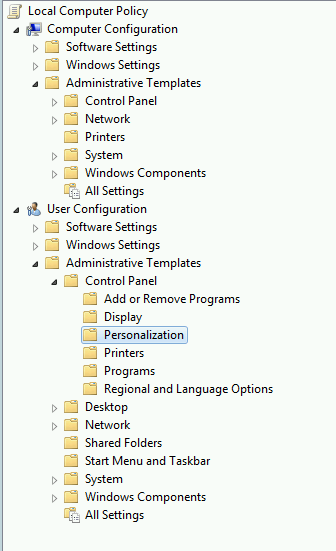
Under “User Configuration” go to Administrative Templates -> Control Panel -> Personalization


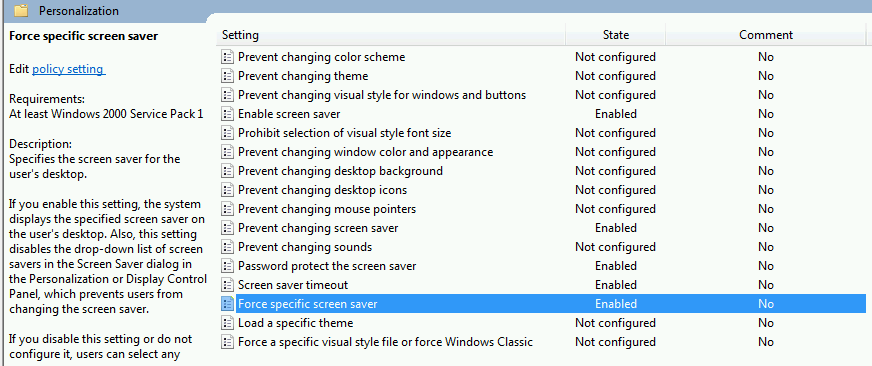
Edit and enable the Following Settings
    1. Enable Screen Saver -> Enable
    2. Prevent Changing Screen Saver -> Enable
    3. Password Protect the Screen Saver -> Enable
    4. Screen Saver Timeout -> Enable and Set to 300 Seconds
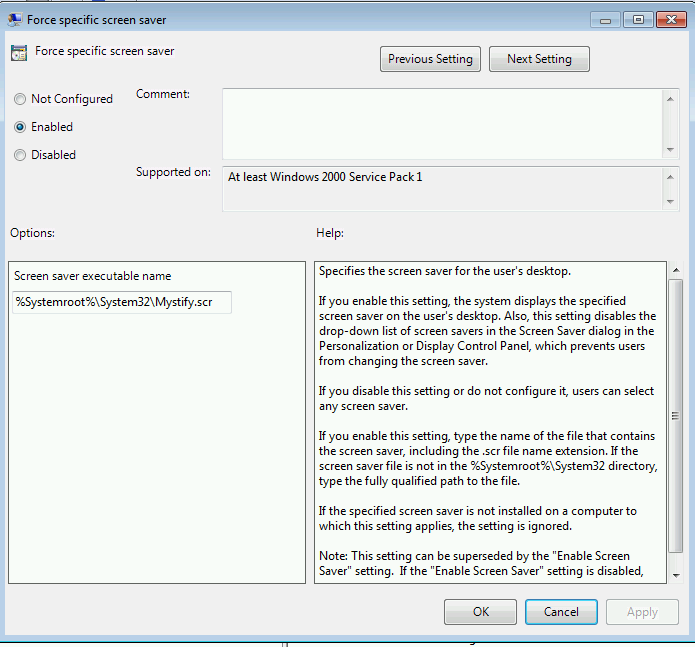
    5. Force Specific Screen Saver ->  Enable and set to %Systemroot%\System32\Mystify.scr


Apply and hit ok.

Open up the cmd prompt and type in gpupdate \force and logout when asked.

Timed Lockscreen on Windows with Taskscheduler

Instead of using a screensaver to activate the lock screen you can use the user32.dll to lock your screen.

Open up Task Scheduler:  I called the task lockscreen.  See below.


On the Trigger I've selected idle.  I've set the task to repeat every 10 minutes.


Actions - Start an program. The path is C:\Windows\System32\rundll32.exe   Add the arguments: user32.dll, LockWorkStation


Conditions.  Start the task only if the computer is idle for how ever many minutes you want.  I selected 1 minute.


 Settings:  Configure any additional settings and be on your way.


Wednesday, August 24, 2016

FreeNAS Disaster Recovery

FreeNAS is a fantastic NAS solution it is really robust when it comes to management, backup and restoring from a dead USB Key, Hard Drive failure are fantastic.  However what if your motherboard dies?  What if your using a RAID controller in JOBD and it dies?  

I had the RAID controller die on me and the consensus on the internet was I'm F*cked.  

I had setup a FreeNAS system on a Quadcore AMD Phenom System from 2007, because I needed a system with lots of storage space, for backup purposes, which this chassy allowed.  The Processor is 2.3 Ghz, and has 40 GB of RAM along with dual power supplies.  I had put in an Areca 1120 because the SATA Bus is faster then the onboard SATA (SATA2 Vs SATA1) on the motherboard.  The system was configured with 8 3TB WD RED NAS drives in a Z2RAID, and an 80GB Intel 520 SSD for a arc cache.  The system was working as an iSCSI target and SMB server and performed extremely well, with the slowest part of the system being the network connection.  Then when I came in to work this morning the system was completely unresponsive.  I had 2 virtual machines running off the iscsi target which were in production, a Linux Print Server and a mailforwarder / Scheduling server.  I had a backup up to a few days before which I recovered to but I had to get the the data for the the scheduling software.

After trying a few reboots hoping the ARC RAID controller might magically work I disconnected it and tried to plug the drives into the mainboard and the system booted but FreeNAS couldn't find the Storage Pool.  I was not surprised with this result and no backup raid controller, it was time to get creative.  I had access to 2 different PCI Silicon Image Software RAID cards a 4 port and a 2 port so I thought I would try put them in and hook up 6 of the drives that were on the failed raid controller to these software based controllers I might have a chance to get the data; after all I had configured the 1120 as a JOBD setup and let FreeNAS handle the raid as stated in their best practices. 

It worked.  FreeNAS booted and was able to access the storage pool but in a "Degraded" state.  I was able to pull the VHD from the iscsi target that I needed with NO LOSS of data, and put it back into production.  I also grabbed a few other files while I had the server up, but the recovery was a complete success.

This is the first time I've tried this, but if anyone is having a issue with freenas not reading a storage pool after a hardware failure and your OS USB drive is in good shape give this Silicon Image RAID controllers a try it worked for me it might work for you.

Friday, July 29, 2016

Pokemon Go, You, Your Child, and Privacy


Pokemon Go is all the rage right now, and if your a parent you might not be to sure how to handle this new app craze that is the Angry Birds of 2016. Pokémon Go is a free-to-play location-based, augmented reality game developed and published by Niantic, Inc. for iOS and Android devices.  What you might not be aware of is some of the privacy issues that you may be exposing you and/or your child to.


As you may or may not be aware the way Pokemon Go! uses two ways to sign up for an account.  Using a Pokemon Trainer Account and tieing it to a Google Account.  If you are signing up a child to play this game I highly recommend you use the Pokemon Trainer account.  If you sign up your child with a new google account there are some issues.

1) The Google Terms of service specifies that a user must be at least 13 years of age.

"At the moment, age restrictions don't warrant a single word in Google's Gmail Terms & Privacy details. Google does, however, spell them out on YouTube, buried down in item 12 of its Terms of Service. “If you are under 13 years of age, then please do not use the Service."

You can use the gmail account setup by the schools if the schools are setup for using google because there are additional privacy protections with those accounts.

2) The Pokemon Trainer account is suppose to compliance with the Children's Online Privacy Protection Rule "COPPA" as is the Google Accounts for schools, and has far more privacy restrictions then with a general Google Account. 

Granted that COPPA is a US based law and according so TWIL Episode 353 it is suppose to offer better privacy protection than your typical google account.

HOW TO CREATE POKÉMON TRAINER CLUB ACCOUNT

1. Go to the Pokémon.com official website or click on this link to go to the signup page https://club.pokemon.com/us/pokemon-trainer-club/sign-up/


2. Once you enter the webpage, below the “Join the Pokémon Trainer Club”” click on “Create an Account” button.
3. Click on the button marked, “Continue,” in the section on the right hand side of the page that is marked, “Sign Up! New to Pokémon.com ? Sign up for an account now!”
4. Select your country of residence from the drop-down menu, then enter your date of birth, Next, click on the button marked, “Continue.”
5. Complete the sign up process as directed to activate your account.
6. Done. Now go back to your phone and start the Sign up process. Please make sure to use your Pokémon Trainer Club Account instead of your Google Account.

Thursday, June 16, 2016

Fixing Veeam Hyper-V Replication Failure Caused By VSS Writer


I just had an issue with the Veeam Backup and Replication Software where a replication job was failing.  I have Veeam setup to email error logs to me and I started getting error messages with a replication job where it was not reconciling the differences in the disk on the fail-over server.

Here is a sample of the email error.


After getting a few of these emails I checked the server and discovered on of the VM replication jobs appeared to be stuck on in progress.

A Sample of the log on the Veeam Server

VM {VMNAME} task has finished with 'InProgress' state.
Task details: Failed to create snapshot (Microsoft Software Shadow Copy provider 1.0) (mode: Veeam application-aware processing) Details: Writer 'Microsoft Hyper-V VSS Writer' is failed at 'VSS_WS_FAILED_AT_PREPARE_SNAPSHOT'.

The writer experienced a transient error.  If the backup process is retried,
the error may not reoccur.
--tr:Failed to verify writers state.
--tr:Failed to perform pre-backup tasks.

Make sure VM does not have 'iSCSI Software Target Storage Provider' feature installed.
Retrying snapshot creation attempt (Writer 'Microsoft Hyper-V VSS Writer' is failed at 'VSS_WS_FAILED_AT_PREPARE_SNAPSHOT'.

The writer experienced a transient error.  If the backup process is retried,
the error may not reoccur.

--tr:Failed to verify writers state.
--tr:Failed to perform pre-backup tasks.)

Task has been rescheduled


Googling the issue I only found this blog http://www.insidetechnologies.eu/en/blog/veeam-br-resolve-hyper-v-vss-writer-error/  and after double checking that his solution wouldn't bring down my Hyper-V Server by checking Microsoft Technet https://social.technet.microsoft.com/Forums/en-US/69e6dcbd-fbe3-43e0-a7b3-65111fbdf00a/will-the-running-vms-be-impacted-if-i-restart-the-hyperv-virtual-machine-management-service?forum=winserverhyperv

I disabled the replication jobs and stopped the Hyper-V Virtual Management Management Service on the primary server; while it took a while for the management service to stop but once it did and I restarted it everything came back no problem and the replication jobs started, reconciled and finished without an issue.

Saturday, June 11, 2016

Setting Up Veeam Backup and Replication in a Hyper-V Enviroment

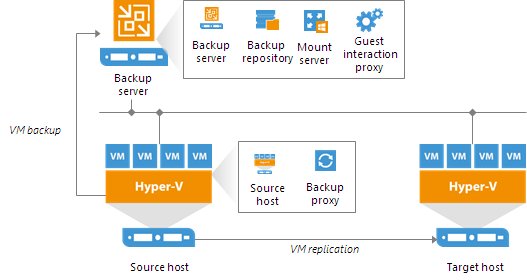
This is a modification of a Veeam backup and Replication setup I have done that is in production.  This system is setup in a WORKGROUP enviroment.   This was done for 2 reasons, all the virtual machines are in a non-domain setup, and I didn't have the resources to setup a full domain for the Veeam setup.  I also have some recommended reading that I would suggest you do before you start to implement the Veeam Backup and Replication System.  This post is going to be a variation of the Simple Deployment Model based on the Veeam user guide.


Veeam Hyper-V Simple Deployment Model

I do have some recommendations that I would suggest putting in place if your organizations budget can handle it.


  1. Two physical active directory controllers and 1 virtual read only controller if your using a clustered hyper-v system (Mostly used for the Cluster System)
  2. A cluster system for the Veeam Backup and Proxy Server which are virtualized.  Having a separate server for the Guest interaction proxy and backup proxy will take load off the source host.
  3. Freenas or other high storage and performance NAS System with dual power supplies and battery backup with at minimum 2 disk redundancy (for freenas known as RAIDZ2).
  4. Smart switches with LACP LAGG and vlan support

For the purposes of this post we are going to assume a few things.  You have all the necessary licences you require for Microsoft Windows Server 2012R2 or better including all CALS, SQL Server, SQL Server Cals, Veeam licences etc.  There is have a working infrastructure in place and for our purposes we are going to use 192.168.42.x network.  This is a setup for a SMB with no available offsite hosting capabilities, this is just an onsite redundant setup for when the virtualized servers needs to be put into a maintenance mode or  have had some sort of failure either in the VM or the Hyper-V Host.


The setup

We are going to use a workgroup setup and the VM's don't need to be on the same network as the host or the storage essentially what you really need to talk to each other is the NAS, Veeam Server, the Primary and Fail-Over servers and the gateway/router.   For my sanity on this post everything is just on the same network.  If you use a domain you can simplify a lot of this due to having a domain level admin on all systems attached to the domain.


Gateway/Router
Primary Host
Failover Host
Veeam Server
VM 1 (SQL Server)
VM 2 (Apache Server on internet)
VM 3 (3rd party connection server)
VM 4 (report server)
FreeNAS SMB
192.168.42.1
192.168.42.2
192.168.42.3
192.168.42.4
192.168.42.5
192.168.42.6
192.168.42.7
192.168.42.8
192.168.42.9


In Veeam when you setup a VM for replication the wizard gives you a variety of questions to answer.

1. Create a new replication job


2. Select your failover host and specify the save location.


3.  Verify The Job Settings.  Next I will be going though Advanced Settings


4.  This Veeam setup is on the same LAN, so optimizing for low bandwidth is not as important but you should always optimize your replication job for which ever environment your in.  In this case a LAN Network Target Server for Failover and Production.

5.  I've setup my Veeam instance for Application Aware Image Processing.  Guest Processing, which will allow you to create a transitionally consistent backup, configure transaction log handling settings, and enable guest file system indexing.

6.  Veeam also has the ability to excite PowerShell scripts when running fail-over/replication jobs.  I haven't set anything up yet but it is possible to do.

7.  If I had setup an off-host proxy server that would be handling the majority of the backup and not the Primary host server which does create quite a bit of additional load.  Currently as per the diagram in the beginning of this post there is the Veeam Server, The Primary Production Server and the Fail-Over/Backup Server.  I will be adding a off-host proxy server to take most of the load off the production server in an effort to speed up the backups and the replication time.

8.  If you have a copy of the VM on the backup server you can do what's called Replica Seeding.  This will significantly reduce the amount of bandwidth used.


9.  Here is where you define the guest processing for the Veeam Backup and Replication Server.  It is recommend that you set this up.


10.  Configure you backup/replication schedule


11.  This is the summary screen, it will tell you everything about your backup/replication job and it is pretty easy to find configuration errors.  One done your Veeam replication job is ready and running.


I would definitely recommend Veeam for any company that is looking for a easy fail-over solution especially if they need to be up 24/7.  The backup jobs work much the same way and when I have done testing of the fail-over I've setup it appears as just a blip in the process, and is not really noticed.  A few of my personal goals for this is to get an off-site proxy server set up, and move the backup server offsite and setup the reconfiguration ip addresses which Veeam is capable of.

I definitely recommend going though Veeam University https://www.veeam.com/university.html

Updating your godaddy certs during the G2 intermediate hierarchy to the TLS Root CA - R1 hierarchy

  If you use GoDaddy TLS certificates you should be aware of some changes during the transition from the G2 Intermediate certificates to the...