Sunday, February 24, 2019

Performing a Rolling Upgrade of Windows Server 2012R2 to 2016

In January I performed a rolling cluster upgrade on my organizations Microsoft Hyper-V cluster going from server 2012R2 to server 2016.  I highly recommend reading the following resources as they were a great reference for me.

https://docs.microsoft.com/en-us/windows-server/failover-clustering/cluster-operating-system-rolling-upgrade
https://redmondmag.com/articles/2016/12/15/clustered-hyperv-deployment.aspx
https://redmondmag.com/articles/2016/12/19/hyperv-deployment-2.aspx

There were a couple of caveats with the upgrade as outlined below.
  • Move from seven clustered nodes to a two node failover
  • Consolidate 19 VMs to 12
  • Upgrade NAS and Cluster Servers to 10 Gig networking
  • virtualize all AD controllers
What is being kept:
  • 2 X FreeNAS storage Servers
What is being removed:
  • 6 X AMD Piledriver 15H Microcloud Server
What was being upgraded and kept:
  • 2 X AMD Bulldozer 1U Servers
Upgrading the core to 10 gig

The migration to the 2X AMD bulldozer 1U servers was due to a lack of availability of getting new hardware ordered and a urgent need to remove the Microcloud system.  I felt it was a good idea to start with the storage as I had 4 servers I needed to upgrade with 10 Gig and with Freenas it is pretty straight forward.  We went with Intel X540 T2 cards because they were within our project budget and with having purchased Meraki MS350 24X which have 10 Gig, I though it was best to make use of them.  Unfortunately they don't support iWARP/RDMA but we were running 19 virtual servers off 2 freenas boxes on dual gigabit LACP LAGG.  Any limit we would reach I would think should be caused by disk (spinning rust) as they are not high speed SAS or NVMe but Enterprise SATA drives.

The upgrade on the FreeNAS servers went great all that was really required was having good documentation for any IP addresses on the storage and that the switches had all the required networks.  On the cluster management part it was a matter of shutting down the VM's, off-lining the cluster storage (maintenance mode), popping in the new network cards and configuring the networks to what they were everything came back without a hitch.  For verification we ran with the 10 gig in the systems for a month with no issues.  We then started with the Rolling upgrade

Step 1. - Run a cluster validation report.

It's hard to see where you're going without knowing where you've been and where you are.  This is why I recommend running a cluster validation report before you start anything.  This way you know what errors you were getting before hand and you will be able to know if something happened because of the upgrade or because there was a mistake or that you fixed something that might have been broken.  As shown below is a validation report before I started the upgrade from 2012R2 to 2016


Server 2012R2 Cluster Validation Report
As you can see I have several warnings on the validation report.  The errors included some network issues of dropping packets and other things such as the Cluster Aware Update Service being configured to be run in a separate monitor as shown below.


With that report being done, we can now start our Rolling upgrade.

Rolling Upgrade

I had to come up with a plan of more or less what I was going to do for the rolling upgrade.  This is it in a nutshell.


<!--IMPORTANT NOTE--!>


When the first Windows Server 2016 node joins the cluster, the cluster enters "Mixed-OS" mode, and the cluster core resources are moved to the Windows Server 2016 node. A "Mixed-OS" mode cluster is a fully functional cluster where the new nodes run in a compatibility mode with the old nodes. "Mixed-OS" mode is a transitory mode for the cluster. It is not intended to be permanent and customers are expected to update all nodes of their cluster within four weeks.


Cluster Upgrade Process
  1. Disable Cluster Aware Updates (CAU), verify if CAU is currently running by using the Cluster-Aware Updating UI, or the Get-CauRun. Stop CAU using the Disable-CauClusterRole to prevent any nodes from being paused and drained by CAU during the Cluster OS Rolling Upgrade process. This really depends on how many resources you have to keep the cluster going in this case we have enough resources so it is not required.
  2. Backup Cluster Database (requires third party software)
  3. Remove/Drain Rolls from from cluster being upgraded for use in 2 node cluster Backup (Full Export) of Workload DATA (VMS)
  4. After moving the VMs off of server, upgrade RAM and Reconfigure disks 1 SSD OS MIRROR and 1 HDD MIRROR for DATA reinstall with server 2016
  5. Upgrade and Configure networking
  6. Add Hyper-V and cluster rolls
  7. Add node to the cluster 

Verify cluster rolls and nodes in hybird 2012r2 and 2016 setup. Once verified evict the other 6 2012R2 nodes ensuring all rolls are transferred to new 2016 nodes and verify the cluster is operating properly.   Then upgrade the Cluster Functionality level

  1. Re-Enable CAU, restart it using the CAU UI or use the Enable-CauClusterRole
  2. Open Powershell -> Run the Update-ClusterFunctionalLevel cmdlet - no errors should be returned. Fix any errors.
  3. Upgrade the VM’s Hyper-V VM Configuration (Version)

Upgrade the Hyper-V Storage-Pool. Storage pools can be upgraded using the powershell command Update-StoragePool which is an online operation.


Cluster Changes


It is always easier and safer to start new or fresh, however this is not possible at this time.  When we go to upgrade the cluster infrastructure we will be doing a Mixed OS cluster until we remove all 2012R2 servers and upgrade the cluster functionality level. When the first Windows Server 2016 node joins the cluster, the cluster enters "Mixed-OS" mode, and the cluster core resources are moved to the Windows Server 2016 node. A "Mixed-OS" mode cluster is a fully functional cluster where the new nodes run in a compatibility mode with the old nodes. "Mixed-OS" mode is a transitory mode for the cluster. It is not intended to be permanent and customers are expected to update all nodes of their cluster within four weeks.


The two nodes I am upgrading to server 2016 from 2012R2 are almost identical, with two major differences. 2 X 2.8 GHZ quad core processors vs 2 x 3.2 GHz quadcore processors and one requires an old adaptec raid driver vs a dothill raid controller. Both machines have 80GB of DDR3 ECC RAM.

TIPS

  • All Nodes need to have the exact same software installed.
  • All Nodes need to have the exact same Virtual Switches and Named the same.
  • All Nodes Should Have RDS Enabled
  • Virtual Network Adapter TEAM: AdapterName ( I typically put the Cluster/Client communication on the default VLAN)
  • Cluster Name: $CLUSTERNAME


Cluster Upgrade Process


Step 1 . Disable/Stop Cluster Aware Updates
  • If you are running Cluster Aware Updates (CAU), verify if CAU is currently running by using the Cluster-Aware Updating UI, or the Get-CauRun. Stop CAU using the Disable-CauClusterRole to prevent any nodes from being paused and drained by CAU during the Cluster OS Rolling Upgrade process. This really depends on how many resources you have to keep the cluster going in this case we have enough resources so it is not required.
  • Backup Cluster Database (use Veeam, Altaro, Windows Server Backup)
    Backing Up Failover Cluster Configuration
  • Drain the rolls from cluster node being updated. Ensure all rolls from node have been removed and transferred then evict from cluster
  • Upgrade Node to Server 2016. I made sure that I had as many of the rolls and features that were on the other nodes re-setup on the new 2016 node.
  • Rolls Required
    • File and Storage Services everything but work folders
    • Hyper-V

  • Features Required
    .net 3.5
    .net 4.5
    Client for NFS
    Data Center Bridging
    Enhanced Storage
    Failover Clustering
    Ink and Handwriting services
    media foundation
    multipath io
    Remote Admin Tools
    Hyper-V management
    File services
    Failover cluster tools
    SMB1
    SMB Bandwidth limit
    User Interfaces
    Windows Internal Database
    Windows Server Backup
    Windows server migration tools
    Windows Standards-based storage management
    WoW64 Support
  • Setup network. (Intel network setup) Cluster only allowed on cluster network. To do this we are setting up NIC Teaming to have easy access to VLAN Tagging.

Once done create the LAGG adding the active NIC to the team.
Repeat the steps for as many times as you need until you have all the VLANS you need for the server.

  • Add the Hyper-V Switches to the network. I setup only one network for VM and Cluster Traffic. It is recommended that you have more then one network for doing this. Make sure you match the proper Microsoft Multiplexor adapter with the proper vlan you have setup on your host interface, otherwise your VM's won't be able to communicate with anything.

VM and Host Network for cluster communication

VM network.  No Host/Cluster Communication Permitted.


    • Re-Connect the iSCSI targets on the host node after all networking is setup and configured.
      iSCSI Initiator
      IP: PORT -SSD
      IP: PORT -HDD
      IP: PORT - Quarcom
      IP: PORT - SSD
      IP: PORT - HDD
      IP: PORT - Backup Quarcom
      • Rejoin cluster
          Verify cluster rolls and nodes in hybird 2012r2 and 2016 setup.  Once verified evict the other 6 2012R2 nodes and verify the cluster is operating properly. Transfer Rolls such as the Cluster Core Resources and ensure are not running on nodes that you are decommissioning.
        1. Re-Enable CAU, restart it using the CAU UI or use the Enable-CauClusterRole
        2. upgrade the Cluster Functionality level
        3. Open Powershell -> Run the Update-ClusterFunctionalLevel cmdlet - no errors should be returned. Fix any errors.
        4. Upgrade the VM’s Hyper-V VM Configuration (Version)

        Upgrade the Hyper-V Storage-Pool. Storage pools can be upgraded using the powershell command Update-StoragePool which is an online operation.

        Verify Cluster Operating Level
        Get-Cluster | Select ClusterFunctionalLevel (Server 2016 and above only)
        https://serverfault.com/questions/848529/hyper-v-2012-r2-cluster-functional-level-missing

          Run cluster verification and fix any issues that crop up.


          Some tips from my Server 2012R2 to 2016 Upgrade:

          • I had to limit the number of networks the cluster host runs off of due to some DNS resolution issues that worked using server 2012R2 but not under 2016.  I had to remove the cluster host from using these networks due to DNS Error 1966 showing up and under server 2016 causing cluster communication problems.  To do this I disabled the communication using the Hyper-V switch manager with the setting shown below.

          • I did have to remove and re-add the cluster auto-update roll. 
          • Cleanup the AD and remove any cluster nodes that did not get automatically removed.
          Other then that I had a really successful cluster update to server 2016 and everything has been working well since.

          Tuesday, January 22, 2019

          Veeam Certificate Expiration Date Check Error


          Updating Veeam Backup Server Certificate

          Veeam uses certificates to secure backup communications between your backup component. In this case I am having Veeam use a self-signed certificate, but you can select your own from the certificate store or import a pxf file that you have from somewhere else like Let’s Encrypt or another certificate authority.


          Go to the menu - > General Options


          Select the security tab


          If you click on the self signed cert link you will get the cert info as shown below.


          To update the certificate press the install button


          Select generate new certificate


          At the Generate Certificate step of the wizard, specify a friendly name for the created self-signed TLS certificate.  (I’m just staying with the default) Veeam Backup Server Certificate


          Once that is done the install the certificate your given the option of installing on the localmachine or for the user; I installed it on the local machine and upon closing and relaunching Veeam, the error was resolved.  When using self-signed certificates with Veeam, the Veeam server is suppose to automatically renew the certificate every 12 months.  However a bug introduced in v9.5 U3a, caused an issue with the certificate renewal. 

          If you ignore this message, agent management functionality and granular restores will start failing.  The fix is to generate a new certificate as described here and in the reference link below.  When updating your certificate disable all backup jobs and update the certificate; then re-enable your backup jobs.  You want to do this because when you update the certificate the Veeam Backup Service restarts.  If you do the certificate update process with jobs running you could cause the jobs to fail or corrupt data.


          You can also refer to veeam 


          Wednesday, December 26, 2018

          Fixing Windows 10 Long Startup Time and Fixing Windows 10 Start Menu

          Sometimes a Windows Update or third party software can cause issues with your system.  In the two cases I'm referring one I'm sure was caused by a Windows Update, the other was caused by third party software.  System One is a Lenovo m93p and System 2 is a HP AMD based laptop.

          System One - Fixing Windows 10 Long Startup Time

          In the first case Running Windows 10 1803, after an update in June (though I believe this to be a May patch), the system started taking longer then 10 minutes to boot.  This system is big of a black sheep as I required some different software so reinstalling Windows would have been a bit of a pain.  Over this period, I re-imaged the system on 3 different SSD's and it seemed to help a little bit but then after a week or two after imaging it would be back to a 10 minute or longer startup.  Doing some more digging for this blog post I found this post (though too late for me but someone might find this useful.)  A very similar case of the boot up issue I was experiencing I found here https://answers.microsoft.com/en-us/windows/forum/windows_10-update/slow-boot-for-windows-1803/997b3e18-d347-4a8f-93e0-829dd0f6e8d2 

          The Lenovo m93 system I was dealing with had no, additional chipset hardware (such as Nvidia or AMD).   Fast boot was disabled, power management was all set to high performance.  The symptoms were the same; a long wait to start for Windows boot times.  Though I did not remove KB4103721 as I didn't find out about this post after the fact,  I started by swapping the SATA SSD in the system and re-imaged the system though this help temporarily alleviate the issue it did return.  The eventual solution I used was upgrading the system from 1803 to 1809.  It has been over a month now and the system has not had any boot up issues since.  To do that without re-imaging I used the Windows 10 Upgrade Assistant.  https://www.microsoft.com/en-us/software-download/windows10

          If your stuck on 1803 and need to stay on 1803 try remove KB4103721, if your experiencing this boot problem otherwise start planning your upgrade to 1809, that is what worked for me.

          System Two - Fixing Windows 10 Start Menu

          A friend of mine brought me their laptop because it was running slow; so when I booted it up it was indeed running slow, and I discovered that there were two antiviruses running on the system and that the start menu was also not working.  After removing the two AV products, the start menu did not come back to good working order, and I was getting a PIN error when trying to login to windows,  even after trying the fixes below.
            
          https://answers.microsoft.com/en-us/windows/forum/windows_10-start/windows-10-start-button-not-working/765f193c-4c67-4b85-81e0-645dfd29836c
          https://www.techadvisor.co.uk/how-to/windows/fix-start-menu-3623893/

          What did work was upgrading them to 1809, now everything seems to be running just fine.  https://www.microsoft.com/en-us/software-download/windows10

          Wednesday, December 12, 2018

          Fixing Lansweeper Active Directory USER LDAP Syncing Error

          In our organization we use lansweeper for ticketing and system inventory and management.  Recently we had an issue where our AD users would not sync with lansweeper.  The error shown was that the LDAP Server was unavailable

          LDAP ERROR
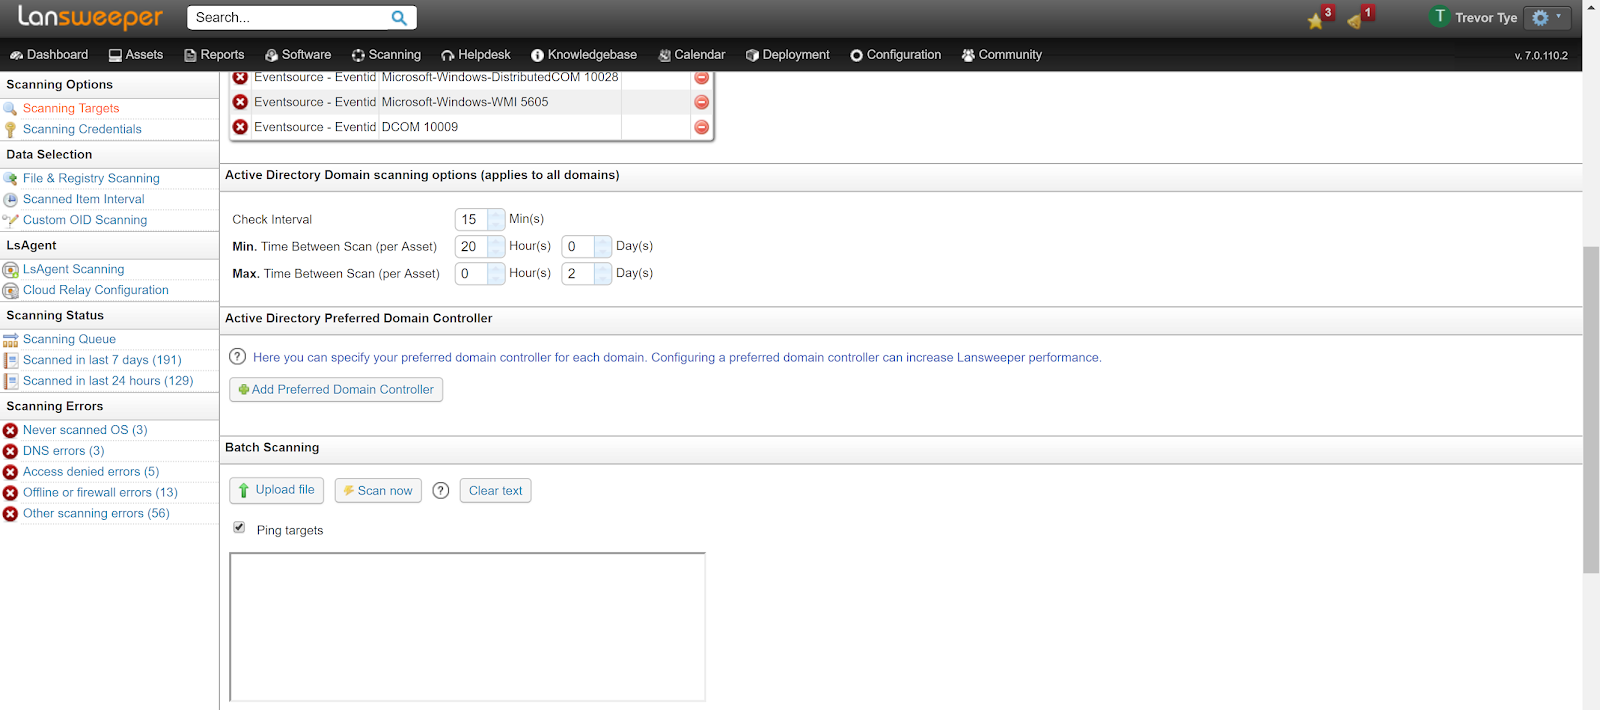
          The issue was caused by using a preferred domain controller that had died.  Theses settings are under "Scanning Targets"


          We removed the Preferred domain controller


          And setup a new scan


          Setup a new scan after the preferred ad controller has been removed

          Lansweeper Syncing with AD

          After the scan the Users started to sync with the AD Controller again.  However having had this issue once before, you may need to reboot the lansweeper server if the users continue to have the LDAP error after the rescan.  After the reboot the LDAP Error should be gone.


          Tuesday, December 11, 2018

          Setting up and configuring a LAMP Server for Joomla

          As a webdev, I spent a lot of time using projects such as xampp and wampp as a quick and easy way to start developing websites but have not had the chance to really deploy one myself, really besides the home server.  Even then I never really took the time to "Secure" the server properly and documentation for this is very wide ranging and opinionated at best.  There are lots of resources out there, but nothing that puts it into a nice neat package with any kind of explanation.  Most of the webservers I've used have been setup by other people, with little to no security in mind and why?  Because security is hard.  It breaks things, and it takes time to do it right.  In this post I will go over how to setup a secure web server from start to finish and this may be a good starting point for everyone who what to learn how to setup a secure server.  As always if you have any comments or pointer please do!

          You can watch my video on setting up a Ubuntu 18.04.1 LTS Server on Microsoft Azure

          https://www.youtube.com/watch?v=y9RQirmC_pk

          This is my video of this post but with out really explaination of why I do some things.  It is just a start to finish this is how you setup the server.

          https://www.youtube.com/watch?v=qszvUjjL-ZI

          With our server already setup via Azure or even on our localhost though Hyper-V or KVM login into your server and update and upgrade any missing packages.


          1. Install Apache2

          sudo apt install apache2


          Once that is complete then we are going to install Mariadb


          2. Install Mariadb

          Add MariaDB Key

          apt-key adv --recv-keys --keyserver hkp://keyserver.ubuntu.com:80 0xF1656F24C74CD1D8

          Add MariaDB Repo

          add-apt-repository 'deb [arch=amd64] http://mirror.nodesdirect.com/mariadb/repo/10.3/ubuntu bionic main'

          update

          sudo apt-get install mariadb-server mariadb-client

          sudo mysql_secure_installation

          Enter current password for root (enter for none): Just press the Enter

          Set root password? [Y/n]: Y

          New password: $password

          Re-enter new password: $password

          Remove anonymous users? [Y/n]: Y

          Disallow root login remotely? [Y/n]: Y

          Remove test database and access to it? [Y/n]: Y

          Reload privilege tables now? [Y/n]: Y

          sudo mysql -u root -p

          $password


          3. Create The Joomla Database


          CREATE DATABASE $DBNAME;

          Now here I would recommend creating a new user for the database we just created.

          Create the User
          create user $DBUSER

          Grant privileges while assigning the password
          grant all on $DBNAME.* to ‘$DBUSER’@’localhost’ identified by ‘$DBUSER_PASSWORD’


          Note: The localhost field usually doesn’t have to be edited, but you can set it to the specific address. The above example grants all privileges, obviously. But you may want to limit privileges.

          exit


          4. Install Unzip

          Install Unzip
          sudo apt-get install unzip


          5. Install PHP

          Install PHP
          sudo add-apt-repository ppa:ondrej/php
          sudo apt update

          sudo apt install php7.2 libapache2-mod-php7.2 php7.2-common php7.2-mbstring php7.2-xmlrpc php7.2-soap php7.2-gd php7.2-xml php7.2-intl php7.2-mysql php7.2-cli php7.2-zip php7.2-curl

          if libzip error
          vi /etc/apt/sources.list and add the following repositories

          deb http://archive.ubuntu.com/ubuntu bionic universe multiverse
          deb-src http://archive.ubuntu.com/ubuntu bionic universe multiverse
          deb http://us.archive.ubuntu.com/ubuntu/ bionic universe
          deb-src http://us.archive.ubuntu.com/ubuntu/ bionic universe
          deb http://us.archive.ubuntu.com/ubuntu/ bionic-updates universe
          deb-src http://us.archive.ubuntu.com/ubuntu/ bionic-updates universe
          deb http://us.archive.ubuntu.com/ubuntu/ bionic multiverse
          deb-src http://us.archive.ubuntu.com/ubuntu/ bionic multiverse
          deb http://us.archive.ubuntu.com/ubuntu/ bionic-updates multiverse
          deb-src http://us.archive.ubuntu.com/ubuntu/ bionic-updates multiverse
          deb http://security.ubuntu.com/ubuntu bionic-security universe
          deb-src http://security.ubuntu.com/ubuntu bionic-security universe
          deb http://security.ubuntu.com/ubuntu bionic-security multiverse
          deb-src http://security.ubuntu.com/ubuntu bionic-security multiverse

          Then edit and make the following changes to the PHP INI File

          sudo vi /etc/php/7.2/apache2/php.ini

          file_uploads = On
          allow_url_fopen = On
          memory_limit = 256M
          upload_max_filesize = 25M
          max_execution_time = 360
          date.timezone = America/Edmonton

          Restart Apache

          sudo systemctl restart apache2.service

          Create the file phpinfo.php

          sudo vi /var/www/html/phpinfo.php
          <?php
          phpinfo();
          ?>


          6. Setup Virtual Hosts


          Now that we have our apache server, mysql and php setup now we want to enable virtualhosts so we can host multiple websites on the same server.

          In this configuration our default site configuration is located in /etc/apache2/sites-available we want to copy the default virtual host file called 000-default.conf contents to the new virtual host files like below.

          sudo cp /etc/apache2/sites-available/000-default.conf /etc/apache2/sites-available/$myvirtualdomain.ca.conf

          you would do this for however many sites you need, but I would recommend getting one setup first then copying the finished config as may times as you need using the command above.  Then edit and change the settings highlighted in yellow to suit what you need as many times as you need it.


          Edit the virtual host file (sudo vi $myvirtualdomain.ca.conf)

          # The ServerName directive sets the request scheme, hostname and port that

          # the server uses to identify itself. This is used when creating

          # redirection URLs. In the context of virtual hosts, the ServerName

          # specifies what hostname must appear in the request's Host: header to

          # match this virtual host. For the default virtual host (this file) this

          # value is not decisive as it is used as a last resort host regardless.

          # However, you must set it for any further virtual host explicitly.

          #ServerName www.example.com

          ServerAdmin demoadmin@domain.ca

          ServerName webserver.domain.ca

          ServerAlias www.domain.ca

          DocumentRoot /var/www/html/domain.ca/public_html


          # Available loglevels: trace8, ..., trace1, debug, info, notice, warn,

          # error, crit, alert, emerg.

          # It is also possible to configure the loglevel for particular

          # modules, e.g.

          #LogLevel info ssl:warn


          ErrorLog ${APACHE_LOG_DIR}/error.log

          CustomLog ${APACHE_LOG_DIR}/access.log combined


          # For most configuration files from conf-available/, which are

          # enabled or disabled at a global level, it is possible to

          # include a line for only one particular virtual host. For example the

          # following line enables the CGI configuration for this host only

          # after it has been globally disabled with "a2disconf".

          #Include conf-available/serve-cgi-bin.conf


          Now disable the default config and enable your virtual host configuration files.

          sudo a2dissite 000-default.conf - disables this config file

          sudo a2ensite domain.ca.conf - enables config file of your virtual host you just setup.

          you will have to restart apache for your setting to take effect.

          sudo service apache2 restart


          ***NOTE it is very important that the ServerAlias matches the DNS otherwise the virtual host will not redirect the browser properly.

          If your working locally, you can make changes to your local hosts file.  Once you've gotten everything setup you can make changes to the DNS for Production.


          7. Copy Joomla to the Webserver

          Now upload the latest version of Joomla to the server via SCP.  Make sure you have a writable directory you can save to if you don't make one.

          SCP /path-to-file/file.zip $username@$HOST:/path-to-destination-folder/


          in this case I typically use just the home directory


          SCP /path-to-file/file.zip $username@$HOST:/~/file.zip


          Then copy and paste the zip file to the virtual host directory we created for the site.


          sudo cp Joomla_X.X.X-Stable-Full_Package.zip /Path/To/Virtual/Site


          Once copied to the server move it to the /var/www/html/$site virtual directory we just enabled and unzip the file.

          Run unzip sudo unzip Joomla_X.X.X-Stable-Full_Package.zip

          The default settings in Joomla are a little different from what however before we do that you will want to fix a couple settings in your php.ini file.

          There are 2 things we need to fix.  Now for Joomla, recommended settings are to disable output buffering, to do that we need to edit the php.ini file

          sudo vi  /etc/php/7.2/apache2

          Find
          output_buffering = 4096
          and change it to Off
          output_buffering = Off

          while were here we are going to increase the max file upload size

          Save your changes restart apache

          With the file now unzipped we are going to add our user/owner to the www-data group so we can properly run and execute Joomla.

          By default the www-data user and group are unprivileged; however Joomla requires the www-data group to have certain permissions.  So we are going to add the owner of the files to the www-data group so that Joomla can install modules, run updates, etc.  We don't want to set ownership of any files to the www-data user. The whole point of the www-data user is that it is an unprivileged user, not able to write to any files. Server daemons accessible from the outside network (such as the web server) typically run as an unprivileged user so that in the event that they are hacked due to a vulnerability, the possible things the attacker can do is minimal. In these cases you should set ownership to www-data ONLY for those files, keeping the number of files writable by www-data at a minimum it's the same reason, don't set any files to be world-writable.  You need to give www-data write permission to the joomla directory files. We don't want to give www-data ownership because of the security implications.  So to do this we are going to add our user to the www-data group, which will  give Joomla the permissions we need for it to run.

          add $USER to www-data

          sudo usermod -a -G www-data $USER

          sudo chgrp -R www-data /var/www/html/$Site
          sudo chown -R www-data:$USER /var/www/html/$Site

          Do this for the setup then change your files and folders for

          If you want to re-verify the proper permissions on the files and folders run the following commands

          find /var/www/html/$Site -type d -exec chmod 755 {} \;
          find /var/www/html/$Site -type f -exec chmod 644 {} \;

          Logout and log back into to verify the changes were made.  Now you should be able to run the Joomla installer without any write or execute permission issues.

          Now open your browser and run though the Joomla setup.  http://yournewjoomlasite/index.php


          Enable .htaccess and security headers

          To enable .htaccess and security headers you will need to add the following to your Site Config file located in /etc/apache2/sites-available called $Site-Domain.conf

          Add the following just under the tag

          Options Indexes FollowSymLinks
          Options FollowSymLinks
          AllowOverride ALL
          Require all granted


          Save the config file then eneable a2enmod by
          sudo a2enmod rewrite
          then restart apache
          sudo systemctl restart apache2


          Securing The Webserver

          enable module headers

          sudo a2enmod headers

          Now edit the security.conf file typically localed in  /etc/apache2/conf-available/security.conf

          Header unset X-Powered-By
          Header always unset X-Powered-By
          Header edit Set-Cookie ^(.*)$ $1;HttpOnly;Secure - Enable once you have ssl setup.
          Header set X-Permitted-Cross-Domain-Policies "none"
          Header always set X-XSS-Protection "1; mode=block"
          Header always set x-Frame-Options "SAMEORIGIN"
          Header always set X-Content-Type-Options "nosniff"
          Header always set Strict-Transport-Security "max-age=31536000; includeSubDomains"
          Header always set Feature-Policy "microphone 'none'; payment 'none'; sync-xhr 'self' Header always set Referrer-Policy "strict-origin"

          <!--very secure policy--!>
          Header always set Content-Security-Policy "default-src 'self'; font-src *;img-src * data:; script-src *; style-src *;"

          Very Insecure policy if your going to be using several different joomla extensions.

          Header always set Content-Security-Policy "default-src 'self'; connect-src *; font-src *; frame-src *; img-src * data:; media-src *; object-src *; script-src * 'unsafe-inline' 'unsafe-eval'; style-src * 'unsafe-inline';"

          So if you want a copy paste security headers

          Header unset X-Powered-By
          Header always unset X-Powered-By
          #Header edit Set-Cookie ^(.*)$ $1;HttpOnly;Secure
          Header set X-Permitted-Cross-Domain-Policies "none"
          Header always set X-XSS-Protection "1; mode=block"
          Header always set x-Frame-Options "SAMEORIGIN"
          Header always set X-Content-Type-Options "nosniff"
          Header always set Strict-Transport-Security "max-age=31536000; includeSubDomains"
          Header always set Feature-Policy "microphone 'none'; payment 'none'; sync-xhr 'self' Header always set Referrer-Policy "strict-origin"
          Header always set Content-Security-Policy "default-src 'self'; connect-src *; font-src *; frame-src *; img-src * data:; media-src *; object-src *; script-src * 'unsafe-inline' 'unsafe-eval'; style-src * 'unsafe-inline';"

          then restart apache

          sudo systemctl restart apache2


          Disable Expose PHP

          sudo vi /etc/php/7.2/apache2/php.ini

          expose_php = Off

          Setup your domains and DNS

          Now before we setup our SSL Cert, we need to setup our DNS.  For my DNS I needed to setup both an A record.


          Now once the DNS resolves we can setup our SSL Certificate using Let's Encrypt.

          Setup the SSL Certificate

          Digital Ocean has a great post on setting up Let's Encrypt on Ubuntu.  You can get the source link in the resources.

          Step 1 - Add the repository and install Certbot

          sudo add-apt-repository ppa:certbot/certbot

          Install Certbot's Apache package with apt:

          sudo apt install python-certbot-apache


          Step 2 - Set Up the SSL Certificate

          Verify that the Server name matches the domain name your going to use.  If it doesn't change it so it matches.

          sudo vi /etc/apache2/sites-available/$SITE.conf

          Your server name should match the domain your setting up with lets encrypt.
          ServerName YOURDOMAIN.CA; 

          You can verify the syntax of your configuration edits:

          sudo apache2ctl configtest

          If you get an error, reopen the virtual host file and check for any typos or missing characters. Once your configuration file's syntax is correct, reload Apache to load the new configuration:

          sudo systemctl reload apache2

          Certbot can now find the correct VirtualHost block and update it.

          Step 3 - Allowing HTTPS and SSH Through the Firewall

          You can see the current setting by typing:

          sudo ufw status

          sudo ufw allow 'ssh'
          sudo ufw allow 'Apache Full'
          sudo ufw delete allow 'Apache'

          if it is disabled do a sudo ufw enable to enable the firewall

          Your status should now look like this:

          sudo ufw status
          Output
          Status: active

          To                         Action      From
          --                         ------      ----
          OpenSSH                    ALLOW       Anywhere                  
          Apache Full                ALLOW       Anywhere                  
          OpenSSH (v6)               ALLOW       Anywhere (v6)             
          Apache Full (v6)           ALLOW       Anywhere (v6)        


          Step 4 - Obtaining an SSL Certificate
          Certbot has an Apache plugin that will take care of reconfiguring Apache and reloading the config whenever necessary.

          sudo certbot --apache -d domain.ca -d dev.domain.ca
          This runs certbot with the --apache plugin, using -d to specify the names you'd like the certificate to be valid for.

          The first time you run certbot, you will be prompted to enter an email address and agree to the terms of service. After doing so, certbot will communicate with the Let's Encrypt server, then run a challenge to verify that you control the domain you're requesting a certificate for.

          If that's successful, certbot will ask how you'd like to configure your HTTPS settings:

          Example:

          Please choose whether or not to redirect HTTP traffic to HTTPS, removing HTTP access.
          -------------------------------------------------------------------------------
          1: No redirect - Make no further changes to the webserver configuration.
          2: Redirect - Make all requests redirect to secure HTTPS access. Choose this for
          new sites, or if you're confident your site works on HTTPS. You can undo this
          change by editing your web server's configuration.
          -------------------------------------------------------------------------------
          Select the appropriate number [1-2] then [enter] (press 'c' to cancel):
          I would suggest selecting option 2.  The configuration on you server will be updated, and Apache will reload to pick up the new settings. certbot will wrap up with a message telling you the process was successful and where your certificates are stored:

          Example:
          IMPORTANT NOTES:
           - Congratulations! Your certificate and chain have been saved at:
             /etc/letsencrypt/live/example.com/fullchain.pem
             Your key file has been saved at:
             /etc/letsencrypt/live/example.com/privkey.pem
             Your cert will expire on 2018-07-23. To obtain a new or tweaked
             version of this certificate in the future, simply run certbot again
             with the "certonly" option. To non-interactively renew *all* of
             your certificates, run "certbot renew"
           - Your account credentials have been saved in your Certbot
             configuration directory at /etc/letsencrypt. You should make a
             secure backup of this folder now. This configuration directory will
             also contain certificates and private keys obtained by Certbot so
             making regular backups of this folder is ideal.
           - If you like Certbot, please consider supporting our work by:

             Donating to ISRG / Let's Encrypt:   https://letsencrypt.org/donate
             Donating to EFF:                    https://eff.org/donate-le

          Your certificates are downloaded, installed, and loaded. Try reloading your website using https:// and notice your browser's security indicator. It should indicate that the site is properly secured, usually with a green lock icon. If you test your server using the SSL Labs Server Test, it will get an A grade.

          Let's finish by testing the renewal process.

          Step 5 - Verifying Certbot Auto-Renewal

          Let's Encrypt's certificates are only valid for ninety days. This is to encourage users to automate their certificate renewal process. The certbot package takes care of this for us by adding a renew script to /etc/cron.d. This script runs twice a day and will automatically renew any certificate that's within thirty days of expiration.

          To test the renewal process, you can do a dry run with certbot:

          sudo certbot renew --dry-run


          If you see no errors, you're all set. When necessary, Certbot will renew your certificates and reload Apache to pick up the changes. If the automated renewal process ever fails, Let’s Encrypt will send a message to the email you specified, warning you when your certificate is about to expire.

          Security Tests and Scanners

          https://app.upguard.com
          https://pentest-tools.com/
          https://sitecheck.sucuri.net
          https://hackertarget.com/
          https://www.owasp.org/index.php/Category:Vulnerability_Scanning_Tools
          https://securityheaders.com/
          https://tools.geekflare.com/report/header-security-test/
          https://app.upguard.com/webscan#/
          https://qualysguard.qg3.apps.qualys.com/fo/home/Dashboard.php?skip=1
          https://pentest-tools.com/website-vulnerability-scanning/web-server-scanner#
          https://observatory.mozilla.org/


          Browser addons

          https://chrome.google.com/webstore/detail/csp-evaluator/fjohamlofnakbnbfjkohkbdigoodcejf
          https://addons.mozilla.org/en-US/firefox/addon/laboratory-by-mozilla/


          References

          Setting up a lampp server
          https://websiteforstudents.com/installing-apache2-mariadb-on-ubuntu-16-04-17-10-18-04-with-php-7-2-support-lamp/

          Configuring Virtual Hosts
          https://www.ostechnix.com/configure-apache-virtual-hosts-ubuntu-part-1/
          https://httpd.apache.org/docs/current/vhosts/

          Server Hardening
          https://askubuntu.com/questions/778463/www-data-vs-username
          https://stackoverflow.com/questions/9133024/www-data-permissions/19620585#19620585
          https://unix.stackexchange.com/questions/268905/is-giving-all-permissions-to-www-data-group-a-good-idea
          https://www.tecmint.com/hide-apache-web-server-version-information/

          .HTACCESS
          https://www.opentechguides.com/how-to/article/apache/115/htaccess-file-dir-security.html

          adding user to www-data group & Joomla Security Checklist
          https://www.cyberciti.biz/faq/ubuntu-add-user-to-group-www-data/
          https://docs.joomla.org/Security_Checklist/Joomla!_Setup
          https://docs.joomla.org/Security_and_Performance_FAQs

          Security Headers
          https://kb.sucuri.net/warnings/hardening
          https://www.ryadel.com/en/apache-setup-httpd-conf-file-send-http-security-headers-web-site/
          https://jsblog.insiderattack.net/apache-security-configuring-secure-response-headers-e8a83b72ce5e
          https://geekflare.com/apache-web-server-hardening-security/
          https://geekflare.com/httponly-secure-cookie-apache/

          Setup SSL
          https://www.digitalocean.com/community/tutorials/how-to-secure-apache-with-let-s-encrypt-on-ubuntu-18-04


          How to make google calendar more secure

          With the rash of spam and phishing attempts lately, I would recommend making the following changes to your google calendar settings to secur...