Showing posts with label apache. Show all posts

Tuesday, December 03, 2019

Installing Apache Tomcat for use with Bibliocommons

How to setup Apache Tomcat for use with Bibliocommons.

I will be pulling form a number of resources if you want to see the referenced Bibliocommons document to can click here.  

However you will in a login to view the document.  We will need a few items before we start.  The apache-tomcat server provided by bibliocommons which is located as an attachment to the end of their documentation https://partnerportal.bibliocommons.com/hc/en-us/articles/202340244-Installing-Tomcat-UNIX-Systems- .

We are going to use Microsoft Hyper-V for running this server.  So before we begin, you will want to open 3 types of ports and restrict them to come from the Bibliocommons IP range.  So for the purposes of this documentation we are going to say 53093, 53094, 53097 

Setup and install your Linux server on Hyper-V.  I am using Ubuntu 18.0.4 LTS.  For the purpose of this documentation, we are making the VM dual processor with all Integration services enabled, we have changed our secure boot to be a Microsoft UEFI Certificate Authority, TPM enabled and processor compatibility is checked.  We will also be using a static IP for this install.
Create Virtual Machine


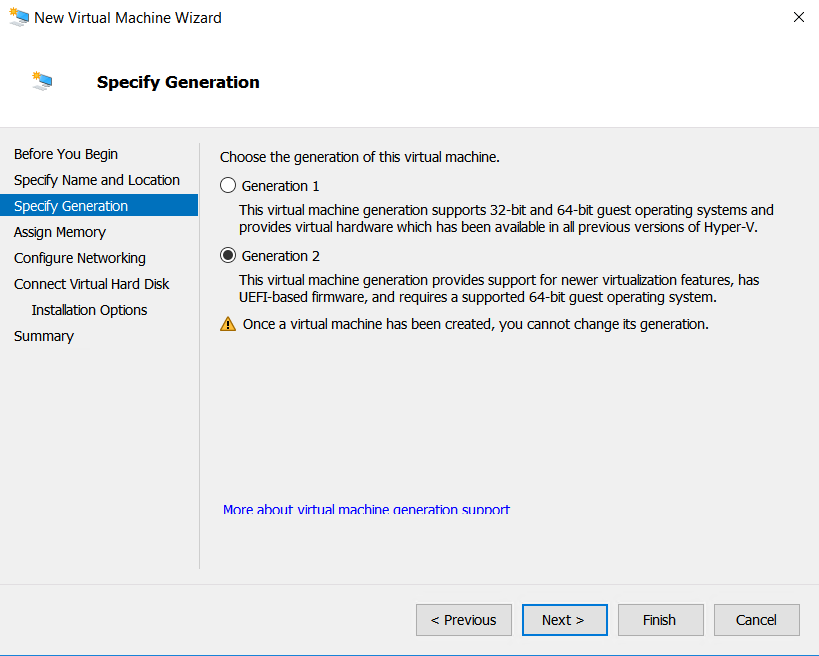
Specify Gen2

Assign Memory

Configure the network


VHDX Summary


Select a boot media

Finish the creation


Connect


Select your language

Install Ubuntu

Specifiy Networking

Edit IP

Add your manual IP
For the purposes of this documentation, the IP address doesn't really matter but it will need internet access to get updates and add the ZIP and Java Package.

Use the entire disk, (use LVM if you want)

Select the disk
  
Create your server name and credentials


add powershell

I prefer the latest stable version

Install

Reboot

There are a few additional items you will want to install for your linux server.  In addition to powershell I installed UNZIP, and Java 8 default repository and from Oracle.  After installing your linux server download and install the Bibliocommons Tomcat installer.  I downloaded it to my Desktop and SCP it to my linux system.  To get the Oracle versions of Java you will need an oracle account. https://www.oracle.com/ca-en/java/


I SCP the files for Java and the Tomcat server from my workstation to the server
Install open JDK first then extract the Oracle Java to the same jdk directory.
sudo apt install default-jdk


Install Open JDK

Extract the Oracle JDK to the Open JDK Directory
sudo tar xvzf jdk -8u221-linux-x64.tar.gz -C /usr/lib/jvm
Multiple Java's in the JVM Directory
Once extracted set the Default JVM


export JAVA_HOME=/usr/lib/jvm/jdk1.8.0_221

export JAVA_HOME=/usr/lib/jvm/jdk1.8.0_221, we can verify the java variable by typing echo $JAVA_HOME


When we see that our JDK Path is /usr/lib/jvm/jdk $Version (in this case 1.8.0221) we are good to go ahead and set our JAVA_HOME Variable

update-alternatives --config java
/etc/environment
Add the path JAVA_HOME=/usr/lib/jvm/jdk1.8.0_221"


Install Bibliocommons Tomcat
Make a directory in /opt called BiblioCommons
Sudo mkdir /opt/BiblioCommons/
Extract the files in the Java8 folder tar xvf apache-tomcat-7.0.82-bibliocommons.tar
You should now see a folder called apache-tomcat-7.0.82-bibliocommons.tar
Move that folder to /opt/BiblioCommons/


Securing Tomcat

First, create a new tomcat group:
sudo groupadd tomcat

Next, create a new tomcat user. We'll make this user a member of the tomcat group, with a home directory of /opt/tomcat (where we will install Tomcat), and with a shell of /bin/false (so nobody can log into the account):

sudo useradd -s /bin/false -g tomcat -d /opt/tomcat tomcat

Add out user to the tomcat group

Sudo usermod -a -G tomcat administrator

Give tomcat ownership of BiblioCommons

sudo chown -R tomcat:tomcat /opt/BiblioCommons

the user owning the folder bibliocommons will be tomcat.

Then you can execute

sudo chmod u+w bibliocommons folder to add the write permission to the username for the user you want (such as administrator).

But if you want to add this user to the group associated with "bibliocommons", you can run

sudo usermod -a -G tomcat administrator

and then execute sudo chmod g+w bibliocommons

to add the write permission to the group.

Change the permissions so owner and the group have rwx permissions

Sudo chmod -R 775 <$Bibliocommons directory> (owner is the user tomcat but the administrator account needs x permissions as well that is why group is 7)

Now that our tomcat user is set up and any users we created to manage the tomcat service have proper permissions, let's download and install Tomcat.


Now setup Tomcat

The default ports Tomcat uses are 9003, 9004 and 9007. If you know the default ports are already in use by other programs on your system and need to change them to ones that are not, open the following file with a text editor to find and replace the default ports: /conf/server.xml. 


Note that you must pick a distinct port for each of the port options and let your BiblioCommons Project Manager know of any change in the SSH Connector Port which is 9007 by default.

Please note, while the BiblioCommons Tomcat installer opens port 9007 labelled as the "SSH Connector Port", its actually the HTTPS port our application servers use to communicate with your on premises Tomcat instance. The labeling of that port is incorrect.


Open the following file with a text editor: /bin/setenv.sh. Inside the file, uncomment the appropriate line for CATALINA_OPTS by following the instructions within based on the amount of population served. Also, update to be the absolute path the the JDK installed as described in the Software Requirements section of Allocating a Server in Your Network, such as /opt/Java/jdk1.7.0_55.

If you have not already done so, create a directory called BiblioCommons on your system and then create another one called Connector_Support inside it. For example, create the directories for the path /opt/BiblioCommons/Connector_Support. Please make sure the user who starts Tomcat has read, write and execute permissions for these directories.
Sudo chmod +rwx “Directory”

Open the following file with a text editor: /lib/connector.properties. Inside the file, update so that config.path is equal to the path to the Connector_Support directory you have created.

Finally, start Tomcat by running /bin/startup.sh and verify there is no error.

Verifying the Tomcat Installation


Verify the Tomcat installation by accessing https://localhost:9007 or https://localhost: with a tool such as cURL or Wget. It should show one of the following messages depending on which tool is used. Please do not be alarmed at the bad certificate error, the mere presence of the following messages is an indicator that Tomcat is running.


With Wget, you should see the following:

$ wget https://localhost:9007
--2014-04-17 16:58:31-- https://localhost:9007/
Resolving localhost (localhost)... 127.0.0.1, ::1
Connecting to localhost (localhost)|127.0.0.1|:9007... connected.
GnuTLS: A TLS fatal alert has been received.
GnuTLS: received alert [42]: Certificate is bad
Unable to establish SSL connection.
With cURL, you should see the following:
$ curl https://localhost:9007
curl: (60) SSL certificate problem: self signed certificate
More details here: http://curl.haxx.se/docs/sslcerts.html
curl performs SSL certificate verification by default, using a"bundle"
of Certificate Authority (CA) public keys (CA certs). If the default
bundle file isn't adequate, you can specify an alternate file
using the --cacert option.
If this HTTPS server uses a certificate signed by a CA represented in
the bundle, the certificate verification probably failed due to a
problem with the certificate (it might be expired, or the name might
not match the domain name in the URL).
If you'd like to turn off curl's verification of the certificate, use
the -k (or --insecure) option.

Please let your BiblioCommons Project Manager know if these messages do not appear.

If you want to verify tomcat is running you can edit the server.xml file and un comment out


Once that is done, stop and restart the tomcat server. This will allow you to verify that tomcat is working



Creating Tomcat Startup Scripts


Once you have installed Tomcat successfully, you will need to set up Tomcat to start automatically on server startup. This is critical to ensuring service recovery in the event of server issues or regular server maintenance.

The process for setting up Tomcat to start automatically varies by operating system and distribution. Some common distribution instructions are outlined in the article below. Please consult the documentation for your OS for exact steps for your case. In this case we are using Ubuntu Server 1804LTS so we going to call this bibcat.sh and place it in the /etc/init.d folder

The Bash Startup Script

The following is a startup script that can be used on Linux based systems:
#! /bin/sh

# set this to wherever the Tomcat binaries/configuration exist
TOMCAT=

case "$1" in
  start)
    ${TOMCAT}/bin/startup.sh
    ;;
  stop)
    ${TOMCAT}/bin/shutdown.sh
    ;;
  *)
    echo "Usage: /etc/init.d/tomcat-bibliocommons {start|stop}"
    exit 1
    ;;
esac
exit 0

Ensure to chmod the script so that the root user can execute it (most likely 755). You can test the script directly by running it with the start and stop parameters (as sudo).

Steps to create a permanent Bash alias:

  1. Edit ~/.bash_aliases or ~/.bashrc file using: vi ~/.bash_aliases 
  2. Append your bash alias For example append: alias update='sudo yum update' 
  3. Save and close the file. 
  4. Activate alias by typing: source ~/.bash_aliases 
Please note that ~/.bash_aliases file only works if the following line presents in the ~/.bashrc file:

if [ -f ~/.bash_aliases ]; then
. ~/.bash_aliases
fi


Are above lines are missing in your ~/.bashrc file? Just append at the end of the ~/.bashrc, using a text editor such as vi/vim or joe.
vi ~./bash_aliases

Alias bibcat=’/etc/init.d/bibcat.sh’ (this is the path to your script)

Source ~./bash_aliases

to activate the aliases


You can now start and stop the tomcat service using bibcat stop or bibcat start

Startup script

Type the command crontab -e
Then add the line below
@reboot /etc/init.d/bibcat.sh start
Save the file and exit
Then add the rules to your firewall to allow bibliocommons to access the server.

Setup your timezone

Be sure to make sure your timezone is setup correctly, if you don’t it will interfere with your bibliocommons records sync.  Since we have no GUI we need to change the files in the terminal.

Sudo vi /etc/timezone -> change it to US/Mountain
Sudo cp /usr/share/zoneinfo/America/Edmonton /etc/localtime

To verify type date in command prompt


Reference:


Install Java on Linux
https://linuxize.com/post/install-java-on-ubuntu-18-04/
https://docs.oracle.com/cd/E19182-01/821-0917/inst_set_jdk_korn_bash_t/index.html
https://thishosting.rocks/install-java-ubuntu/
Install Tomcat
https://partnerportal.bibliocommons.com/hc/en-us/articles/202340244-Installing-Tomcat-UNIX-Systems-
https://www.vultr.com/docs/how-to-manually-install-java-8-on-ubuntu-16-04


Ubuntu Software Firewall
https://www.digitalocean.com/community/tutorials/how-to-set-up-a-firewall-with-ufw-on-ubuntu-18-04


Path Alias for starting and stopping the service

Tuesday, December 11, 2018

Setting up and configuring a LAMP Server for Joomla

As a webdev, I spent a lot of time using projects such as xampp and wampp as a quick and easy way to start developing websites but have not had the chance to really deploy one myself, really besides the home server.  Even then I never really took the time to "Secure" the server properly and documentation for this is very wide ranging and opinionated at best.  There are lots of resources out there, but nothing that puts it into a nice neat package with any kind of explanation.  Most of the webservers I've used have been setup by other people, with little to no security in mind and why?  Because security is hard.  It breaks things, and it takes time to do it right.  In this post I will go over how to setup a secure web server from start to finish and this may be a good starting point for everyone who what to learn how to setup a secure server.  As always if you have any comments or pointer please do!

You can watch my video on setting up a Ubuntu 18.04.1 LTS Server on Microsoft Azure

https://www.youtube.com/watch?v=y9RQirmC_pk

This is my video of this post but with out really explaination of why I do some things.  It is just a start to finish this is how you setup the server.

https://www.youtube.com/watch?v=qszvUjjL-ZI

With our server already setup via Azure or even on our localhost though Hyper-V or KVM login into your server and update and upgrade any missing packages.


  1. Install Apache2

sudo apt install apache2


Once that is complete then we are going to install Mariadb


2. Install Mariadb

Add MariaDB Key

apt-key adv --recv-keys --keyserver hkp://keyserver.ubuntu.com:80 0xF1656F24C74CD1D8

Add MariaDB Repo

add-apt-repository 'deb [arch=amd64] http://mirror.nodesdirect.com/mariadb/repo/10.3/ubuntu bionic main'

update

sudo apt-get install mariadb-server mariadb-client

sudo mysql_secure_installation

Enter current password for root (enter for none): Just press the Enter

Set root password? [Y/n]: Y

New password: $password

Re-enter new password: $password

Remove anonymous users? [Y/n]: Y

Disallow root login remotely? [Y/n]: Y

Remove test database and access to it? [Y/n]: Y

Reload privilege tables now? [Y/n]: Y

sudo mysql -u root -p

$password


3. Create The Joomla Database


CREATE DATABASE $DBNAME;

Now here I would recommend creating a new user for the database we just created.

Create the User
create user $DBUSER

Grant privileges while assigning the password
grant all on $DBNAME.* to ‘$DBUSER’@’localhost’ identified by ‘$DBUSER_PASSWORD’


Note: The localhost field usually doesn’t have to be edited, but you can set it to the specific address. The above example grants all privileges, obviously. But you may want to limit privileges.

exit


4. Install Unzip

Install Unzip
sudo apt-get install unzip


5. Install PHP

Install PHP
sudo add-apt-repository ppa:ondrej/php
sudo apt update

sudo apt install php7.2 libapache2-mod-php7.2 php7.2-common php7.2-mbstring php7.2-xmlrpc php7.2-soap php7.2-gd php7.2-xml php7.2-intl php7.2-mysql php7.2-cli php7.2-zip php7.2-curl

if libzip error
vi /etc/apt/sources.list and add the following repositories

deb http://archive.ubuntu.com/ubuntu bionic universe multiverse
deb-src http://archive.ubuntu.com/ubuntu bionic universe multiverse
deb http://us.archive.ubuntu.com/ubuntu/ bionic universe
deb-src http://us.archive.ubuntu.com/ubuntu/ bionic universe
deb http://us.archive.ubuntu.com/ubuntu/ bionic-updates universe
deb-src http://us.archive.ubuntu.com/ubuntu/ bionic-updates universe
deb http://us.archive.ubuntu.com/ubuntu/ bionic multiverse
deb-src http://us.archive.ubuntu.com/ubuntu/ bionic multiverse
deb http://us.archive.ubuntu.com/ubuntu/ bionic-updates multiverse
deb-src http://us.archive.ubuntu.com/ubuntu/ bionic-updates multiverse
deb http://security.ubuntu.com/ubuntu bionic-security universe
deb-src http://security.ubuntu.com/ubuntu bionic-security universe
deb http://security.ubuntu.com/ubuntu bionic-security multiverse
deb-src http://security.ubuntu.com/ubuntu bionic-security multiverse

Then edit and make the following changes to the PHP INI File

sudo vi /etc/php/7.2/apache2/php.ini

file_uploads = On
allow_url_fopen = On
memory_limit = 256M
upload_max_filesize = 25M
max_execution_time = 360
date.timezone = America/Edmonton

Restart Apache

sudo systemctl restart apache2.service

Create the file phpinfo.php

sudo vi /var/www/html/phpinfo.php
<?php
phpinfo();
?>


6. Setup Virtual Hosts


Now that we have our apache server, mysql and php setup now we want to enable virtualhosts so we can host multiple websites on the same server.

In this configuration our default site configuration is located in /etc/apache2/sites-available we want to copy the default virtual host file called 000-default.conf contents to the new virtual host files like below.

sudo cp /etc/apache2/sites-available/000-default.conf /etc/apache2/sites-available/$myvirtualdomain.ca.conf

you would do this for however many sites you need, but I would recommend getting one setup first then copying the finished config as may times as you need using the command above.  Then edit and change the settings highlighted in yellow to suit what you need as many times as you need it.


Edit the virtual host file (sudo vi $myvirtualdomain.ca.conf)

# The ServerName directive sets the request scheme, hostname and port that

# the server uses to identify itself. This is used when creating

# redirection URLs. In the context of virtual hosts, the ServerName

# specifies what hostname must appear in the request's Host: header to

# match this virtual host. For the default virtual host (this file) this

# value is not decisive as it is used as a last resort host regardless.

# However, you must set it for any further virtual host explicitly.

#ServerName www.example.com

ServerAdmin demoadmin@domain.ca

ServerName webserver.domain.ca

ServerAlias www.domain.ca

DocumentRoot /var/www/html/domain.ca/public_html


# Available loglevels: trace8, ..., trace1, debug, info, notice, warn,

# error, crit, alert, emerg.

# It is also possible to configure the loglevel for particular

# modules, e.g.

#LogLevel info ssl:warn


ErrorLog ${APACHE_LOG_DIR}/error.log

CustomLog ${APACHE_LOG_DIR}/access.log combined


# For most configuration files from conf-available/, which are

# enabled or disabled at a global level, it is possible to

# include a line for only one particular virtual host. For example the

# following line enables the CGI configuration for this host only

# after it has been globally disabled with "a2disconf".

#Include conf-available/serve-cgi-bin.conf


Now disable the default config and enable your virtual host configuration files.

sudo a2dissite 000-default.conf - disables this config file

sudo a2ensite domain.ca.conf - enables config file of your virtual host you just setup.

you will have to restart apache for your setting to take effect.

sudo service apache2 restart


***NOTE it is very important that the ServerAlias matches the DNS otherwise the virtual host will not redirect the browser properly.

If your working locally, you can make changes to your local hosts file.  Once you've gotten everything setup you can make changes to the DNS for Production.


7. Copy Joomla to the Webserver

Now upload the latest version of Joomla to the server via SCP.  Make sure you have a writable directory you can save to if you don't make one.

SCP /path-to-file/file.zip $username@$HOST:/path-to-destination-folder/


in this case I typically use just the home directory


SCP /path-to-file/file.zip $username@$HOST:/~/file.zip


Then copy and paste the zip file to the virtual host directory we created for the site.


sudo cp Joomla_X.X.X-Stable-Full_Package.zip /Path/To/Virtual/Site


Once copied to the server move it to the /var/www/html/$site virtual directory we just enabled and unzip the file.

Run unzip sudo unzip Joomla_X.X.X-Stable-Full_Package.zip

The default settings in Joomla are a little different from what however before we do that you will want to fix a couple settings in your php.ini file.

There are 2 things we need to fix.  Now for Joomla, recommended settings are to disable output buffering, to do that we need to edit the php.ini file

sudo vi  /etc/php/7.2/apache2

Find
output_buffering = 4096
and change it to Off
output_buffering = Off

while were here we are going to increase the max file upload size

Save your changes restart apache

With the file now unzipped we are going to add our user/owner to the www-data group so we can properly run and execute Joomla.

By default the www-data user and group are unprivileged; however Joomla requires the www-data group to have certain permissions.  So we are going to add the owner of the files to the www-data group so that Joomla can install modules, run updates, etc.  We don't want to set ownership of any files to the www-data user. The whole point of the www-data user is that it is an unprivileged user, not able to write to any files. Server daemons accessible from the outside network (such as the web server) typically run as an unprivileged user so that in the event that they are hacked due to a vulnerability, the possible things the attacker can do is minimal. In these cases you should set ownership to www-data ONLY for those files, keeping the number of files writable by www-data at a minimum it's the same reason, don't set any files to be world-writable.  You need to give www-data write permission to the joomla directory files. We don't want to give www-data ownership because of the security implications.  So to do this we are going to add our user to the www-data group, which will  give Joomla the permissions we need for it to run.

add $USER to www-data

sudo usermod -a -G www-data $USER

sudo chgrp -R www-data /var/www/html/$Site
sudo chown -R www-data:$USER /var/www/html/$Site

Do this for the setup then change your files and folders for

If you want to re-verify the proper permissions on the files and folders run the following commands

find /var/www/html/$Site -type d -exec chmod 755 {} \;
find /var/www/html/$Site -type f -exec chmod 644 {} \;

Logout and log back into to verify the changes were made.  Now you should be able to run the Joomla installer without any write or execute permission issues.

Now open your browser and run though the Joomla setup.  http://yournewjoomlasite/index.php


Enable .htaccess and security headers

To enable .htaccess and security headers you will need to add the following to your Site Config file located in /etc/apache2/sites-available called $Site-Domain.conf

Add the following just under the tag

Options Indexes FollowSymLinks
Options FollowSymLinks
AllowOverride ALL
Require all granted


Save the config file then eneable a2enmod by
sudo a2enmod rewrite
then restart apache
sudo systemctl restart apache2


Securing The Webserver

enable module headers

sudo a2enmod headers

Now edit the security.conf file typically localed in  /etc/apache2/conf-available/security.conf

Header unset X-Powered-By
Header always unset X-Powered-By
Header edit Set-Cookie ^(.*)$ $1;HttpOnly;Secure - Enable once you have ssl setup.
Header set X-Permitted-Cross-Domain-Policies "none"
Header always set X-XSS-Protection "1; mode=block"
Header always set x-Frame-Options "SAMEORIGIN"
Header always set X-Content-Type-Options "nosniff"
Header always set Strict-Transport-Security "max-age=31536000; includeSubDomains"
Header always set Feature-Policy "microphone 'none'; payment 'none'; sync-xhr 'self' Header always set Referrer-Policy "strict-origin"

<!--very secure policy--!>
Header always set Content-Security-Policy "default-src 'self'; font-src *;img-src * data:; script-src *; style-src *;"

Very Insecure policy if your going to be using several different joomla extensions.

Header always set Content-Security-Policy "default-src 'self'; connect-src *; font-src *; frame-src *; img-src * data:; media-src *; object-src *; script-src * 'unsafe-inline' 'unsafe-eval'; style-src * 'unsafe-inline';"

So if you want a copy paste security headers

Header unset X-Powered-By
Header always unset X-Powered-By
#Header edit Set-Cookie ^(.*)$ $1;HttpOnly;Secure
Header set X-Permitted-Cross-Domain-Policies "none"
Header always set X-XSS-Protection "1; mode=block"
Header always set x-Frame-Options "SAMEORIGIN"
Header always set X-Content-Type-Options "nosniff"
Header always set Strict-Transport-Security "max-age=31536000; includeSubDomains"
Header always set Feature-Policy "microphone 'none'; payment 'none'; sync-xhr 'self' Header always set Referrer-Policy "strict-origin"
Header always set Content-Security-Policy "default-src 'self'; connect-src *; font-src *; frame-src *; img-src * data:; media-src *; object-src *; script-src * 'unsafe-inline' 'unsafe-eval'; style-src * 'unsafe-inline';"

then restart apache

sudo systemctl restart apache2


Disable Expose PHP

sudo vi /etc/php/7.2/apache2/php.ini

expose_php = Off

Setup your domains and DNS

Now before we setup our SSL Cert, we need to setup our DNS.  For my DNS I needed to setup both an A record.


Now once the DNS resolves we can setup our SSL Certificate using Let's Encrypt.

Setup the SSL Certificate

Digital Ocean has a great post on setting up Let's Encrypt on Ubuntu.  You can get the source link in the resources.

Step 1 - Add the repository and install Certbot

sudo add-apt-repository ppa:certbot/certbot

Install Certbot's Apache package with apt:

sudo apt install python-certbot-apache


Step 2 - Set Up the SSL Certificate

Verify that the Server name matches the domain name your going to use.  If it doesn't change it so it matches.

sudo vi /etc/apache2/sites-available/$SITE.conf

Your server name should match the domain your setting up with lets encrypt.
ServerName YOURDOMAIN.CA; 

You can verify the syntax of your configuration edits:

sudo apache2ctl configtest

If you get an error, reopen the virtual host file and check for any typos or missing characters. Once your configuration file's syntax is correct, reload Apache to load the new configuration:

sudo systemctl reload apache2

Certbot can now find the correct VirtualHost block and update it.

Step 3 - Allowing HTTPS and SSH Through the Firewall

You can see the current setting by typing:

sudo ufw status

sudo ufw allow 'ssh'
sudo ufw allow 'Apache Full'
sudo ufw delete allow 'Apache'

if it is disabled do a sudo ufw enable to enable the firewall

Your status should now look like this:

sudo ufw status
Output
Status: active

To                         Action      From
--                         ------      ----
OpenSSH                    ALLOW       Anywhere                  
Apache Full                ALLOW       Anywhere                  
OpenSSH (v6)               ALLOW       Anywhere (v6)             
Apache Full (v6)           ALLOW       Anywhere (v6)        


Step 4 - Obtaining an SSL Certificate
Certbot has an Apache plugin that will take care of reconfiguring Apache and reloading the config whenever necessary.

sudo certbot --apache -d domain.ca -d dev.domain.ca
This runs certbot with the --apache plugin, using -d to specify the names you'd like the certificate to be valid for.

The first time you run certbot, you will be prompted to enter an email address and agree to the terms of service. After doing so, certbot will communicate with the Let's Encrypt server, then run a challenge to verify that you control the domain you're requesting a certificate for.

If that's successful, certbot will ask how you'd like to configure your HTTPS settings:

Example:

Please choose whether or not to redirect HTTP traffic to HTTPS, removing HTTP access.
-------------------------------------------------------------------------------
1: No redirect - Make no further changes to the webserver configuration.
2: Redirect - Make all requests redirect to secure HTTPS access. Choose this for
new sites, or if you're confident your site works on HTTPS. You can undo this
change by editing your web server's configuration.
-------------------------------------------------------------------------------
Select the appropriate number [1-2] then [enter] (press 'c' to cancel):
I would suggest selecting option 2.  The configuration on you server will be updated, and Apache will reload to pick up the new settings. certbot will wrap up with a message telling you the process was successful and where your certificates are stored:

Example:
IMPORTANT NOTES:
 - Congratulations! Your certificate and chain have been saved at:
   /etc/letsencrypt/live/example.com/fullchain.pem
   Your key file has been saved at:
   /etc/letsencrypt/live/example.com/privkey.pem
   Your cert will expire on 2018-07-23. To obtain a new or tweaked
   version of this certificate in the future, simply run certbot again
   with the "certonly" option. To non-interactively renew *all* of
   your certificates, run "certbot renew"
 - Your account credentials have been saved in your Certbot
   configuration directory at /etc/letsencrypt. You should make a
   secure backup of this folder now. This configuration directory will
   also contain certificates and private keys obtained by Certbot so
   making regular backups of this folder is ideal.
 - If you like Certbot, please consider supporting our work by:

   Donating to ISRG / Let's Encrypt:   https://letsencrypt.org/donate
   Donating to EFF:                    https://eff.org/donate-le

Your certificates are downloaded, installed, and loaded. Try reloading your website using https:// and notice your browser's security indicator. It should indicate that the site is properly secured, usually with a green lock icon. If you test your server using the SSL Labs Server Test, it will get an A grade.

Let's finish by testing the renewal process.

Step 5 - Verifying Certbot Auto-Renewal

Let's Encrypt's certificates are only valid for ninety days. This is to encourage users to automate their certificate renewal process. The certbot package takes care of this for us by adding a renew script to /etc/cron.d. This script runs twice a day and will automatically renew any certificate that's within thirty days of expiration.

To test the renewal process, you can do a dry run with certbot:

sudo certbot renew --dry-run


If you see no errors, you're all set. When necessary, Certbot will renew your certificates and reload Apache to pick up the changes. If the automated renewal process ever fails, Let’s Encrypt will send a message to the email you specified, warning you when your certificate is about to expire.

Security Tests and Scanners

https://app.upguard.com
https://pentest-tools.com/
https://sitecheck.sucuri.net
https://hackertarget.com/
https://www.owasp.org/index.php/Category:Vulnerability_Scanning_Tools
https://securityheaders.com/
https://tools.geekflare.com/report/header-security-test/
https://app.upguard.com/webscan#/
https://qualysguard.qg3.apps.qualys.com/fo/home/Dashboard.php?skip=1
https://pentest-tools.com/website-vulnerability-scanning/web-server-scanner#
https://observatory.mozilla.org/


Browser addons

https://chrome.google.com/webstore/detail/csp-evaluator/fjohamlofnakbnbfjkohkbdigoodcejf
https://addons.mozilla.org/en-US/firefox/addon/laboratory-by-mozilla/


References

Setting up a lampp server
https://websiteforstudents.com/installing-apache2-mariadb-on-ubuntu-16-04-17-10-18-04-with-php-7-2-support-lamp/

Configuring Virtual Hosts
https://www.ostechnix.com/configure-apache-virtual-hosts-ubuntu-part-1/
https://httpd.apache.org/docs/current/vhosts/

Server Hardening
https://askubuntu.com/questions/778463/www-data-vs-username
https://stackoverflow.com/questions/9133024/www-data-permissions/19620585#19620585
https://unix.stackexchange.com/questions/268905/is-giving-all-permissions-to-www-data-group-a-good-idea
https://www.tecmint.com/hide-apache-web-server-version-information/

.HTACCESS
https://www.opentechguides.com/how-to/article/apache/115/htaccess-file-dir-security.html

adding user to www-data group & Joomla Security Checklist
https://www.cyberciti.biz/faq/ubuntu-add-user-to-group-www-data/
https://docs.joomla.org/Security_Checklist/Joomla!_Setup
https://docs.joomla.org/Security_and_Performance_FAQs

Security Headers
https://kb.sucuri.net/warnings/hardening
https://www.ryadel.com/en/apache-setup-httpd-conf-file-send-http-security-headers-web-site/
https://jsblog.insiderattack.net/apache-security-configuring-secure-response-headers-e8a83b72ce5e
https://geekflare.com/apache-web-server-hardening-security/
https://geekflare.com/httponly-secure-cookie-apache/

Setup SSL
https://www.digitalocean.com/community/tutorials/how-to-secure-apache-with-let-s-encrypt-on-ubuntu-18-04


Crontab changes in Linux 26.04 vs previous versions

I use a small Linux server to control the turning on and shutting off our client stations with crontab.  The system I typically use is Ubunt...