Friday, September 21, 2018

Updating Let's Encrypt Certificate for SirsiDynix Horizon Web Services

How to update the a Letsencrypt Certificate on Apache Tomcat for SirsiDynix Horizon Web Services.  If you went though my post on Adding Let's Encrypt TLS Certificate to SirsiDynix Horizon Web Serivces Tomcat Server you will like this post.  It takes about 10 to 20 minutes to do and is pretty quick for having to do a manual update.


There are a couple of things that you will want to have handy to make this process sing.
  • Logged in to The windows Apache Tomcat server with a view of the desktop 
  • Access to the Lets Encrypt Key and CSR 
  • Logged into your DNS Provider 
  • Passwords required for your tomcat keystore

Environmental Variable Verification:


Keystore Details

Alias: KeystoreAlias FileName: $KeystoreFileName Password $KeystorePassword!


From your windows server running Apache Tomcat go to zerossl.com


Put in the email you have setup your tomcat server account, you will also need your account key and domain CSR.


Select DNS Verfication, Accept TOS, Accept SA and hit next.

This will take you to the DNS ACME-Challenge page. You will need to copy and paste the challenge and update the challenge in the TXT field in our Zoneedit account under the _acme-challenge.$yourdomain value.


Once Verified it will allow you to download your new domain and intermediate cert.

Save the downloaded file to the documents folder. Then open it up in sublime text edit and split the certs appart. The top certificate one is the domain cert which we need the other is the intermediate certificate. Save them in the following format. Copy and paste them into

Domain-cert-renewal-$TodaysDate.crt
Intermediate-cert-renewal-$TodaysDate.crt

Copy and paste the files into the apache tomcat directory. C:\Program Files\tomcatserver

Run CMD as Administrator and go to cd “C:\Program Files\tomcatserver” this will make things easier.

Type in “$JAVA_VAR”\keytool -import -alias $yourkeystorealias -trustcacerts -file domain-cert-renewal-20180919.crt -keystore $yourkeystorefilename

Then it will prompt you for a password:

Enter the password for the keystore.

Then it will ask you for a new password. You can continue to use the one that you have, so if you change it update the documentation!

You will get a warning about PKCS12 you can ignore it but that is it your done. Your SSL Cert is updated. Restart your apache tomcat server for the certificate updates to take effect.


If you want to verify the certificate there is a java program loaded called Portecle
http://portecle.sourceforge.net/


Once the Program is open you can open the keystore file by going File -> Open Keystore File -> “C:\Program Files\$pathtotomcatdirectory” or by Opening the file from the drop down as shown below.


You will then be prompted for the Keystore Password: $KeystorePassword!
Once that is done you can see the certificates in the keystore as shown below.


Thursday, September 20, 2018

Setting windows server network binding/priority order

In Windows Server you can have multiple networks "VLANS" connected to your computer.  Windows will randomly setup the priority of your virtual networks which can cause a problem for you especially in a clustered hyper-v environment.  You can set the network priority of your virtual networks in two ways in server 2012R2 but is a little bit different in 2016.

In server 2012R2 go to network and sharing

Press the "ALT" Key and the advanced menu will be displayed.


Under advanced select "Advanced Settings"


You can then set the order of what networks get priority.  With the top most being the highest priority.


In Server 2016 this has changed a bit where you set the metric for the binding priority.

If your using Hyper-V you need to select the vEthernet interface -> Right Click and get properties -> Select Advanced TCP/IP Settings and deselect "automatic metric" and put a metric with the lower value gets the binding


Reference:

https://docs.microsoft.com/en-us/powershell/module/netadapter/set-netadapter?view=win10-ps
https://www.mssqltips.com/sqlservertip/4928/configure-network-binding-order-for-a-windows-server-2016-failover-cluster/
https://labs.supinfochina.com/en/change-network-card-priority-in-windows-server-2012-r2/
https://social.technet.microsoft.com/Forums/windowsserver/en-US/da2cebda-4ead-401e-a821-3330eb5d4988/change-network-binding-order?forum=windowsserver2008r2networking
https://social.technet.microsoft.com/Forums/windows/en-US/cb8dac7f-5f04-42b1-8065-a95c946f6ec2/change-network-adapter-priority-order?forum=ws2016

Thursday, September 06, 2018

Setting up Mitel VOIP phones using PFSense and Active Directory


At my office we were using a Mitel Phone controller that used streamline adapters for connecting our phones to the VOIP system.  At the best of time the system required a weekly reboot otherwise phones would randomly drop off the system and need to be rebooted.


Mitel Streamline Dongle

So we had a bit of a panic, on a Friday before the long weekend near closing time; Mitel Streamline system decided to die.  


About the Organization:


So we have 2 locations about 500 meters apart lets call one SAP and the other LMC; they are connected by a high speed fiber link.  So what was done is we were asked to pass two different VLANs though the network VLAN 11 for LMC and 210 for SAP.  Our LMC network was already getting the VOIP system though the DHCP on our Active Directory Controller.


Here is some of the info for the single DHCP Server:  192.168.1.0/24 on VLAN 100 and we are using option 43 to pass VLAN 11 to the phones.


To add or modify the Mitel string you need to go to DHCP Server -> Server Name -> IPV4 -> Scope -> Scope Options


Find 043 put a good name and description then add the following String:


id:ipphone.mitel.com;sw_tftp="$YOURSRVIP";call_srv="$YOURSRVIP";vlan=11;dscp=46  


example:

id:ipphone.mitel.com;sw_tftp=10.12.0.10;call_srv=10.12.0.10;vlan=11;dscp=46  


Active Directory Mitel Scope Option
With our two locations we know LMC is setup on a 192.168.1.0/24 network and we have Mitel phones working and being passed though on option 43 on our DHCP Server.

We need to add the phones at SAP to the network and to do that we need to setup another virtual network with a DHCP server so it can pass the Mitel info but still connect to the active directory controller.


Since we use PFSense and Cisco switches adding another virtual network was pretty easy and we are going to use PFSense.  So we added 2 new VLAN to the switches VLAN 210 and 200 and we also added it to the PFSense firewall.


So we are going to setup the following on the SAP network:


Vlan 200 - 192.168.200.0/24 - 210 in the Mitel DHCP Options


Adding vlan 200 to the PFSense Firewall to allow users to connect to the domain and keep using their Mitel phones.  Please note this is a redundant firewall so everything goes though CARP.


Go to Interfaces -> Assignments.  Press the add button and add the new network VLAN (You might want to make sure you've added the vlan to all relevant switches)

VLANS
be sure to add the new network in your interface assignments for carp.

Then go to Firewall -> Virtual IPs


Press the Add Button.  Below is a sample of the settings that might be used in the new network.

VIRTUAL IP Settings
Enable the network interface and set the IP for the PFSense firewall on the network
SAP Network Interface Settings

Now that we have the Gateway and the Interface setup now we can enable the DHCP Server.   Under Services -> DHCP Server.  Select the network you want to enable the DHCP server on and fill out your settings you want for your DHCP Server


DHCP Range


***IMPORTANT***

Here is where we add the option 43 Type is Text and the value for our Mitel phones is the same as what we have for our AD DHCP Option with the exception of the vlan (Unless you are obviously using a different server)

Press the add button and fill out 43 in the number field, should be a text type and copy/paste or type the value listed below for your mitel phone option.

id:ipphone.mitel.com;sw_tftp=10.12.0.10;call_srv=10.12.0.10;vlan=210;dscp=46  


With that done now we can configure our firewall rules for SAP Network so we can talk to our AD controller on the LMC Network so our users can login and use the network resources with the appearance that nothing has changed.  We have 3 different rule sets that we have to setup, the LMC interface (which were already done)


LMC interface:


We have an open rule for an SMTP mail forwarder on port 587
Access for "CatMan" which is allowed to go through to anywhere
A block for any thing from getting to the SuperSecret_Network
A Pass for anything on the LMC_Network to be allowed anywhere

SAP Interface:

A block for any thing from getting to the SuperSecret_Network
A Pass for anything on the SAP_Network to be allowed anywhere


Floating Rule:


This makes the whole thing work properly.  On our selected network interfaces we want to make sure we allow all traffic to the network our domain controller is on.  This lets us get our DNS for our clients from our domain server while they get a different DHCP address from our PFSense firewall and the proper Mitel information for the phones.

Floating Rule that allows the pass from one network to another

List of the floating rules

Now there is obviously more happening with this firewall then meets the eye but this is essentially what you need in a nutshell.  On our LMC network we have our computer clients on Vlan 100 with a subnet of 192.168.1.0/24. The Mitel Phones work using vlan 11.  Our SAP Network on Vlan 200  clients are on a subnet of 192.168.200.0/24 using vlan 210 for the Mitel phones.  


All clients can access network shares and login to the domain with no issue.  Below is a ping test from a machine on the SAP Network to another machine on the LMC Network and it also works from LMC to SAP.

Verification that the network passes though.

Reference Documents Mitel VOIP Phones:
http://edocs.mitel.com/UG/Apps-Solutions/MiCollab%207.2/MiCollab/MiCW%20Help/forms/dhcp_options.html

http://www.mitelforums.com/articles/option-128-missing.php

Monday, August 13, 2018

Windows 10 and Idle Timeout

I had built a simple session management software with a C# login screen that saves the data to a google sheet, and I used the Windows task manager for controlling the launching of the session management login screen and the idle timeout. In windows 7 the idle timeout was more/less 15 minutes. For in-depth information about the windows idle state

https://docs.microsoft.com/en-us/windows/desktop/taskschd/task-idle-conditions


As defined in the Task Idle Condition

"In Windows 7, the Task Scheduler verifies that the computer is in an idle state every 15 minutes. Task Scheduler checks for an idle state using two criteria: user absence, and a lack of resource consumption. The user is considered absent if there is no keyboard or mouse input during this period of time. The computer is considered idle if all the processors and all the disks were idle for more than 90% of the last detection interval. (An exception would be for any presentation type application that sets the ES_DISPLAY_REQUIRED flag. This flag forces Task Schedule to not consider the system as being idle, regardless of user activity or resource consumption.)

In Windows 7, Task Scheduler considers a processor as idle even when low priority threads (thread priority < normal) execute.

In Windows 7, when the Task Scheduler detects that the computer is idle, the service waits only for user input to mark the end of the idle state."


The changes in the Task Scheduler in Windows 8/10

In Windows 8, Task Scheduler performs the same general user absence and resource consumption checks. However, Task Scheduler relies on the operating system power subsystem to detect user presence. By default, the user is considered absent after four minutes of no keyboard or mouse input. The resource consumption verification time is shortened to 10 minute intervals when the user is present. When the user is away, the verification time is shortened to 30 second intervals. Task Scheduler makes additional resource consumption checks for the following events:

  • User presence state changed
  • AC/DC power source changed
  • Battery level changed (only when on batteries)

When any of the events above happens, Task Scheduler tests the computer for idleness since the last verification time. In practice, this means that Task Scheduler may declare the system as idle immediately after user absence is detected, if the other conditions have been met since the last verification time.

This is a big problem for the session management system we had. It went from having a 15 minute idle check to 30 seconds to 5 minutes (varies as per above technical info)

So I wrote a program in C# that had checked the last time a user had used the system. This thinking was also flawed because like the Windows 8/10 idle check it was based on the last user input. What I wanted was a full 15 minutes after the idle program was launched. So I used this bit of code.

(DateTime.UtcNow - Process.GetCurrentProcess().StartTime.ToUniversalTime()).TotalMilliseconds

This is different because I had the program doing the idle reboot based on the following:

IdleTime = System.Environment.TickCount - LastInput.dwTime;

In my testing I would have the task scheduler launch the app but because I was checking for LastInput.dwTime I would have used up between 200000 and 400000 milliseconds, even though the app was launched on idle from the task scheduler. This makes total scene since I am reading the system event.  However I still want to use this code because I am using it to exit the application if the idle timeout launches the application for the countdown.  When the user comes back and moves the mouse or presses the keyboard it closes (exits) the application.

The major part of the code is as follows


using System;

using System.Collections.Generic;

using System.ComponentModel;

using System.Data;

using System.Drawing;

using System.Linq;

using System.Text;

using System.Runtime.InteropServices;

using System.Windows;

using System.Diagnostics;

using System.Windows.Forms;


namespace EndSession

{


public partial class EndSession : Form

{

//initialize variables
//Popup Counter. This ensures we only see the message windows that popups in the last 2 minutes once.


int popupCounter = 0;


[DllImport("user32.dll")]

public static extern Boolean GetLastInputInfo(ref tagLASTINPUTINFO plii);


public struct tagLASTINPUTINFO

{

public uint cbSize;

public Int32 dwTime;

}


public EndSession()

{

InitializeComponent();

//Hide the windows for the program so no one can see it running.  Turn off for debugging

this.WindowState = FormWindowState.Minimized;

this.ShowInTaskbar = false;


}


private void timer1_Tick(object sender, EventArgs e)

{

tagLASTINPUTINFO LastInput = new tagLASTINPUTINFO();

Int32 IdleTime;

LastInput.cbSize = (uint)Marshal.SizeOf(LastInput);

LastInput.dwTime = 0;

if (GetLastInputInfo(ref LastInput))

{

IdleTime = System.Environment.TickCount - LastInput.dwTime;


//DEBUGGING Text Field

// label1.Text = IdleTime + " ms " + rowCounter + "run time:" + "last input" + LastInput.dwTime + "App start" + ((DateTime.UtcNow - Process.GetCurrentProcess().StartTime.ToUniversalTime()).TotalMilliseconds);

// label1.Text = idleStart +" "+ idleEnd;


}


IdleTime = System.Environment.TickCount - LastInput.dwTime;


//Check the idle time. If less then 100ms close the application.  Based on the last time there was user input
//The Reason for 100ms is if it is set to 0, the program doesn't always catch the user input. If it is set to high the program closes right away.


if (IdleTime <= 100)

{

//If the user had moved the mouse or hit the keyboard close the program because IdleTime is less the 100 milliseconds.
Application.Exit();

}


//This is our time check. If we were to use the system idle time the program would close at the time the

//user stopped the keyboard/mouse input We are starting the idletime based on when our app lauches

if ((DateTime.UtcNow - Process.GetCurrentProcess().StartTime.ToUniversalTime()).TotalMilliseconds > 780000)


{

if (popupCounter == 0)

{

//increment our popup counter and show our message box. Force it to main focus over all other windows

//MessageBoxOptions 0x40000

popupCounter++;

DialogResult AutoResult = MessageBox.Show("This System will reboot in 2 minutes if it is left idle", "End Session Alert", MessageBoxButtons.OK, MessageBoxIcon.Warning,

MessageBoxDefaultButton.Button1, (MessageBoxOptions)0x40000);

}


}

//If it is 900000ms or 15 minutes and greater since the launch or the app, force close all programs and restart.

if ((DateTime.UtcNow - Process.GetCurrentProcess().StartTime.ToUniversalTime()).TotalMilliseconds > 900000)

{

// Force close and reboot the system it is over 15 minutes or 900000 milliseconds

System.Diagnostics.Process.Start("shutdown.exe", "-r -f -t 0");

}

}


}

}


You can get the code from my GitHub Repository

Monday, July 30, 2018

Fast Active Directory Replication and Change Notification

This setting also can affects the Bridgehead settings for AD (please refer to my post on Bridgehead settings). Active Directory site links have three key attributes governing efficiency: schedule, cost, and interval. They also have a feature called “change notification” that is not exposed in the GUI. The table below summarizes defaults versus today’s recommended practices:

Default
Recommendation
Schedule
24 x 7
24 x 7
Cost
100
100 *
Interval
180 minutes
15 minutes
Change Notification
Disabled
Enabled *
* Tweak as appropriate.
Active Directory Topology should be looked at when the organization is looking at making changes to departments, adding or removing locations and as an overall ongoing audit to ensure what was implemented matches what was designed. The is a free tool will draw a Visio diagram of your sites and links. 

A useful tool Microsoft Active Directory Topology Diagrammer can be helpful for auditing your AD site topology to keep what was implemented to the intended design. Continuously verifying your AD can help ensure that major changes are planned out and implemented correctly; not hastily.

To implement Change Notification:
Open ADSI Edit the Configuration Server (not shown below)


If your missing the Configuration Server from your list; you need to make a new connection for the configuration: Right Click on ADSI Edit and Select Connect

The Following popup will come up. On Connection Point press the second radio “Select a well-known Naming Context:”

Select “Configuration” from the Dropdown menu


Hit OK
Once that is done browsse though Configuration -> CN=Sites -> CN=Inter-Site Transports -> CN=IP and click on CN=DEFAULTIPSITELINK and right click and select properties as shown below.

To Enable change notification you have to add the value 1 to the “options” option. Now if you can’t find the “options” option it would be because of the filter settings in ADSI Edit.


By Default the “options” option blank and the default value is setup to only display attributes that have values.
You need to uncheck the “Show only attributes that have values” and then you can find the “options” setting and set it to 1.


Then Hit Ok and Apply. Now we need to make 2 registry entries to enable change notification on our AD controllers.

Option Value = 1 -> Change Notification with Compression

Option Value = 5 -> Change Notification with no Compression


On our AD controllers we need to add 2 registry (Dword32) key entries.  If they are not there add them.

HKEY_LOCAL_MACHINE\SYSTEM\CurrentControlSet\Services\NTDS\Parameters

Replicator notify pause after modify (secs)

set to 15 seconds (tweaking may be required based on infrastructure)

and

Replicator notify pause between DSAs (secs)

set to 3 seconds (tweaking may be required based on infrastructure)


References:

http://pctechgo.blogspot.com/2014/03/active-directory-intersite-replication.html
https://blogs.technet.microsoft.com/qzaidi/2010/09/23/enable-change-notifications-between-sites-how-and-why/
https://blogs.technet.microsoft.com/ashleymcglone/2011/06/29/report-and-edit-ad-site-links-from-powershell-turbo-your-ad-replication/
https://blogs.msdn.microsoft.com/canberrapfe/2012/03/25/active-directory-replication-change-notification-you/
https://blogs.technet.microsoft.com/markmoro/2011/08/05/you-are-not-smarter-than-the-kcc/

Tuesday, July 24, 2018

Active Directory Bridgehead Settings

Back in May I did a post about doing my organizations AD Health and Security Audit. Well now is the start of that process (wish me luck so I don't break anything). I had setup a mirror to lookup errors and verify that processes are going to work but a lab environment can really only take you so far. So today I began the process of going through the Active Directory will be going though the bridgehead settings in Active Directory.

The bridgehead in the domain were setup like this

Domain's Previous Bridgehead settings
This means that AD02, AD1 and Mission were preferred Active Directory Replicators and AD00 would have a harder time replicating changes (but not impossible) since it is not a preferred AD Controller. This would be consistent with other IT staff making changes on AD00 and changes were being replicated properly and/or extremely slowly if not at all. 

To make these changes we need to get the properties of the servers defined as bridgeheads and remove the IP protocol from the specified bridgehead setting.

Server's Bridgehead settings before
According to my research Bridgehead servers are domain controllers that have replication partners in other sites. The selection of bridgeheads is automatic by default. Manually defining preferred bridgeheads is generally not required, because it incurs additional administrative overhead, can reduce the inherent redundancy of Active Directory, and can easily result in replication failures due to invalid configurations.

Designating a single bridgehead for a domain in a site that contains a single domain controller of that domain is redundant as that domain controller would have been the bridgehead anyway. It can also lead to future problems should additional domain controllers be deployed to the site and only one of them configured as a preferred bridgehead server

Now since this is a single AD site and everything is local there is no need to manually set a bridgehead server.


When is it appropriate to manually specify a bridgehead server?

Since we know a bridgehead server is a domain controller (DC) that functions as the primary route of Active Directory (AD) replication data moving into and out of sites it is best used in low bandwidth situations. This setup would minimize bandwidth usage during intersite communication; the Knowledge Consistency Checker (KCC) would dynamically choose a server from each site to handle the communication.

These servers would be the bridgehead servers so rather than letting the KCC choose the servers; you might prefer to nominate domain controllers (e.g., a domain controller with the best network connectivity, a domain controller that is the proxy server in a firewall environment).  For more information about the replication transport protocols over site to site visit the How Active Directory Replication Topology Works Document by Microsoft

IP Transport has been removed from the Bridgehead
The bridgehead servers have now been setup to be automatically selected by the KCC and because this is a single site where everything is local these settings should now be sufficient and stop some of the issues when we makes changes to the AD on any controller and have it replicate though.

Tuesday, July 17, 2018

Configuring High Availability for Windows Server and a FreeNAS iSCSI target using Cisco Meraki Switches


This post will go over how to setup a 10 gig link with a 1gig failover between Windows and FreeNAS using a Cisco Meraki Stack.  The FreeNAS Server is setup using a FAILOVER link aggregation which allows the FreeNAS Server to keep it's IP address in the event of a switch or link failure.  The Meraki Stack has the Windows Server setup for LACP for aggregation on port 1 on 125.46 and port 24 on 125.47.  FreeNAS is set up for LACP for aggregation on port 1 on 125.27 and port 24 on 125.46.  LACP automatically disables the slower port and it is used in a FAILOVER mode as shown in the image below.

Meraki Stack Setup


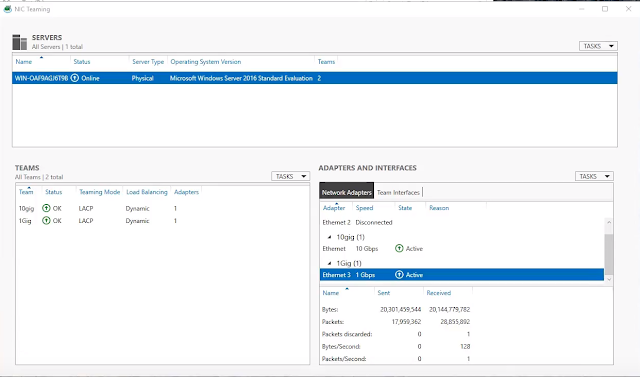
The Windows Connection is setup as two different network interfaces with 2 different IP addresses.  As shown in the image below there is a 10 gig network interface and a 1 gig network interface.  These interfaces cannot be aggregated together, if you do they will not operate properly.
Windows Network Interface Setup


FreeNAS Network Setup For FAILOVER aggregation

The Windows Server for the Hyper-V Server or just as the host has actually two different IP addresses as stated before.  This should not be a problem if your using it as a Hyper-V host as the VM's that you are running will get it's traffic from the failover connection should the primary connection fails.


Before our failover here are some benchmarks of our FreeNAS connection using the iSCSI Connector


As you can see we are pretty much saturating the network bandwidth of the 10gig link, and now when we cause a failure (in this case I disconnected the 10Gig link) the Storage hesitates for a few seconds before re-routing the network traffic through the failover link.


Windows Showing a failure in the 10 gig link


Once the failure in the link is auto detected port 1 on 125.47 is no longer disabled in the Meraki Stack and the server continues to operate as it should just at a reduced capacity and performance.


The Meraki enables the 1gig link to allow network traffic to continue to flow to the iSCSI target


The Windows server and FreeNAS continue to operate and communicate with eachother but in a reduced capacity until the primary 10 gig link can be restored.

When failing the link back there is no noticeable interruption that I was able to notice from Windows, FreeNAS or the switches.  The only noticeable interruption was when the failure occurred and I doubt it would be noticeable unless it was some application that need to work in real time.  During the failover I wouldn't even call the event a hiccup it went that smooth.  My testing included killing the power from an entire switch in the stack, and killing each link on both switch on both servers.

I must say I was really very impressed by how well the failover worked and I can't wait to get this setup into our production environment.


Replacing a drive and repairing a storage spaces volume

When you have a drive fail in a storage spaces, changing out the drive isn't straight forward, however well worth the effort when you co...