Tuesday, April 27, 2021

Adding a digicert certificate to xampp

I setup a computer that was connected to a building speaker system to act as a PA System.  I created a web utility that allowed users to enable and disable the audio if it was required without having to get IT to do it.  Now those with all the browser security settings and SSL everywhere I had to add an SSL Certificate to the server.

The Server is running XAMPP on Windows, so we have a couple steps to get this site validated.

  1. Download our Certificate and Key.  In this case the key is on my primary webserver, and the certificate I need to download from digicert.

  2. Install the certificate.  Using the "CMD Prompt" type MMC then add the snap in for certificates, ensure you use the "local computer" and then in the "Trusted Root Certification Authorities" import the SSL Certificate.

  3. Stop Apache, Create a folder in C:\xampp\apache\ called crt

  4. Create 2 Files, copy the content from the provided links into the new files. 
    cert.conf  https://gist.githubusercontent.com/turtlepod/3b8d8d0eef29de019951aa9d9dcba546/raw/518d3a96b7bb03494ada4f2ebde8325fb6ba6966/cert.conf
    and make-cert.bat
    https://gist.github.com/turtlepod/e94928cddbfc46cfbaf8c3e5856577d0

  5. Double click and run the make-cert.bat and create your local certificate, this will make it easier or create a directory with your domain name (pasystem.domain.ca) and copy/paste the cert and the key in there

  6. Add the following to the xampp conf file located in C:\xampp\apache\conf\extra\httpd-xampp.conf

    • And add this code at the bottom:
      ## site.test
      <VirtualHost *:80>
      DocumentRoot "C:/xampp/htdocs"
      ServerName pasystem.domain.ca
      ServerAlias pasystem.domain.ca
      </VirtualHost>
      <VirtualHost *:443>
      DocumentRoot "C:/xampp/htdocs"
       ServerName pasystem.domain.ca
      ServerAlias pasystem.domain.ca
      SSLEngine on
      SSLCertificateFile "crt/pasystem.domain.ca/server.crt"
      SSLCertificateKeyFile "crt/pasystem.domain.ca/server.key"
       </VirtualHost>
    • In newer versions of xampp you may need to combine them as shown below
      <VirtualHost *:80 *:443>
      DocumentRoot "C:/xampp/htdocs"
      ServerName pasystem.domain.ca
      ServerAlias pasystem.domain.ca
      SSLEngine on
      SSLCertificateFile "$PATH/crt/pasystem.domain.ca/server.crt"
      SSLCertificateKeyFile "$PATH/crt/pasystem.domain.ca/server.key"
      </VirtualHost>

  7. After that, you will need to restart Apache in XAMPP.

Reference

https://stackoverflow.com/questions/64800565/how-to-create-valid-ssl-in-localhost-for-xampp

https://shellcreeper.com/how-to-create-valid-ssl-in-localhost-for-xampp/

Thursday, April 22, 2021

Updating SSL Certificate for Lansweeper

Lansweeper has some great instructions for adding a SSL certificate to their IIS server.  I added a SSL certificate to the lansweeper server 11 months ago, and now it was time to update the certificate.  I logged into my digicert account and downloaded a pkcs 7 certificate to install into lansweeper.  I installed the cert to Certificates -> Personal -> Certificates.


and following Lansweeper's instructions also updating the iisexpressSvc.exe.config and restarting the service.  To my surprise I got the following error.


Being unable to bypass the error I discovered that putting the old certificate's thumbprint back into place or setting  "UseCustomSSLCertificate" to 0 you would be able to access lansweeper again.


<add key="UseCustomSSLCertificate" value="0"/>

<add key="CertificateThumbPrint" value="‎$TLSThumbprint"/>


The error logs were not really helpful either; showing just a binding error.

--------------------------------------Error Logs----------------------------------

me: 22-04-2021 12:06:50 - Result: ADD Custom URL -  Port: 443

Time: 22-04-2021 12:06:50 - Result: Error Performing Commands. System.ComponentModel.Win32Exception (0x80004005): A specified logon session does not exist. It may already have been terminated    at SslCertBinding.Net.HttpApi.ThrowWin32ExceptionIfError(UInt32 retVal)    at SslCertBinding.Net.CertificateBindingConfiguration.<>c__DisplayClass1_0.<Bind>b__0()    at SslCertBinding.Net.HttpApi.CallHttpApi(Action body)    at SslCertBinding.Net.CertificateBindingConfiguration.Bind(CertificateBinding binding)    at IISExpressSvc.ServiceStart.PerformCommands(String thumbPrint, Boolean isCustom, Boolean debug)

Time: 22-04-2021 12:07:04 - Result: === Stop ===

Time: 22-04-2021 12:07:29 - Result: === Start ===

Time: 22-04-2021 12:07:29 - Result: ADD Custom URL -  Port: 443

Time: 22-04-2021 12:07:29 - Result: Error Performing Commands. System.ComponentModel.Win32Exception (0x80004005): A specified logon session does not exist. It may already have been terminated    at SslCertBinding.Net.HttpApi.ThrowWin32ExceptionIfError(UInt32 retVal)    at SslCertBinding.Net.CertificateBindingConfiguration.<>c__DisplayClass1_0.<Bind>b__0()    at SslCertBinding.Net.HttpApi.CallHttpApi(Action body)    at SslCertBinding.Net.CertificateBindingConfiguration.Bind(CertificateBinding binding)    at IISExpressSvc.ServiceStart.PerformCommands(String thumbPrint, Boolean isCustom, Boolean debug)

Time: 22-04-2021 12:07:40 - Result: === Stop ===

Time: 22-04-2021 12:08:03 - Result: === Start ===

Time: 22-04-2021 12:08:03 - Result: ADD Custom URL -  Port: 443

Time: 22-04-2021 12:08:03 - Result: ADD Custom SSL -  Port: 443

Time: 22-04-2021 12:21:09 - Result: === Stop ===

Time: 22-04-2021 12:21:29 - Result: === Start ===

Time: 22-04-2021 12:21:29 - Result: ADD Custom URL -  Port: 443

Time: 22-04-2021 12:21:29 - Result: Error Performing Commands. System.ComponentModel.Win32Exception (0x80004005): A specified logon session does not exist. It may already have been terminated    at SslCertBinding.Net.HttpApi.ThrowWin32ExceptionIfError(UInt32 retVal)    at SslCertBinding.Net.CertificateBindingConfiguration.<>c__DisplayClass1_0.<Bind>b__0()    at SslCertBinding.Net.HttpApi.CallHttpApi(Action body)    at SslCertBinding.Net.CertificateBindingConfiguration.Bind(CertificateBinding binding)    at IISExpressSvc.ServiceStart.PerformCommands(String thumbPrint, Boolean isCustom, Boolean debug)

Time: 22-04-2021 12:21:53 - Result: === Stop ===

Doing some checks on Lansweeper's website I came across the same error on the forums. PR_CONNECT_RESET_ERROR when trying to connect via HTTPS - Followed the instructions. Why is my result bad?

After trying the notepad instructions, and it failing spectacularly, I researched the error "A specified logon session does not exist.  It may already have been terminated."

On techraptor.net I found this post https://techraptor.net/guides/how-to-fix-iis-server-error-specified-logon-session-does-not-exist stating that the certificate had to be reimported, following this procedure:

Run MMC

Here’s how to fix:

Open up certificates in MMC

Step 1: Open up a Run window and type “mmc”

Step 2: Click File > Add/Remove Snap In

Step 3: Add > Certificates, Click OK

Step 4: Choose “Computer Account”, then “Local Computer” and proceed.

Step 5: Hit OK

Export Certificate in MMC

Step 1: Open “Certificates”

Step 2: Open the folder where your certificate is stored.

Step 3: Right Click on Certificate, All Tasks, Export

Step 4: Export to the server Desktop

Now you should be able to re-import your certificate into IIS (or just into MMC) without issue. Restart IIS, and Note: You may have to reimport as “Complete certificate renewal” depending on your certificate.  This did not fix the certificate issue.

What did fix the SSL Issue in lansweeper was the following this article on Microsoft.com to repair the certificate and added the private key.  https://docs.microsoft.com/en-us/troubleshoot/iis/assign-certificate-private-key

Below is the output from powershell, showing the successful repair of the certificate, and after running the commnad Lansweeper was able to run under the new certificate.

Windows PowerShell
Copyright (C) 2014 Microsoft Corporation. All rights reserved.

PS C:\Users\Administrator> certutil -repairstore my "Certificate Serial Number"
my "Personal"
================ Certificate 9 ================
Serial Number: 0933dade655d53658470d076c90446ff
Issuer: CN=GeoTrust TLS DV RSA Mixed SHA256 2020 CA-1, O=DigiCert Inc, C=US
 NotBefore: 2021-03-22 6:00 PM
 NotAfter: 2022-04-23 5:59 PM
Subject: CN=*.sapl.ca
Non-root Certificate
Cert Hash(sha1): 01 e5 53 e4 cc cf f9 73 15 11 35 2e 0b fd c4 d1 91 74 b5 05
  Key Container = {63B4CC61-46F3-4C4B-9F8E-CB38E333DD79}
  Unique container name: 3f90b86fe9b728070aead75c51dfc869_ebcb9c16-cc6e-4b9c-b957-49c2f2cdfce1
  Provider = Microsoft Enhanced Cryptographic Provider v1.0
Encryption test passed
CertUtil: -repairstore command completed successfully.
PS C:\Users\Administrator> 01 e5 53 e4 cc cf f9 73 15 11 35 2e 0b fd c4 d1 91 74 b5 05


After running the repair command in powershell as an administrator, lansweeper started working with the new certificate after updating the thumbprint and restarting IIS.

Thursday, March 11, 2021

Installing Windows 10 on old Intel Apple Hardware

2008 iMac

I was asked to setup a laptop for a local food bank and while the laptop was a good idea to setup some concerns arose about how to secure the device and whether a newer laptop was the best choice based on the needs for the food bank which is a large screen, windows 10, and microsoft office.  Now given the requirements there were a couple older iMacs around that I had upgraded with solid state drives.  We had a early 2008 iMac with 4 gigs of ram and an early 2009 iMac with 8 gigs of ram.  The clients for this project originally requested laptops for the space.  However since none were available and given the nature of the use case (web surfing and documents) I thought it would be a good idea to use a older iMacs that were available.  

Setting up the 2009 iMac was relatively easy, enable bootcamp, and restarted the computer holding down the option key.  I did have to use a USB DVD Drive to get boot camp to complete the process and ask for a reboot but when it did I selected the Windows 10 boot device and installed windows 10.

Enabling Bootcamp on old mac

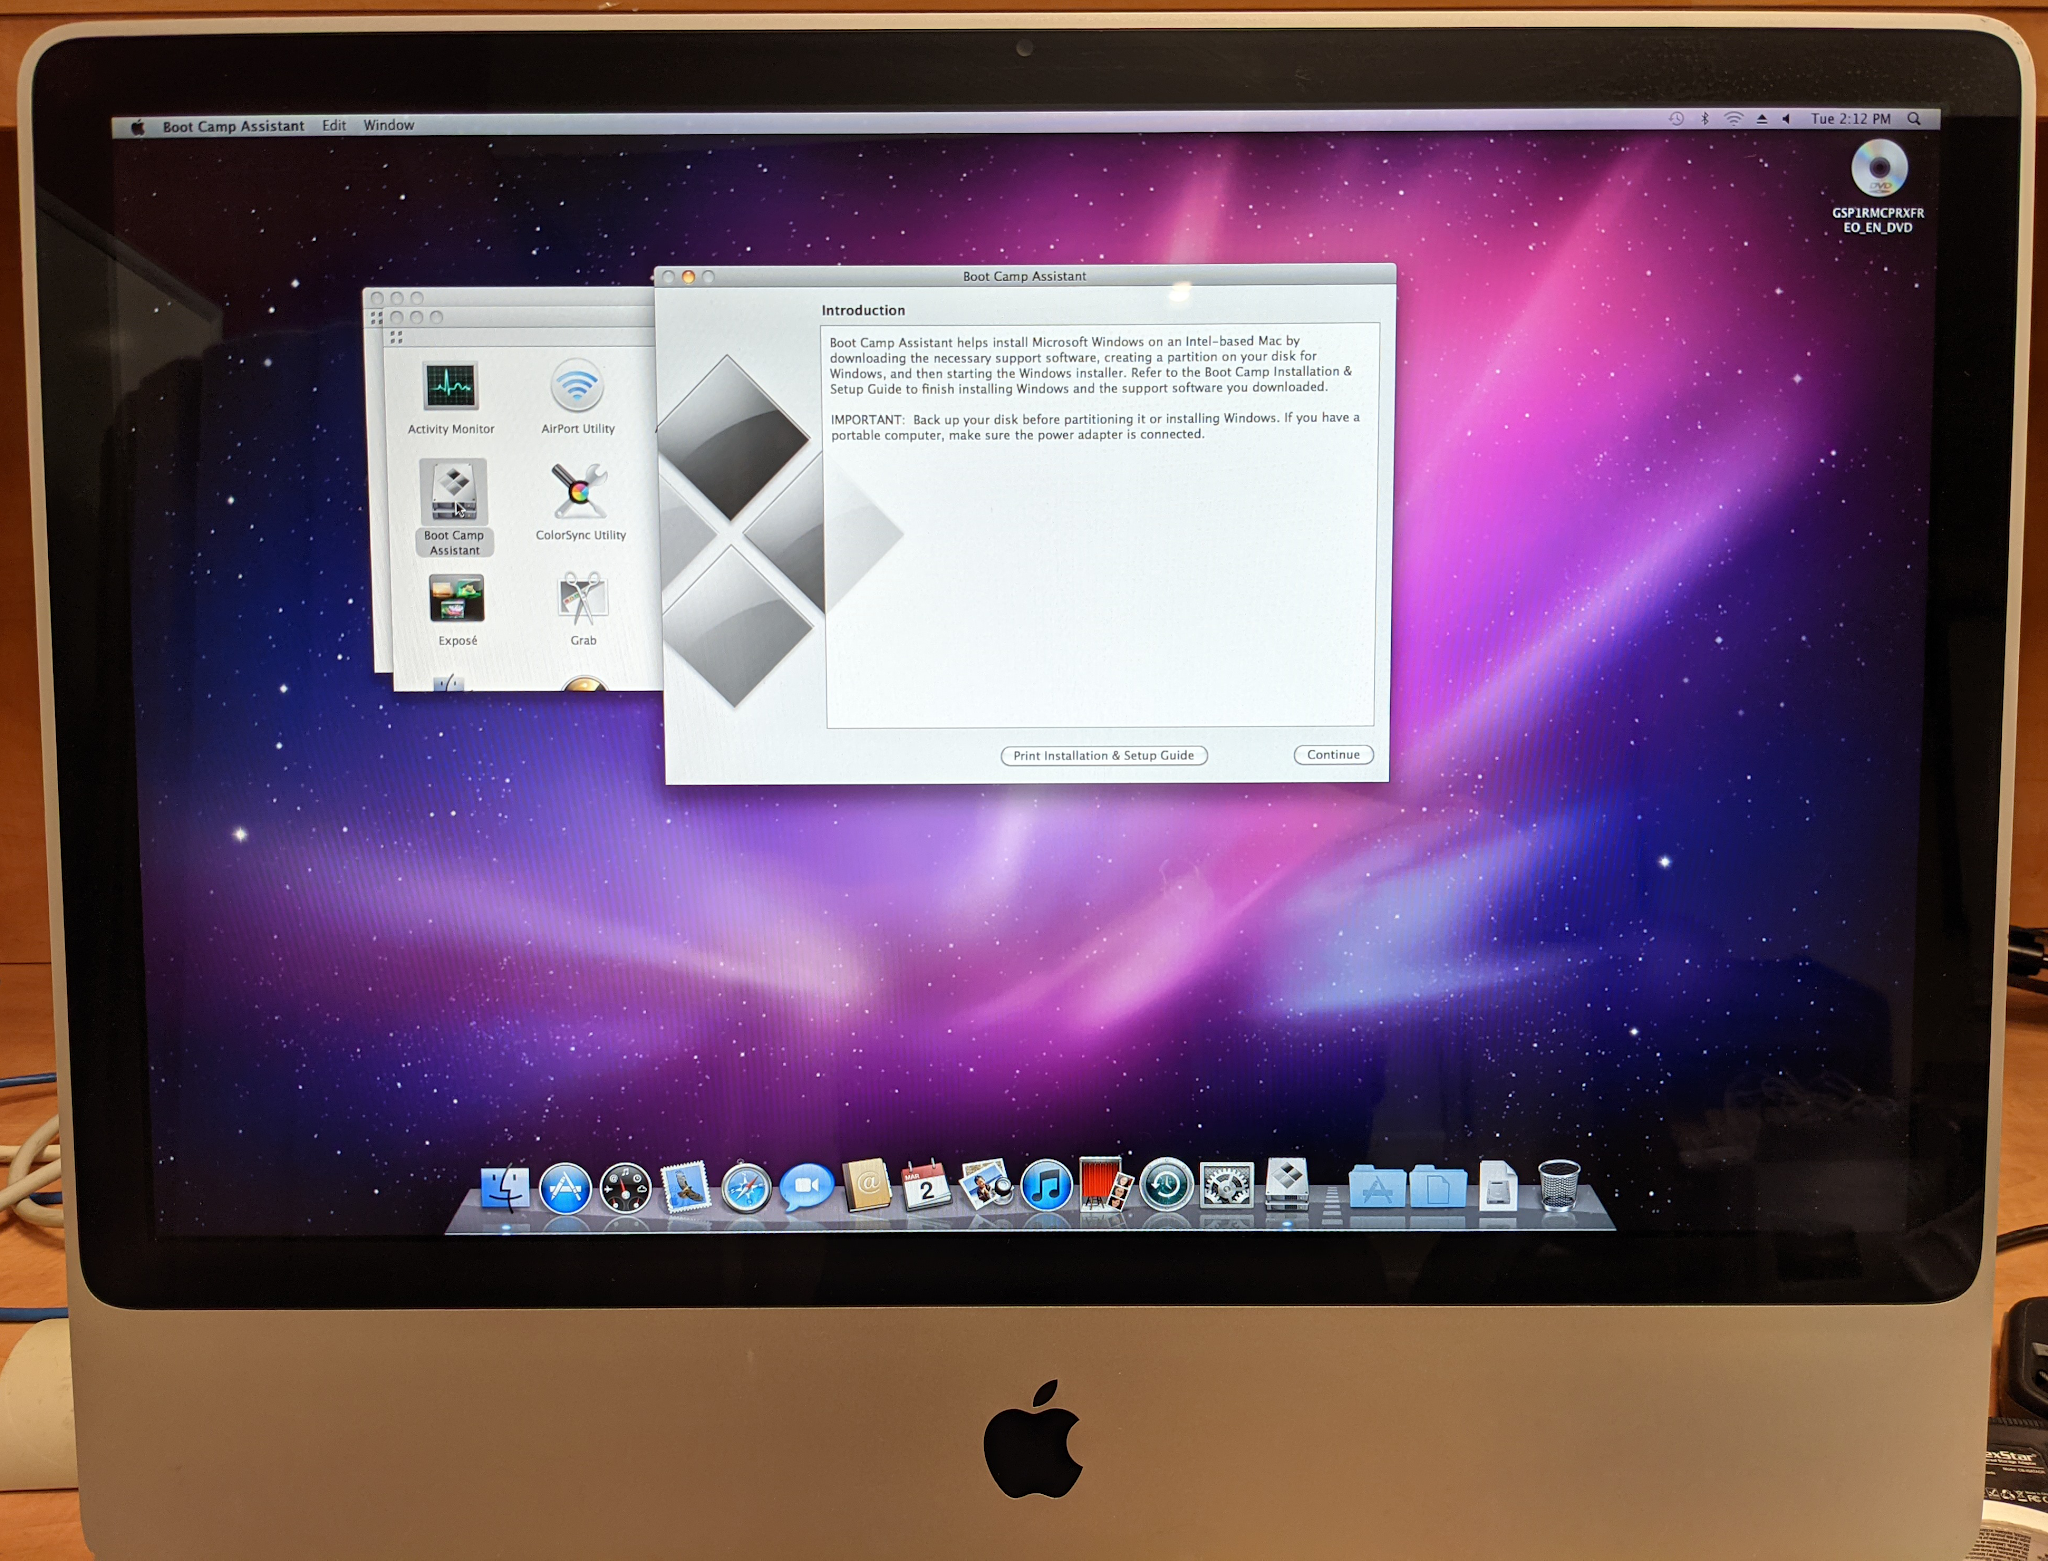
When you have your Windows 10 ISO mounted; check your Mac to see if you need a 32bit or 64bit version of windows and a 8GB USB Drive formated to FAT32 with a MBR record, run Bootcamp.  It is located in Applications -> Utilities.


You will then get the following screen and it will download and format the flash drive with the windows drivers for your version of the mac.


Make the selection of the disk as shown below.  The disk will have to be formatted as a FAT32 (MBR) disk for the Bootcamp tools.


 Once created, the system will then partition your Mac OS Drive (a safe bet is to go 50/50 for the Windows/Mac OS partition)


However getting the 2008 iMac setup was much more challenging.  I did the same process to setup windows 10 as I had done on the 2009 iMac and the system would freeze trying to boot off the usb drive.   

Frozen UEFI Boot Menu

So then I setup a usb dvd drive using a SATA to USB Adapter and it worked fine for the 2009 to recognize and boot off of but not for the  2008 imac, the only thing it would boot off was was a snow leopard DVD.


Every Windows bootable disk, xp, vista, 7 would not boot, it would show in selection menu but would give no  bootable devices found error.  


Even this Samsung USB DVD drive, it would also only boot the snow leopard disk until I switch out the 7 pin USB cable.  Once I did that all windows disk would boot.  I was then able to install the 64bit Windows 7 DVD as I had no dual layer disks of the Windows 10 installer.


With the 2008 iMac, once I got Windows 7 loaded and activated the key, I loaded chrome, then downloaded and ran the Windows 10 upgrade.


<!-- IMPORTANT THIS WILL NOT WORK UNLESS YOU HAVE WINDOWS 7 ACTIVATED or a VALID WINDOWS 7, 8 or 10 KEY!! --!>

With Windows 7 being activated the upgrade wizard went though and took it's sweet time but it did upgrade the windows install and rebooted to the Windows 10 Install Screen.


Once I was done with the install wizard, everything went just great, and we eventually got to our Windows 10 Desktop.


The Windows 10 install seems to work best with the generic windows drivers, trying to install the NVidia driver or the bootcamp driver caused the system to require a reset.  However this core2 2.8Ghz 4GB Ram and 120GB SSD mac seems to be running windows, office and the web browsers just fine.

Wednesday, February 24, 2021

Using Ring Central to setup curbside phone queuing


Covid-19 has been a big pain for everyone with many businesses and organizations trying to offer services during the pandemic.  A change for a library was the need for call cueing due to a number of users coming at the same time for pickup.  So in this case the organization wanted a call cue for up to 9 people with no voicemail, and a pre-recorded message they would get when dialing the number.  Also we have to use a cell phone number that is already in use and didn't have account access to at the time.

To use the phone number on the current cell phone is easy; we just enabled call forwarding on the phone but the other features required would be much more challenging.  The organization doesn't have a pbx that they control, and they are only wanting to use the service for a few months.  I knew that ring central could do lots of the things that were desired but I didn't know if it could do it in the process they wanted it.

Here is how they organization wanted it to work.  A single phone/user that could have the option of transferring the call to a lan line or another user.  The call cue should be able to handle up to 9 users and answer them sequentially also NO VOICEMAIL!  The phone would only work during operating hours.  It has to be easy to use.  I am going to go over and show the settings I used to get it working the way they wanted.

It is worth noting that ring central does have a 15 day trial which I had signed up for then realized that the trial did not do the call queuing; the call queuing is only available on a non trail basis.  I dealt with a helpful rep Jace Henderson, he was able to help us out with what was needed.  I had originally setup a trail account which did not do any of the call queuing features that I was looking for.

Once your setup you have to go through and make some changes so it comes in line with what you want for your business.  The login is simple get an email asking you to activate your account, once activated you get an email with a temporary password.  Then you login.  The login allows you to use your phone number or email address you used to setup the account.


Once your logged in a wizard starts and you can follow it to fill out the information required by ring central.  I skipped most of the wizard with the exception of the E911.  This account was setup for use at a single location.  After the initial setup the UI is pretty simple but I did find myself going around in circles occasionally looking for some of the recorded call settings.


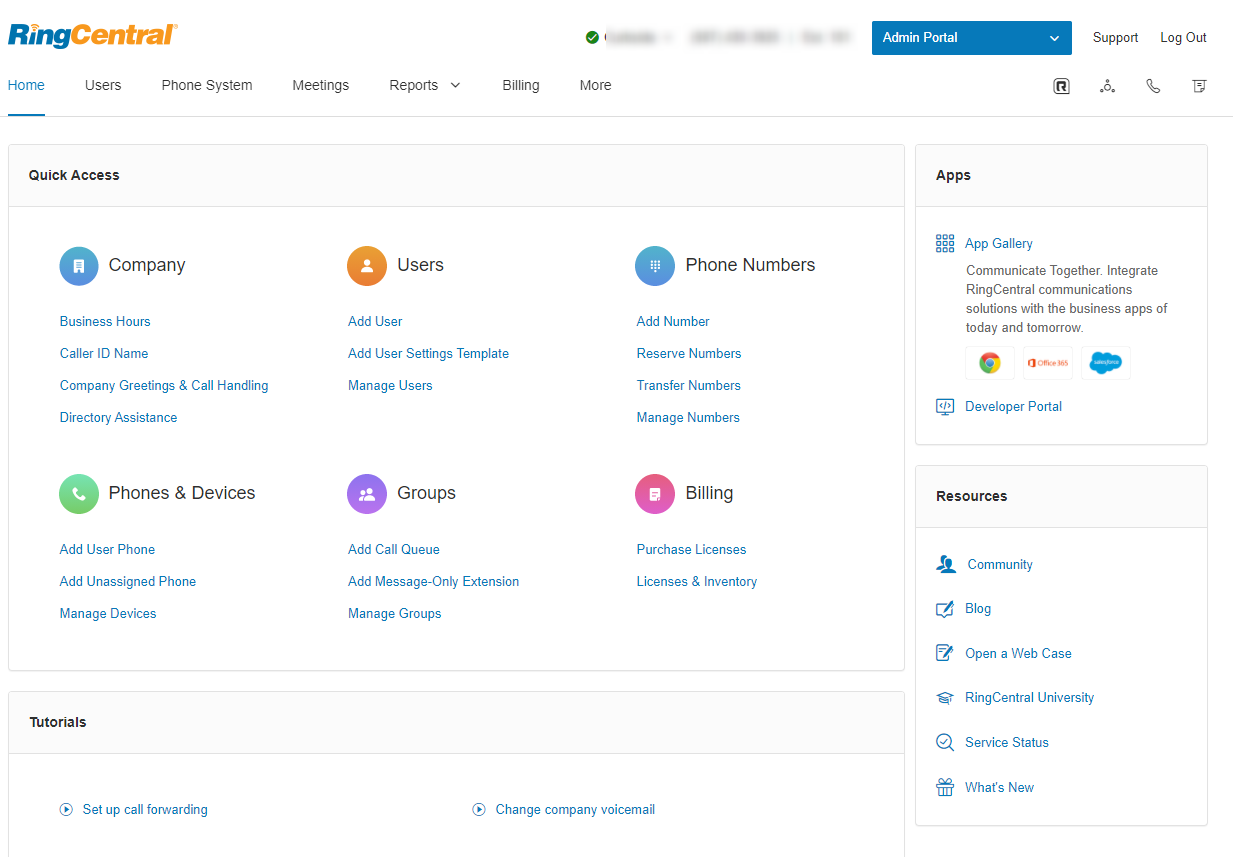
From the quick access menu we adjust the business hours to the hours we want or are defined by the organization.

You may want to change your caller id as there is a limit of 15 characters.  The name of the organization was being cut off so they changed the caller id to a shortened version of the name.

The real settings for the call queuing is in the groups settings.  Once you create a group, you can then assign a number or numbers to the group to handle the queued calls.


When you click on the group you have a number of settings you get to setup.  We will be going through all of the settings starting with Call Queue Details


Call Queue Details - General Settings

In this situation the organization is only using one user and they happen to be the manager.

Call Queue Details - Settings

In the settings, I setup the business hours and changed the regional settings.

Direct Numbers

I made no change to the Direct Numbers options.


Greeting and Hold Music

Here is where I made lots of changes to the settings.  Using audacity and a good microphone I had pre-recorded some scripted text with some good voice talent.  The organization changed the Call Queue Greeting, the Interrupt Prompt and the After Hours Call queue greeting.


To upload or record a new greeting you select the edit then hit the record button


Then when you hit the record button you will have three options for changing the audio.  You can get a phone call where ring central will record the call, using your computer microphone or importing which accepts .wav or .mp3.  I chose to use the last option.  You will need to do this process for any audio you want to customize or change from the preset defaults provided by ring central.


Call Handling & Members

For the call queue you need to add a member, in this case the default user as we only have one user.  


Auto-Receptionist

The auto receptionist settings were pretty simple, I just make sure that zero dialing went to the user extension and company hours were set with the general company hour settings we set before.

User Settings

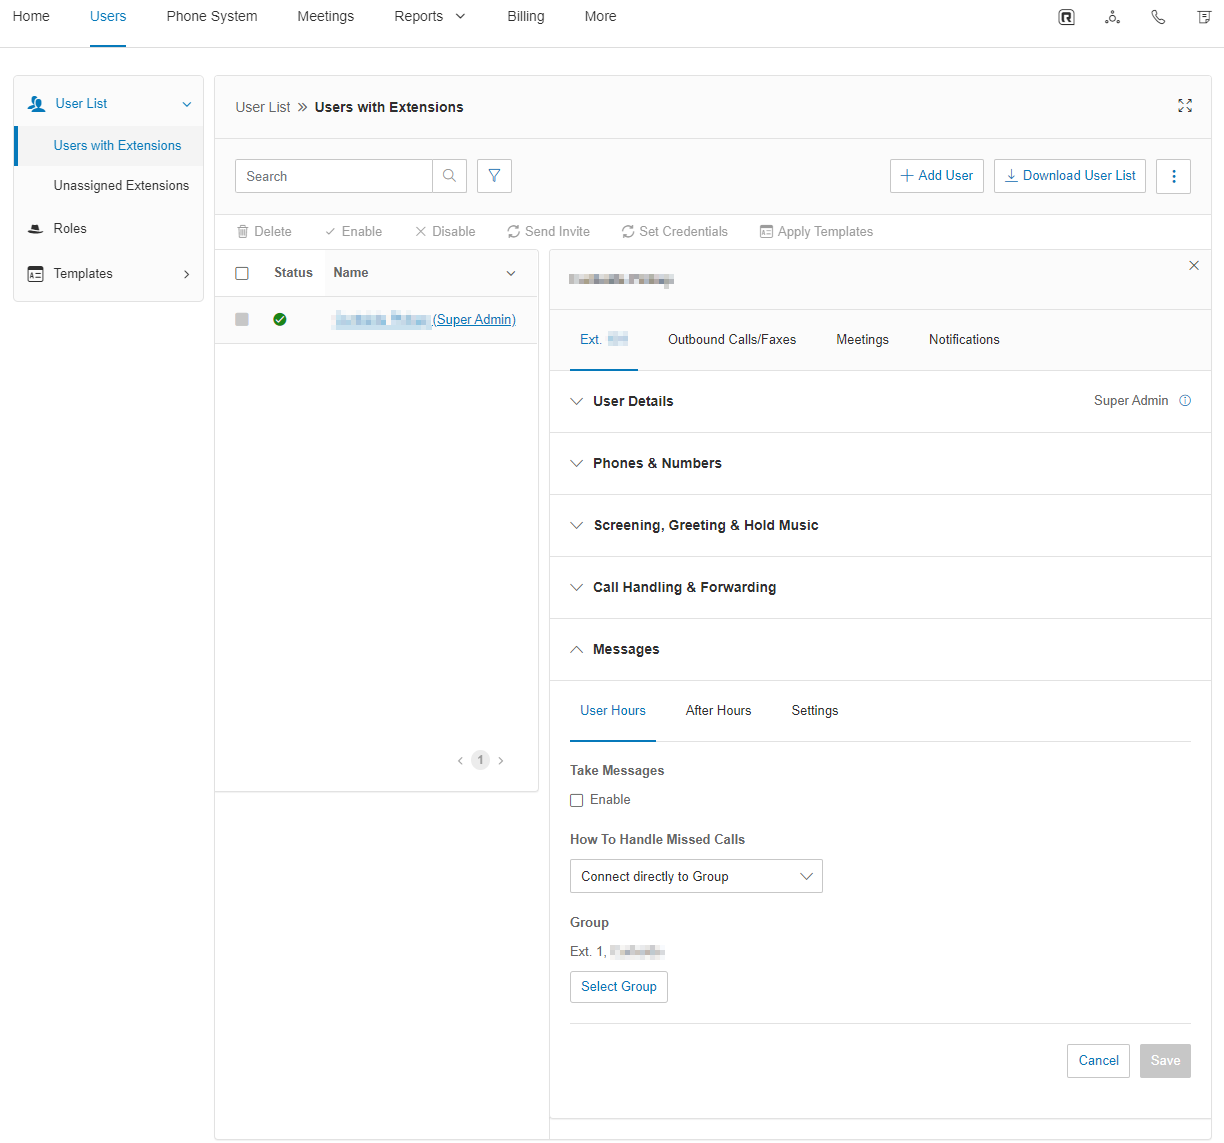
This is where you can disable voicemail, you need to edit to user and go to messages.  Uncheck Take Messages, then change the How To Handle Missed Calls to connect directly to Group and select the group.


You also need to make changes to the Call Handling and Forwarding, changing the incoming calls to a sequential order and I changed the ring for 15 Rings and enabled a 30 second break between calls.


Along with Screening, Greeting & Hold Music


Users with Extensions

There is one more place that you can add business hours and it is in the Settings & Permissions section of the Users with Extensions.  So when a user should be off they no longer get phone calls and can have different hours from the phone group and the business.


This setup has the following process.  During operating hours the user calls the cell phone number which is then forwarded to the Ring Central Account Mainline, where they press 0 or are automatically forwarded to the default extension.  Where the call is then answered or put into a queue if the phone is busy where they stay in the queue until the phone is available.  The caller is not able to leave a voice message, so must stay in queue or hang up and try again.  If they call during non-operational hours they the user gets a message saying that the organization is closed, the user gets the operating hours then disconnects.  If there are more then 10 users in the queue the user will get a message saying there is higher than expected call volume and to try again later.  It's not pretty but it does work.

Thursday, February 18, 2021

Acrobat Update Breaks Office Save As PDF Button


Acrobat update 17.011.30175 breaks the com add-in for office 2016.  Doing a fresh install of acrobat 2017 without the update the com add-in works as you would expect but upon installation of the update you get the error shown below.

You can view the full video here.  https://youtu.be/WIP6EQsKsQo

while I don't have a fix for this you can mitigate any issues by users by disabling the add-in in your office applications by going File -> Options -> Add-ins -> select manage COM Add-ins and press go


Then uncheck the offending add-in which is Acrobat PDFMaker Office COM add-in and hit ok


This will remove the Save as PDF option from the file menu, though it doesn't fix the issue users will not encounter the error because the menu option is not available.

Adobe Acrobat 

https://docs.microsoft.com/en-us/office/troubleshoot/third-party-add-ins/incompatibilities-between-office-and-adobe

https://www.adobe.com/devnet-docs/acrobatetk/tools/Labs/cleaner.html

https://community.adobe.com/t5/acrobat/unable-to-find-quot-adobe-pdf-quot-resource-files/td-p/8749598

Remove Acrobat Plugin

https://support.microsoft.com/en-us/office/add-or-remove-add-ins-in-excel-0af570c4-5cf3-4fa9-9b88-403625a0b460

Monday, January 25, 2021

Managing VM Storage On A Hyper-V Cluster

Managing storage on a cluster can be pretty dry but it is a challenge to keep your data files from becoming a sprawling mess much like my desktop.  File duplication from copies, backups, even testing VMs can create a confusing mess.  When it comes to your virtual machines and their storage you should make sure that you do everything you can to keep everything together; otherwise your not only asking for trouble. Microsoft has some great tools for managing your virtual machine storage and you should use them otherwise you could easily end up with duplicated virtual disks which could be outdated and can cause you all sorts of issues.

Sprawling Desktop Mess
My Messy Desktop

In my case I want to move several VM's off of a storage server called STORAGE1 and move them to STORAGE2 as shown below.  Now before I go head and move these because I am cautious and paranoid; I make a backup of said VM, in this case let's say it's VM1.  I run a export out of the cluster node to which the VM is on (or you can move it to the node your on) and run a full export to a usb drive I have connected.  

VM File Management

Wanting to keep your File System Organization nice and clean, I highly recommend that you pre-setup your folders where you want to move your VM, so on STORAGE2 I would create a folder called VM2 and inside that folder I created a folder called Virtual Hard Disk.  The Cluster Server Manager will move your files but it won't create the same folders, the cluster storage manager will just put everything in a single directory, and I myself prefer to keep the default structure as much as possible.  So on Storage2 my directory pathing is setup like this.
STORAGE2 -> VM2 -> Virtual Hard Disk


As you can see below I have the Failover Cluster Manager open and I have the roles menu selected.  Here is where you can modify your Clustered Role Storage


Right click on the selected VM and Select Virtual Machine Storage as shown below.


You will get a dialog box showing you where the virtual machine storage resides.  Then you drag and drop the virtual machine storage elements into the folders on the left as shown below.

Once you move all the items to the new storage locations press start.  This will take some time to process which also depends on the VM and the size of the VM disk etc.  Obviously the larger the VM is the longer the process will take.  Unfortunately there isn't any progress bar to tell how where the progress is on the moving of the VM storage, but the text on in the information section will disappear when the process is complete.  You can run this while the VM is live, though I do recommend shutting down the VM then move it; but that is just me being extra cautious.


Once your VM has finished moving the folders on the storage server where the VM was will still be there but will be empty.  I do recommend tiding up after and removing these unused folders as shown below.  This really beats the alternative of removing the role of the VM on the cluster and moving your backed up file to where you want it on the storage and resetting up the role.


Fix a windows network printer that is offline

How to fix a network printer that get's installed and shows offline. By default SNMP is set to public, so when you are installing a netw...