Friday, May 29, 2020

Setting up storage spaces virtual disk with a two disk parity using powershell

On Server 2019 I came across an issue setting up a storage spaces virtual disk in the Server Manager GUI.  You can view the issue and resolution on my YouTube channel https://www.youtube.com/watch?v=l1UEUi3twOg or continue reading the post.  I have an Intel Socket 2011 Board with a Intel E-2620v1 Xeon.  This motherboard has 6 sata ports, and I added in  a Silicon Image 3132 1x PCI-E card (2 ports) for some additional storage ports for a total of 8.  I have a single OS drive, a "scratch/temp" drive, and the rest of the disks I wanted to setup as a single storage disk for setting up and testing VMs.

So in my server manager you can see the 6 disks I am going to use., 2 of them are detected on a raid bus (Si3132 controller) the other 4 are detected as SATA.


Creating the Storage Pool works just fine.


Tasks -> New Storage Pool -> Give it a name and description


Select the disks you want to use


Once you confirm your settings, create your storage pool


Then open up the create a virtual disk wizard


Select the storage pool, in this case DATA


The new virtual disk wizard will then run, give your virtual disk a name


Specify enclosure resiliency (if applicable - in this case it isn't.)


Select your storage layout


Select your provisioning type (in this case fixed)


Define the size of the virtual disk


Create the virtual disk.


At this point creating the virtual disk will fail.  It should have setup the disk as a 6 disk parity with a single drive redundancy, this is how the wizard has been setup requiring a minimum of 7 disks for a 2 disk parity.


So at this point I switched to powershell, to create the storage spaces virtual disk.  I deleted the storage pool, even though it wasn't necessary; but I like starting clean, it helps keeps any issues down to a minimum.

If you haven't already install the latest version of powershell from github.  https://github.com/PowerShell/PowerShell

To make sure I can add all me disks to the storagespaces pool, I ran the following command.

PS C:\Users\Administrator> Get-PhysicalDisk -CanPool $True


Then I put these disks into a variable called $pd and created storage pool called DATA.
PS C:\Users\Administrator> $pd = (Get-PhysicalDisk -CanPool $True)
PS C:\Users\Administrator> New-StoragePool -PhysicalDisks $pd -StorageSubSystemFriendlyName "Windows Storage*" -FriendlyName "DATA"


Now that the storage pool is created we can create or virtual disk.

PS C:\Users\Administrator> New-VirtualDisk -StoragePoolFriendlyName "DATA" -FriendlyName "DATA" -Size 1000GB -ProvisioningType Fixed -ResiliencySettingName "Parity" -PhysicalDiskRedundancy 2


With the virtual disk made we can go into computer management and online the disk, initialize, format and set it up how ever we like.  After running the powershell commands if you want to see things in server manager you may have to do a physical refresh to have it all show up in the dashboard.


Thursday, May 21, 2020

How to install, setup and deploy a remote desktop server

I put this blog post and video together to document setting up a basic RDP Server for setting up access for organizations that need to quickly move users from an on site workstation based setup to a mobile VPN based work environment.  I had set this up in anticipation that my organization would be required to work from home because of CORVID-19.  To take care of the VPN I used our PFSENSE firewall to handle the VPN connection.

How the setup was done you can find the documentation here for site2site VPN  https://optionkey.blogspot.com/2019/12/setting-up-site-to-site-vpn-on-pfsense.html or  client2site VPN https://optionkey.blogspot.com/2017/03/setting-up-pfsense-with-openvpn-using.html.  Almost all users were setup using client to site.

For the setup of the server 2019 Hyper-V virtual I machine, I downloaded the Server 2019 ISO on a trial basis from microsoft https://www.microsoft.com/en-us/cloud-platform/windows-server-trial (RDP is 120 day trial).  The server was configured with the following specs 24 Gigabytes of dynamic ram (use non-dynamic setting for better performance), a quad core CPU and 127GB disk.  You can view a full video of the install, setup and configuration on my youtube channel https://www.youtube.com/watch?v=mQG8TN_yf6Q

What this post will do:

This post will help you get a RDP server setup without a domain and it will explain the process of letting local users to connect and use the RDS server, and then connect it to a domain to get some additional features such as App-V, additional user permissions, etc.


Setup:

After your initial install of Windows, you will want to go to the add and remove features tab in server manager.


Select a Role-based or feature-based installed


Install roles and features you want for a RDP Server I use the following:

● .net 3.5
● Multipath IO
● Network Load Balancing
● Remote Server Admin Tools
● Remote Desktop Services
● Remote Access
● Multipath IO

● Network Load Balancing
● Remote Desktop Licensing Diagnoser Tools
● RAS Connection Manager
● Windows Internal DB
● Windows Standards Based Storage Management
● Simple TCP/IP Services


When installing the services select the following:

● Remote Desktop Session Host
● Remote Desktop Connection Broker
● Remote Desktop Gateway
● Remote Desktop Licencing
● Remote Desktop Web Access


To install all these features you will need to specify the additional source as well in my case it is D:\sources\sxs


Installing these services and features will take several reboots.  Once the installation is finished local machine users can login to the server with remote desktop services.  However without a domain, we can't really use services like App-V.  The App-V service is available by ip/machine dns resolution https://$IPADDRESS/rdweb/ but will not have any published apps available.  If your setting up a remote desktop server your doing this because you have multiple users that need to login to your network remotely so most likely your going to use active directory for managing this.  So to get all the features for the remote desktop services you will need connect your system to the domain.  I renamed the machine from the auto generated WIN-HM7LU99C2OG TO RDSv8 and connected the server to the domain controller I was using.


Once you've rebooted the system and are on the domain, go manage -> Add Roles and Features


Select "Start the Remove Roles and Features Wizard"


Now select Remote Desktop Services Installation


Since we are using a single server select our server RDSv8 select the Quick Start.


We want to still use our session-based desktop deployment


Select the RDSv8 server


Once everything has finished installing reboot the server


After reinstalling the services after renaming the machine and connecting to the domain, you can then access remote app and published applications by the URL https://$COMPUTER.DOMAIN/rdweb.    Now your regular RDP session server is available but no you also have App-V and by default the calculator, paint and wordpad are default apps that are available for use.


Something which I recommend doing if your using the RDP server the traditional way instead of using app-v, I would recommend disabling the server manager at login.

Disable server manager on login:

Click on Start > Run.
Type GPEDIT> MSC > hit OK.
The Local Group Policy Editor snap-in will open.
The policy that we are interested in can be found by expanding the following: 

Computer Configuration\Administrative Templates\System\Server Manager.


Now if users can connect to the network using the VPN, you should be able to access the remote desktop server and have access to all the apps that are available on the server.

Once I finished installing the server, I installed Office 2019 as a trial.  Now we had got it licensed before the licence period expired; so I included a link in the Reference Links to how to extend the trial (though I have not tried it myself)


Reference Links


Monday, May 04, 2020

Automating Reboots with Task Scheduler

How to automate a reboot or shutdown with task scheduler. To do this you will have to be a user with admin permissions.  You can view the video here

1. Open Task Scheduler


2. Create a new task


3. Fill out the settings in the general tab.  How you want to configure the command and the user account running it.  In this case, I am using a local administrator account, it will run if the user is logged in or not, run with highest privileges, and is configured for server 2019


4.  Create and configure a new trigger


For our new tigger we are setting it to be run on a daily schedule, 5 am every day.  Here you can also disable the task or have it expire after a specific date.


5. Once triggers are set, we can put the code in for setting up the reboot in the actions tab.


Here is where the code goes for executing the reboot

%SystemRoot%\system32\shutdown.exe -r -f -t 1

The task above has set a reboot of the system in one second.  You can read below for other options that can be configured.

Shutdown
%SystemRoot%\system32\shutdown.exe -s -f -t 60 (Shutdown the system in 60 seconds)

Reboot
%SystemRoot%\system32\shutdown.exe -r -f -t 60 (Reboot the system in 60 seconds)

Here is a description of the parameters used above:

-s : The shutdown option.  This will turn the computer off.

-r : The reboot option.  This will reboot the system (turn it off and on again)

-f : forces all applications and services to close and/or stop.

-t : timeout before executing the shutdown or reboot (in seconds).  The default is 20 seconds, but can be changed by adding a number right after it, separated by a space: for example, -t 60 for 60 seconds.

6. Conditions


Setup any additional conditions you want the to configure, such as only running if there is a network connection, if the system has been idle, etc.

7. Settings

Friday, May 01, 2020

Setting up and supporting an organization from home

March 2020 changed a lot of things for everyone, everywhere.  The biggest change has been the working from home (remote working).  From an IT perspective this brings up many challenges as most work places (mine included) are not a mobile first or mobility first type of organization.  So when COVID-19 hit, we were scrambling to get a remote setup that could handle enough users, and have a way to connect them without really compromising security or making us an easy mark for an attack with few IT resource for defense.

I had three issues that I had to immediately solve.

1. How to connect users to the company's network securely
2. How to support users systems as remote desktop clients
3. How to troubleshoot issues with remote desktop clients with visibility

To solve issue 1, I decided to setup a new RDP Server (2019) based using OpenVPN.

To solve issue 2 and 3 since it would be a combination of corporate and personal devices, I decided to use MSP360 and Teamviewer with a how to document.  My idea was to treat both the corporate and personal devices as simple remote desktop clients.  With less then a week to set up a new RDP server and prep any corporate devices we had available it was going to be a huge challenge.

For issue 1, I have had experience in setting up PFSense to also be an OPEN VPN Server
https://optionkey.blogspot.com/2017/03/setting-up-pfsense-with-openvpn-using.html though this wasn't the easiest solution (such as setting up RD Gateway) it was the one I felt was more secure and easier for me to support.  I also had an issue with having to get users to update their passwords to something more secure.  Going with OpenVPN allowed me to setup long secure passwords then move to a certificate based authentication once I get that setup so users wouldn't want to fight the updating of their Active Directory passwords.  Also with RDP Attacks on the rise, I also feel it more/less avoids that kettle of fish.


For issues 2 and 3, to treat corporate and personal devices as simple RDP Client's is easy, it really doesn't matter what or how they connect so long as they have an RDP client and connect.  I setup the OpenVPN client on the corporate devices we had and used MSP360 or teamviewer quickconnect apps to setup and install the open VPN client on any devices that needed setup.  

Provide How To Documentation

My organization uses GSUITE so I have a secure way of providing the VPN documentation to the users for those who thought they can set it up on their own.  Below is a sample document with non-working links, this is more/less the document I sent out to staff to get them setup on the VPN.  I choose to support both Apple and Windows users.

To that end, only 6% of our staff were on Apple Computers.  We still chose to support them but made the documentation primarily Windows based and because of the extra security setup required for Apple Computers, we decided it was best to just provide the links for required software, and staff would walk though the "extra" requirements for the Apple machines.

Since our VPN is OpenVPN based we used the following:

Windows VPN Client - OpenVPN Client https://openvpn.net/community-downloads/

MacOS VPN Client - Tunnelblick https://tunnelblick.net/downloads.html

Apple App Store Link for Microsoft Remote Desktop Application: 
https://apps.apple.com/ca/app/microsoft-remote-desktop-10/id1295203466?mt=12

***************SAMPLE DOCUMENT*************


Staff can setup access to remotely login to the office from our RDP Server. However for network connectivity and security reasons we do require you install a VPN client where you need to login with a username and a password.

Here is a 5 minute step by step video tutorial on how to connect to the VPN from Windows

IT can remotely help you by using our Remote Support APP. Call them at 555 555 5835

Mac Version | Windows Version

If your a mac user you will need to install the Microsoft Remote Desktop Application

Then you will need to download the following files, for the VPN client please select the VPN Config File and the OpenVPN Client for your OS.


VPN Config File | OpenVPN Client (Mac version) | OpenVPN Client (windows version)

How to install the OpenVPN Client for Windows

We will need to install the vpn client and import the VPN configuration. Then put in your username/password provided by IT.


To connect to the library on a computer download the OpenVPN configuration file attached in this email.  Then install the  Open VPN client.


Once the VPN client is installed you can then connect to the VPN


How to connect to the VPN


When you're connected to the VPN you can then connect to the RDP Server.  You can manually connect or download the RDP connection files


Here is a 2 minute video on How to connect using a RDP connection file


If you want to manually input the information open the Remote Desktop Connection App


When you open the program you will see a dialog box as shown below


In it you will be able to put either of the following


IT would prefer if you would use the RDS 
$COMPANYRDSSERVER.COMPANY.DOMAIN


And if you have an issue please use the secondary
$COMPANYRDSSERVER2.COMPANY.DOMAIN


Press connect.


Then put in your workstation username and password


login with your domain username and password (the one you would use if you were sitting in front of the screen at work).  It should be in the following format

domain\$username or $username@domain.com where $username is your workstation login


*******End Of Sample Document*******

Remote Support Applications


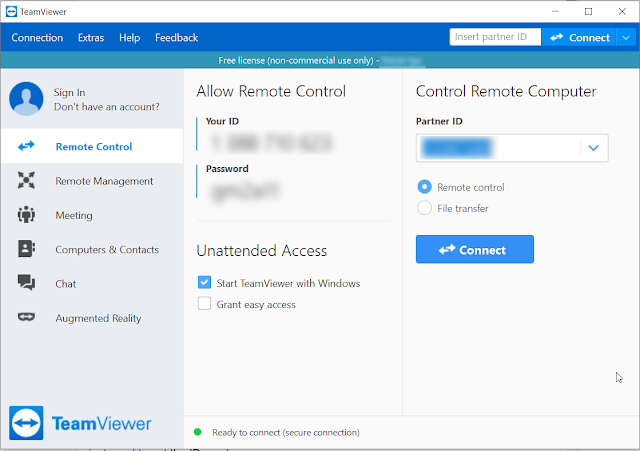
For the remote support applications we used a combination of msp360 and Teamviewer both work great for remote support.  We did not install the app though we decided to go with the Quick Support Application for both.  For the laptops connected to the domain, my preference was to use Teamviewer as it does domain authentication and you just need to get the ID number.

Teamviewer Client 


Teamviewer Console


By default the teamviewer tries to connect using teh teamviewer password, but if the user is a limited user, you will see a note about UAC controls.  To bypass this you can use teamviewer to sign in as a windows administrator.


Teamviewer authentication from domain is a two step process.  You actually have to connect twice.  The first time after authentication it will actually close Teamviewer on the client then relaunch using the admin credentials provided.  This will cause your console to be disconnected.


When you disconnect you can immediately reconnect using Teamviewer as the id will be saved in the Partner ID field. 


 and it will then prompt you to sign in with the the windows authentication again.


It will then connect and you will have administrator permissions.

MSP360, works well as well but doesn't give you the UAC login options and you will be required to give username/passwords over phone, chat etc.  It is not a good solution for UAC protected devices but it is great for connecting regular laptops (as everyone on their personal device is an administrator).

MSP360 Client


MSP360 Console


Once you connect you will be prompted to put in the password on the client side, then be connected.


Remote support applications.

https://www.msp360.com/remote-assistant.aspx

https://www.teamviewer.com/en-us/

Summary


Overall the experience for the users wasn't terrible, there were a few hiccups that occurred caused by ISP DNS.  The issues did not affect the remote access using the remote support apps but did cause issues connecting to the VPN which was setup to use a DNS address in case we want to change or need to change our ip address.  At any rate an ISP was giving only IPV6 DNS and the translation to IPV4 was not working properly since our DNS host was not setup to use IPV6 some users could not connect to the VPN.  Remoting in and changing either the config file to the ip or adding a host entry in the host file resolved the issue.  A part from ISP issues, most users had a pretty positive experience with working from home (or at least that's what they told me).  Using MSP360 and Teamviewer to remotely administer essentially RDP clients did work incredibly well.  Users either tried to connect to the RDP server using a downloaded RDP connection file; or were setup by IT staff when using the remote support applications.  Beyond that any application or other issues were resolved using RDP admin shadow sessions once the user was connected to the remote desktop server. 

How to fix CURL call imporitng an RSS feed on a site blocking CURL calls

There is a 3rd party service provider that my organization uses called bibliocommons.  They have these nice book carousels.  However the car...