Tuesday, December 08, 2020

Setting up email activesync using SAGE


I was asked to lend a hand with an IT project a friend had.  They were having some trouble getting email syncing to work the way the client wanted.  They are younger and had started their own IT business to I thought I'd lend a hand and help them thought this one small job.  To be completely fair their client wasn't exactly forth right with their setup.

The client insisted that they were running everything off office 365 and they had configured their sage email to pull from O365 along with outlook.com, their iPhones and outlook desktop client; and were having sync issues.  This was not the case.

They had signed up for Office 365, but were using sage as their email server.    They had configured their mx record on their domain to be the sage email servers much like I had setup for a client when they setup their shopify site; they had setup a DNS alias on their domain host and had their MX records pointing to SAGE.  Since they were on the non-premium tier they had a limited amount of email space (compared with O365) with only 5GB


The web based outlook accounts were setup to be personal email accounts and would have to be dealt with or transfered to use the O365, but only once the mx records were changed to be O365.  The DNS TTL is set to 60 minutes so that should be updated before the DNS change so that any update that is done happens quickly such as 600 and changed back after the migration.  I recommend that happen after the email syncing got sorted out.

The easiest thing to do was to The first thing that was done was to make sure email was working on the email clients.  Email clients on the web, phones and desktop outlook were configured to be POP3 with the phone and web client configured to leave messages on the server.  My friend had already tried to change the emails over to imap by SAGE's own email documentation and was unsuccessful.  The email would not refresh in acceptable period of time or did not sync at all which is why he asked for  my help.  After checking and trying the imap accounts again and verifying there was something causing it not to sync or be accessed.

Since imap was not an option, on the web or email clients, we moved the client over to activesync which did work but the client no longer had web email for a time.  I recommended that they setup a time to do the email migration to O365 after they had updated the TTL for the domain to 600 seconds.  

I explained that to avoid email interruption it would probably be best to setup another email account for this users and alias the accounts to the new O365 emails.  Since the TTL would be set to a low time when the DNS record got changed there would be a 5 minute window where email could "be lost" but was unlikely if it is done in an "off hours time".  

I also recommended setting up new email inboxes and aliasing the current emails to the new 365 accounts, that way email forwarding could be setup on the SAGE servers and if some providers were caching the DNS record it would then catch the email in two places and send the email over to the new email address and then decommission the sage email after about a week.

The activesync setup for iOS and Desktop client were working perfectly.  We left the email for the web client (outlook.com) configured for POP3 but it did not appear to be working.  It also didn't help that the accounts for outlook.com were all setup as personal accounts but would be fixed when the email migration to 365 was complete.

Additional Information for SAGE Integration with Exchange Server

https://support.na.sage.com/selfservice/viewContent.do?externalId=23758&sliceId=1

Friday, November 06, 2020

Migrating a website to shopify, while keeping your email working

Recently a site I was hosting on my shared host decided to move their online presence off Joomla to the shopify platform.  The website was originally on a shared host; which is fine but when the site was moved to shopify, I was asked to update the A and cname records for the domain to the shopify ip and url.

My host on CPANEL when you setup a domain, puts in a bunch of default settings for the domain, as they should.  Here is a sample of a default setup.


This client is forwarding domain emails to a gmail account, they don't have google apps or anything like that and it isn't required for them.  So when I updated one mx record pointing to my main a record and when I updated the A record to point to the new IP and change the cnames to point to shops.myshopify.com, my client being unaware that shopify doesn't provided email service email just stopped working because the mx record was pointing to the main A record.  This caused all email pointing to domain.ca to stop which was being forwarded by the server to a web email service.


The solution was to make a new A record with the old ip address in this case making a name record mail.domain.ca A = sharedhost IP and putting a new cname domain.ca MX = mail.domain.ca


Now you can see here I removed the mail.domain.ca cname record I felt it was redundant but if I have problems I can always put it back in especially since the mail.domain.ca was not being used.  I do have to setup DMARC but that is something else that I'm not doing at the moment.

Tuesday, November 03, 2020

Creating and Installing a SSL/TLS Certificate on a Windows Papercut Server

Papercut has a pretty good tutorial for updating/installing an SSL Certificate on papercut but I found it a little hard to follow, if you want to see the origionanl post go to https://www.papercut.com/kb/Main/SSLWithKeystoreExplorer.  As in their post I also recommend using KeyStore Explorer for installing the SSL Certificate as it makes it much easier.  

I am using an existing wildcard cert for securing this server.  I have also setup the server to use port 80 and 443.  I am working directly on the papercut server to create the cert, you can create the cert on another machine then copy the cert over and begin the import process using KeyStore Explorer, or even copy the file you create using keystore explorer to the papercut server.

To start if you haven't install the openssl tools, and create a compatible certificate if you haven't https://wiki.openssl.org/index.php/Binaries


Create you certificate (I'm working out of the OpenSSL Directory - "C:\Program Files\OpenSSL-Win64\bin") and my source is a wildcard cert for an apache webserver.

openssl pkcs12 - export -out $PATH\To\Save\$mycertname.pfx -inkey "$Path\to\privatekey\$cert.key" -in "$Path\to\crt\" enter export password and verify

I saved this to the OPENSSL directory.


To install the certificate into papercut open KeyStore Explorer

1. Click Create a new Key Store


2. Select JKS, then click OK


3. Click the Import Key Pair icon


4. Select the type of certificate you are using, then click OK, I'm using PKCS Certificate which we created earlier


This is normally PKCS12 (.pfx, .p12), but it depends on where your certificate came from.

5. Click Details to verify the certificate. If you get an error, it could be the password or the wrong certificate type

pkcs12 import
pkcs8 import

6. In the Enter Alias field, enter an alias for the newly imported Certificate, this can be anything, but in this case we are putting print.papercut.com, then click OK


7. Save your KeyStore


8. Set the password for your KeyStore 
then click OK, Remember to make a note of this, as you will need to re-enter this later when you set the value for the “server.ssl.keystore-password” value in the server.properties file.


9. 
I saved it in 2 places, my documents folder and to the papercut custom directory located in the PaperCutMF Server Folder ie (C:\Program Files\PaperCutMF\server\custom) which we will use later.


10. Edit the papercut server.properties file typically located in the server folder and change the values below to match your filename and passwords and remember to remove the # signs to enable these keys


server.ssl.keystore=custom/$papercut-keystore (in my case it is called papercut)
server.ssl.keystore-password=$PASSWORD
server.ssl.key-password=$PASSWORD


11. Restart the PaperCut Application Server service and check https://your.fully.qualified.domain.name:$port/admin, in my case it is https://print.papercut.com/admin

Wednesday, October 21, 2020

Setting up a virtual studio using OBS Studio and Voice Meeter Banana

I had to come up with a way to setup some virtual studio style conferencing for a virtual event.  I have experience with OBS Studio but was required to have a sound track running before the stream.  Now having learned a bit about broadcast video I wasn't sure how I was going to setup the sound track as OBS doesn't really have a way of playing an audio file to another interface your not listening to.  

So to accomplish this I initially used a griffin iMic and set the input to line in.  Unfortunately because of the time constraints I must have had a bad cable or connection input setup that hooked up to a phone's headphone jack but the sound on it wasn't very good and could be better.  Instead of troubleshooting the cable, software inputs etc, I knew there were some virtual audio input software that could route songs, and input from other software like skype.  

Eventually I came across Voice Meeter Banana an advanced virtual mixing console able to manage 5 audio inputs (3 physicals and 2 virtual) and 5 audio outputs (3 physicals and 2 virtual) through 5 multichannel busses (A1, A2, A3 & B1, B2). Eventually I will probably get the virtual audio channeling setup properly to have an application or browser setup on it's own input but for right now I just need quick, dirty and it has to work.

I did a youtube video about some OBS Basics which can be viewed on my youtube channel.  

You will need to have OBS Studio installed and Voicemeeter Banana

The setup for piping the audio is simple.  The audio cassette in the picture below can play audio files in this case I have an mp3.  B1 is the Voicemeeter VAIO digital input which is also B1 which is lite up next to the audio cassette.  


The Hardware out A2 is set as the Voice Meeter Input which we will set as Mic/Aux 3 in OBS Studio as shown below.  This allows us to play the audio we require with an option of listening to it or not though our headphones on the computer speakers (which is set to Yeti Stereo Microphone).


To hear what your playing on on Mic/Aux3 you need to have audio monitoring set to monitor and output.  This will put play the audio on your primary computer speakers which is the Yeti Mic as we had stated before.  However if you continue to play the audio you can set audio monitoring for Mic/Aux3 to Monitor off.  


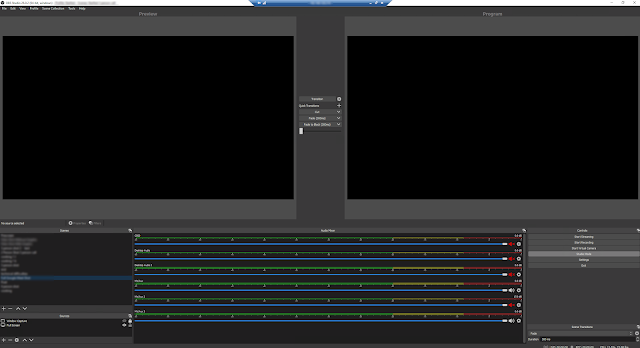
Your audio will continue to play and it will stream out unless you mute the audio on the output in OBS Studio which is shown by the speaker being either white or red.  The Red Speaker means your audio is muted while the white means that it is being passed through to the stream.  So in the image below Mic/Aux3 and Mic/Aux are live and will be heard in the stream while Desktop Audio, Desktop Audio 2 and Mic/Aux2 are muted and will not be heard.


To do the studio style interview setup I am using Google Meet but anything will work, skype, gotomeeting, zoom, and using window or display capture and the crop filter I crop the window where they are speaking so they fit in the 1920x1080 canvas.


The Google Meet call looks like this with 3 tiles and the layout is set to 6 tiles manually as at most you will have 3 users on screen.


The shots shown in green are the filter when there are 2 people on screen the red shows the crop filter set to when there are 3 people on screen.  Below I've distorted the images but you can see where the users are in the silhouette.  When they login to the google meeting you get them positioned and ask them not to move to much.  In the case of the framing I chose to setup I asked them to try stay in the middle of their camera and used OBS to scale to fit the rest of the frame.


the 2 person shot


3 person shot

After some thought, I thought I would try a new layout for OBS where I would layout the guest in a 16:9 format, because the guess were having a hard time staying in frame, so in OBS studio I used the display capture and the crop filter to setup video feeds from your meeting app of choice (in this case it happens to be google meet, but can be skype, zoom, teams, etc)


the blue outline is the crop from OBS Studio and with a live camera feed you get a result with a graphical background as shown below.  The top image is from an onsite camera with lighting and the other 2 are the cropped display from google meet.


Then you can have on display a computer screen video, etc, in this case it is an interview from google meet, where we just have the interviewer and the guest.  This gives more room for the interviewer to move and keeps them from getting cut off because of such type framing going with the full screen view as shown above.

Depending on the setup you can also have different frame this below is done with a camcorder and a HDMI to USB capture card, with 2 point lighting.  OBS will let you make groups and put graphics and text as shown below.

I put a graphic on the left and put a tight shot which was scaled from the wide shot from the shot above.

Audio quality is really important and depends if they have a microphone; most of the time they are using the phone or built in mic on the laptop and adjustments must be made with speakers so you don't get feedback from hearing your self through their speakers and back through their mic.  To prep it up takes about 30 minutes, for placement and audio.  For people doing this I would recommend they ask people wear earphones and get an irig mic or something similar.  It makes a big difference in the sound.

It is difficult to keep people from moving but this setup does work pretty well, to see some samples checkout the STARFest - St. Albert Readers Festival videos.

Tuesday, September 15, 2020

FreeNAS What is a L2ARC Cache and why is it useful?

In FreeNAS nothing beats RAM. A general rule of thumb is a minimum is 1GB of Ram per TB of storage but might need to be adjusted depending on workload/application.  Personally I prefer to have 2 GB RAM to 1 TB of disk if possible. Generally in the FreeNAS (truenas) community it is well known that it is recommended that FreeNAS run on 32GB of ECC RAM minimum, however I have found that if you are using a the 2:1 Ram ratio you can use non-ecc ram and FreeNAS runs fine though is not recommend by FreeNAS; but you work with what you got.

FreeNAS uses ZFS which provides a read cache in RAM, known as the ARC, to reduce read latency. FreeNAS adds ARC stats to top(1) and includes the arc_summary.py and arcstat.py tools for monitoring the efficiency of the ARC. 

If you use a L2ARC cache it is recommended using an SSD as a cache device.  ZFS uses it to store more reads which can increase random read performance.  If you are using a low ram system you shouldn't use a L2ARC, it will not increase performance, and in most cases you will actually hurt performance and could cause system instability.  If the hit rate of the ARC is below 90%, the system can benefit from L2ARC. If the ARC is smaller than RAM or if the hit rate is 99.X%, adding L2ARC to the system will not improve performance, the L2ARC is really only useful if your asking for the same data over and over again. 

As far as selecting appropriate devices for L2ARC, they should be biased towards random read performance. The data on the L2ARC is not persistent, and the L2ARC will be cleared on a reboot.  If you have a drive failure on your L2ARC device there is no need to worry ZFS is resistant and only uses it for read caching; your NAS will continue to function, however read performance will most likely be affected.  There is no need to provision, mirror or otherwise make L2ARC devices redundant, nor is there a need for power protection on these devices.

For example on some of my backup NAS systems I've build where I am moving over 500+ GB of data within 20 minutes my L2ARC cache gets hit quite a bit.  However it depends on what your doing.  It might be more beneficial to have a mirrored SSD pool for more active data and spinning drives for less active content then having a L2ARC Cache if the data needs to be read.

I would suggest using the tools in FreeNAS and monitoring your L2ARC's effectiveness using tools such as arcstat. If you need to increase the size of an existing L2ARC, you can stripe another cache device using Volume Manager. The GUI will always stripe L2ARC, not mirror it. As stated above the L2ARC data is not persistent.

I usually add a L2ARC if I have a spare SSD handy; with a 2:1 RAM ratio my experience is that it does help more then hurt but it depends on what your setup is and what your using it for.  Most of the NAS Systems I use are used for smb backups, and I'm backing up severs virtual disks which are always changing and moving them from NAS to NAS.  Having an L2ARC cache doesn't help there but with a file server that servers out files that don't change much the L2ARC does help with the read performance.

Note: that a dedicated L2ARC device can not be shared between ZFS pools.

Setting up Microsoft for Non-Profits

Google has been given access to GSUITE for a while now and I've setup several non-profits with this and do occasionally help them administrate it if required.  Now Microsoft is getting in the game (and this is a good thing) now giving Office 365 for free for non-profits.

Microsoft 365 is now free for non-profits
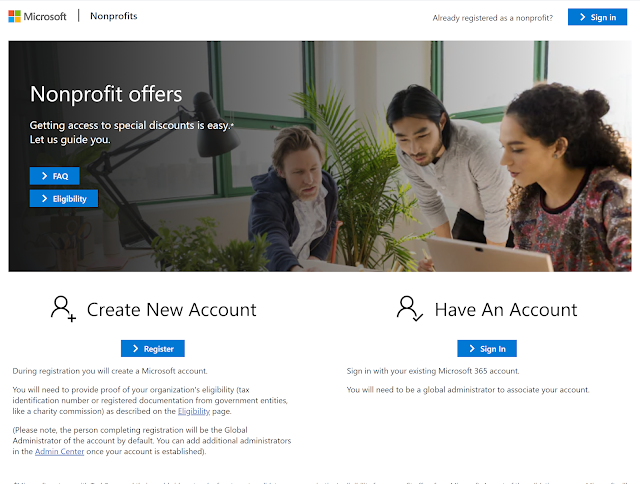
This post will go though what is required to apply and (hopefully) get approved for Microsoft 365 for Non-Profits.  I highly recommend before going forward you go thought the https://www.microsoft.com/en-us/nonprofits/ site and verify your eligibility.  The plans that are available for free are the Office 365 Nonprofit Business Essentials and 

Before you setup your Microsoft 365 account I recommend you have the following:
  • a techsoup account
  • a domain, ie. $yourdomain.ca
  • an email on that domain that can receive email.  This may require setting up an email alias if you don't have your own server
  • a way to verify your registration.  I recommend using a business or corporation number
  • picture of registration information
When you have all this information setup then you can go ahead and signup for Microsoft 365 Business for Non Profits.  When signing up I used a image of the registration information.  In the case of the setup I did I used the corporation number, and your techsoup validation token.

For more information about what is included in the free version of office 365 for non-profits.  https://www.techsoup.org/support/articles-and-how-tos/what-you-need-to-know-about-microsoft-office-365-nonprofit


Once you've filled out all the information you will get a verification email stating that the office 365 application is in progress.

Office 365 Verification
Once your organization has been verified you will get an email informing you to some of the services that are available for your organization.


When you go to login you can use the non-profit portal to login.  Typically you will be logging in with the format $user@$domain.onmicrosoft.com

Once you login to the non-profit portal you see your status and quick links for github, linkedin, and more Microsoft services that are available to you.


When you sign in to office.com you will be taken to a dashboard.


From here you can go into the office admin, non-profit portal, etc.  At least for this non-profit I am showing you the dashboard for they are allowed up to 25 unique users.


My experience with google there is no limit on the number of users you can have, but if you want Microsoft's products and services this is a fantastic service which I am sure will cut into google apps for non-profits adopters.  I found the setup and verification quick and fairly easy.  You are required to setup 2FA for the administrator account and for that I use and recommend Microsoft Authenticator available on Google Play and iOS


Friday, September 11, 2020

Installing a small footprint version of Ubuntu Desktop for Ubuntu Server

When I install a Linux server like Ubuntu Server, I occasionally do require a desktop but I don't want all the additional software that comes with the gui like LibreOffice, Thunderbird, etc.  Don't get me wrong, this is all great software for a client desktop but it isn't something that one might want on a server.  To achieve a small desktop footprint I do the following:

  • Get and install updates
    "sudo apt-get install update"
  • Get and install upgrades
    "sudo apt-get install upgrades"
  • Install lightdm
    "sudo apt-get install lightdm"
  • Install Unity
    "sudo apt-get install unity"
  • Install ubuntu desktop

    *** Important update ****
    When I went to setup a new lite version of ubuntu server when I tried to use the latest version of Ubuntu Server 20.04.02 and ran 

    "sudo apt-get install --no-install-recommends ubuntu-desktop"

    I got the following error

    "Command line option --no-install-recommends is not understood in combination with other options"

    In previous versions of Ubuntu the command works fine such as in 16.04.07 but in Ubuntu 20.04.02 I had to use

    "sudo apt-get install ubuntu-desktop-minimal"

    So please note this important change if you are trying to create a minimal version of a linux desktop; this may also affect other distros.

    Then continue with the other installs


    "sudo apt-get install compizconfig-settings-manager"
    "sudo apt-get install firefox"
    "sudo apt-get install net-tools"

If you want to pin the terminal application to the launcher, but the launcher won't show up in your applications though the gui.

No Terminal Application showing up

To add the terminal to the launcher is to right click on the desktop and open the terminal


Once the terminal is open right click on the terminal in the launcher and lock to launcher


Friday, September 04, 2020

Setting up Papercut print release system for Linux

Ramsey Public Library Envisionware Print Release System
In December of 2019 an organization was expanding and opening a new location.  This post is part 1 of a 4 part series which will go though the investigationThey offer public printing services and were using a public printing solution from Envisionware called LPTONE.  I did a previous post on this software in 2018 with setting up a release station with the Envisionware LTPONE software.    

However after investigating upgrade options and the cost for adding an additional location and coinop for the release station it was not a cost effective solution since new hardware would be required for both locations and there was just not the budget for it.  Not to mention the difficulty of managing two release systems that were non-centralized.


Ramsey Public Library uses an envisionware print release system, I know from the experience I've had with it; it's ok but it is quite lacking and expanding they system it is currently on to windows server from windows 10 pro would be quite the expense as it would require more then 2 machines with server if we ever got over 30 clients and we were right on the cusp of being.  


ITC 5400 COINOP
The organization had service contracts with Toshiba for managing the maintenance and materials of their printers which also included a ITC 5400 coinop, which was attached to one of the copiers for paid copies; so I investigated if that company had any kind of print management software that could use the same coinop and if the coinop could do double duty for the coping and the printing.  After contacting ITC and verifying that yes indeed the 5400 coinop can do double duty for the printing and coping payment; however they use a 3rd party software for the print management called papercut.

Now Papercut is a centralized print management solution, that works on Linux or Windows and is actually pretty light on system requirements.  At a glance you would think for just managing client side printing the NG version would all that is required however it didn't quite do all that was desired from the printing side so it was decided to go with the MF version.  The project started with a decision to go with a Ubuntu 18 LTS virtual server on Hyper-V to host the papercut MF software.


You can view Papercut's System Requirements I found on Hyper-V these settings work pretty good for a workgroup of of about 40 clients.


Processor: 2 Core


Minimum 4GB of Ram (max of 16GB) Dynamically Assigned


Disk Space: 
3GB for Log, 100GB free disk space, between 60 and 500GB recommended.


Here are the CDN links for the papercut software if you want to try it yourself.


Linux:

https://cdn1.papercut.com/web/products/ng-mf/installers/mf/19.x/pcmf-setup-19.1.5.52403.sh

Setting up Papercut on Ubuntu Server 18.03 LTS / 20.04 LTS


There are a couple things you need to know before you can install papercut on Linux.

  1. The "ROOT"/Administrator must be called papercut
  2. The user must have sudo access for the install
So when you install your username must be papercut, otherwise you will have serious issues with your install, with permissions etc.  

For this install I'm going to use the following credentials:

  • username: papercut
  • password: papercut
and I am installing open ssh and powershell.

Once we have finished our base install we will need to install the following (for a slimmed  down version):
  • Get and install updates
    "sudo apt-get install update"
  • Get and install upgrades
    "sudo apt-get install upgrades"
  • Install lightdm
    "sudo apt-get install lightdm"
  • Install Unity
    "sudo apt-get install unity"
  • Install ubuntu desktop
    "sudo apt-get install --no-install-recommends ubuntu-desktop"
    "sudo apt-get install compizconfig-settings-manager"
    "sudo apt-get install firefox"
    "sudo apt-get install net-tools"
If you don't want a slimmed down version just use "sudo apt-get install ubuntu-desktop"
  • restart
  • Install and configure cups
    "sudo apt-get install cups (should be already installed)"
  • add the papercut user to the printer admin for cups
    sudo usermod -a -G lpadmin "$USERNAME"
  • Install Samba
    "sudo apt-get install samba"
  • add the papercut user to the sudoers list
    sudo vi /etc/sudoers
    papercut ALL=(ALL:ALL) ALL
  • Install papercut
    chmod 777 "PATH TO PAPERCUT".sh
    sudo ./"PAPERCUT INSTALLER"
You can watch a video on the full process on my youtube channel here. https://youtu.be/9re8L6uWc94


How to fix CURL call imporitng an RSS feed on a site blocking CURL calls

There is a 3rd party service provider that my organization uses called bibliocommons.  They have these nice book carousels.  However the car...