Showing posts with label #windows. Show all posts

Sunday, March 19, 2023

Intel Mac - Install the latest version of Windows using Bootcamp

I have a project I am working on where a computer is needed to be available for any body to use but it has to have Multi-Media software installed and it needs to be useable.  There is no budget for new hardware but there are two outdated iMacs available.  These iMacs were purchased in 2015 and were not being used.  Originally the idea was to have these macs put out with MacOS X because of the reputation apple did have as being used for creative professionals, that was a different era though and those times are gone.  Also with the costs to upgrade the software, staff training, etc.  Since the software we were planning to use was also available on Windows it was decided to go with the latest version of Windows 10 22H2, because of the software that we are currently using for managing our systems.

3.2GHz Quad-core Intel Core i5, Turbo Boost up to 3.6GHz
NVIDIA GeForce GT 755M 1 GB GDDR5
16GB 1600MHz DDR3 SDRAM - 2x8GB
256GB Flash Storage


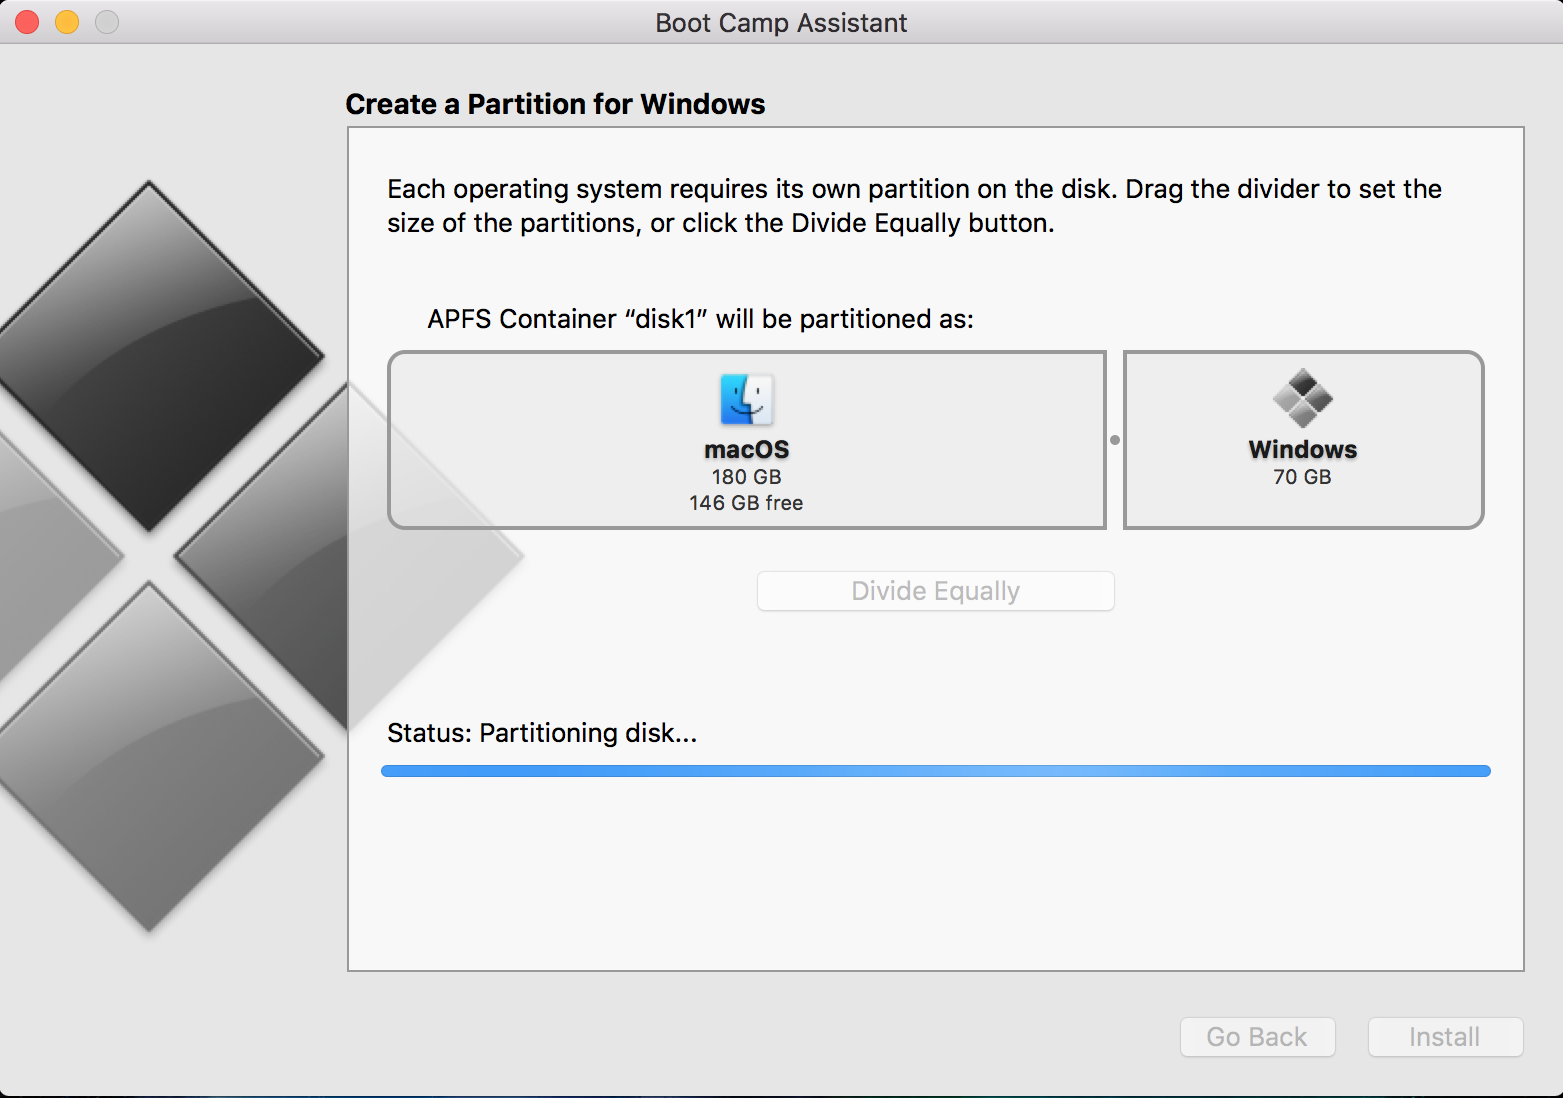
You MUST run thought the boot camp wizard.  If you try to make a bootcamp boot disk with a newer version of windows such as 22H2 IT WILL FAIL.  To successfully run though the bootcamp assistant; I had to use a windows 7 iso to create a bootcamp disk and have the Boot Camp Assistant successfully partition the disk.

While the Bootcamp assistant was working I used Rufus to make a second windows boot disk using GPT and UEFI for booting.  Once the Mac OS as finished with the boot camp assistant, it will reboot and if you do nothing it will try to boot off the Windows 7 boot disk that was created.  I put the Rufus boot disk into an open USB port after the boot camp partitioning completed successfully.  Now if you reboot and hold down the "OptionKey" you can select which disk you can boot off of.


The Rufus boot disk shows up as a EFI boot disk and the bootcamp disk shows up as a Windows Disk.  will booted into boot camp and started to run the windows 7 installer I cancelled the install and booted up holding the "Option" or "Alt" key then selected the UEFI boot device (which is our windows 10 usb installer)


After a few minutes it booted into the windows 10 installer


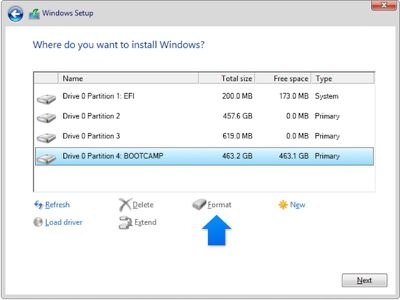
Bootcamp formats the drive for NTFS, you can either keep your mac files or erase the whole thing install windows on the whole system disk.  I deleted all partitions and installed windows on the full disk.  I chose the latter because I need a full fledged windows Machine and don't need Mac OS.  This will NOT affect the system's bootup.  If you need to install Mac OS you will have to make a USB drive or use the cloud recovery mode.

Windows will go though it's full installer; once it gets into windows the bootcamp installer we made should auto launch and install any required drivers.  Once the installation is complete the system will reboot and will work like any other windows system.  Some caveats about using a mac like this.

  1. Wake on Lan doesn't work.  We are using WOL to schedule turning on the systems and shutting them down at night.  While the shutdown is still possible to do; turning the system on is a big time saver for the staff so the shutdown for the system will be disabled.

  2. Cloud Recovery.  Since it is not possible to lockout cloud recovery it is possible for someone to erase the system and reset it to MacOS

  3. Ports are on the back.  The ports are on the back of the imac and are accessible and can be damaged.


Tuesday, November 03, 2020

Creating and Installing a SSL/TLS Certificate on a Windows Papercut Server

Papercut has a pretty good tutorial for updating/installing an SSL Certificate on papercut but I found it a little hard to follow, if you want to see the origionanl post go to https://www.papercut.com/kb/Main/SSLWithKeystoreExplorer.  As in their post I also recommend using KeyStore Explorer for installing the SSL Certificate as it makes it much easier.  

I am using an existing wildcard cert for securing this server.  I have also setup the server to use port 80 and 443.  I am working directly on the papercut server to create the cert, you can create the cert on another machine then copy the cert over and begin the import process using KeyStore Explorer, or even copy the file you create using keystore explorer to the papercut server.

To start if you haven't install the openssl tools, and create a compatible certificate if you haven't https://wiki.openssl.org/index.php/Binaries


Create you certificate (I'm working out of the OpenSSL Directory - "C:\Program Files\OpenSSL-Win64\bin") and my source is a wildcard cert for an apache webserver.

openssl pkcs12 - export -out $PATH\To\Save\$mycertname.pfx -inkey "$Path\to\privatekey\$cert.key" -in "$Path\to\crt\" enter export password and verify

I saved this to the OPENSSL directory.


To install the certificate into papercut open KeyStore Explorer

1. Click Create a new Key Store


2. Select JKS, then click OK


3. Click the Import Key Pair icon


4. Select the type of certificate you are using, then click OK, I'm using PKCS Certificate which we created earlier


This is normally PKCS12 (.pfx, .p12), but it depends on where your certificate came from.

5. Click Details to verify the certificate. If you get an error, it could be the password or the wrong certificate type

pkcs12 import
pkcs8 import

6. In the Enter Alias field, enter an alias for the newly imported Certificate, this can be anything, but in this case we are putting print.papercut.com, then click OK


7. Save your KeyStore


8. Set the password for your KeyStore 
then click OK, Remember to make a note of this, as you will need to re-enter this later when you set the value for the “server.ssl.keystore-password” value in the server.properties file.


9. 
I saved it in 2 places, my documents folder and to the papercut custom directory located in the PaperCutMF Server Folder ie (C:\Program Files\PaperCutMF\server\custom) which we will use later.


10. Edit the papercut server.properties file typically located in the server folder and change the values below to match your filename and passwords and remember to remove the # signs to enable these keys


server.ssl.keystore=custom/$papercut-keystore (in my case it is called papercut)
server.ssl.keystore-password=$PASSWORD
server.ssl.key-password=$PASSWORD


11. Restart the PaperCut Application Server service and check https://your.fully.qualified.domain.name:$port/admin, in my case it is https://print.papercut.com/admin

Updating your godaddy certs during the G2 intermediate hierarchy to the TLS Root CA - R1 hierarchy

  If you use GoDaddy TLS certificates you should be aware of some changes during the transition from the G2 Intermediate certificates to the...