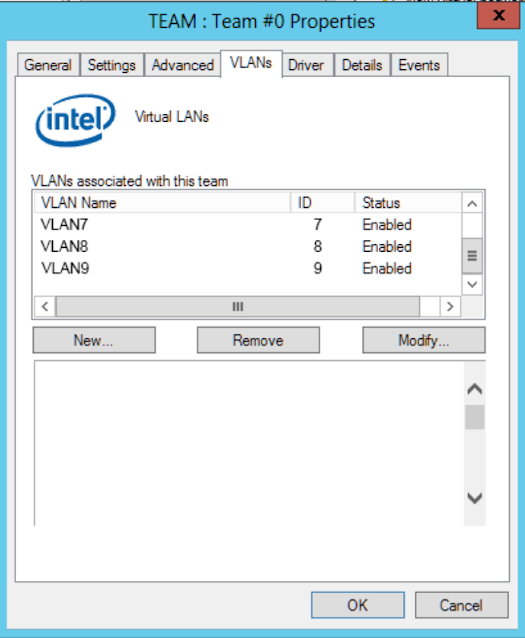
Windows 10 pre 1809 and Windows Server pre 2022 typically would be setup with a Teamed network adapter using LBFO (Load Balancing and Failover). Windows 10 after 1809 and Windows 11 now require powershell to create your virtual switch and your vlan networks. In windows Pre-1809 you would put the VLANs inside the network driver and it would show up in the VLAN tab of the driver as shown below.
You can view a post I did for this back in 2018 https://optionkey.blogspot.com/2018/07/how-to-fixsetup-teaming-and-vlans-while.html
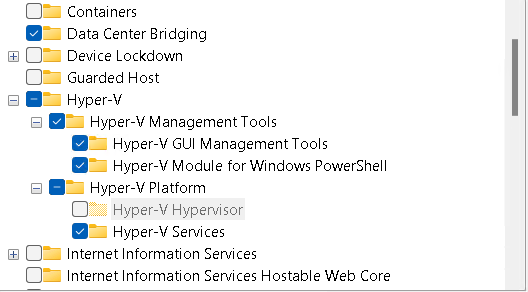
- Data Center Bridging
- Hyper-V GUI Management Tools
- Hyper-V Module for Windows Powershell
- Hyper-V Services
- Window's Hyper-Visor platform
New-VMSwitch -Name "SET" -NetAdapterName "Ethernet" -AllowManagementOS $true
If you are using a virtual team be sure to enable the LBFO Teams shown below.
New-VMSwitch -Name "SET" -NetAdapterName "Ethernet" -AllowNetLBFOTEAMS $true -AllowManagementOS $true
To add the vlan to hyper-v we need to add the VM network adapter
Add-VMNetworkAdapter -ManagementOS -Name "VlanX" -SwitchName "SET"
Now we set the vlan, otherwise it will take it's network information from the Untagged VLAN
Set-VMNetworkAdapterVlan -VMNetworkAdapterName "vlanX" -vlanid X -Access -ManagementOS
From here you can flush your ip address and reset the network adapter to get the ip address of the vlan. Disabling and enabling the adapter also works well for that.
Here are some other powershell commands you will want to make note of for removing virtual network adapters and switches.
Remove-VMSwitch "$VMSwitchName"
Remove-VMNetworkAdapter -ManagementOS -Name "VLANX" -SwitchName "$VirtualSwitch"
Sources
https://techcommunity.microsoft.com/t5/networking-blog/teaming-in-azure-stack-hci/ba-p/1070642
https://www.aligrant.com/web/blog/2022-12-16_creating_multiple_vlans_on_windows_11
https://www.veeam.com/blog/hyperv-set-management-using-powershell.html


