Quick guide: Automatic login in Windows 10
- Open the Registry Editor using [Windows] + [R] and “regedit”.
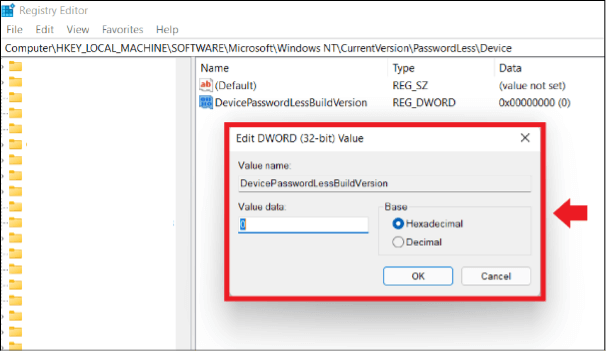
- Enter HKEY_LOCAL_MACHINE\SOFTWARE\Microsoft\WindowsNT\CurrentVersion\PasswordLess\Device.
- Double click on “DevicePasswordLessBuildVersion”.
- Set the value from “2” to “0”.
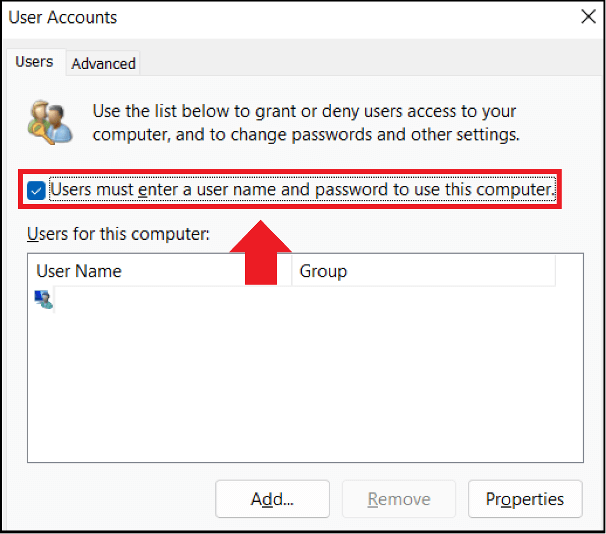
- Open User Accounts using [Windows] + [R] and the CMD command “netplwiz”.
- Uncheck the box beside “Users must enter a user name and password to use this computer”.
How to set up an automatic login in Windows 11
Follow these steps to set up an automatic login in Windows 11 and remove the password prompt. The steps to set up an automatic login in Windows 10 are identical.
Enable automatic login in Windows 11
Firstly, you must set up the automatic login feature.
Step 1: Open the “Run” dialog box by entering the shortcut [Windows] + [R] and enter the CMD command “regedit”. This will open your system’s Registry Editor.
Proceed with caution when making changes to the Registry Editor. Unintended changes may permanently alter the system and could permanently damage it in a worst-case scenario.
Disable the password prompt in Windows 11
You can disable the password prompt once you completed the following steps.
Step 1: Open the “Run” dialog box again with the shortcut [Windows] + [R] and enter “netplwiz”.
Step 2: The “User accounts” menu will open. Uncheck the box beside “Users must enter a user name and password to use this computer”.
Step 3: Enter the current password to confirm changes and click “OK”.
Automatic login after stand-by/energy-saving mode
It is even easier to disable the password prompt after waking the device from standby mode. This option is possible without changing anything in the Registry Editor.
Step 1: Open “Settings” with the shortcut [Windows] + [i].
Step 2: Go to the “Accounts” menu and select “Never” in “Login options”. The password prompt will not appear anymore after the device has been woken from power saving mode.
Computer\HKEY_LOCAL_MACHINE\SOFTWARE\Microsoft\Windows NT\CurrentVersion\Winlogon
AutoAdminLogon
DefaultPassword
DefaultUserName
if you don't have them we will need to make these entries and set the following values, these are all string entries and will need the following values
AutoAdminLogon and set the Value data to 1
DefaultUserName and set the Value data to $domainuser
DefaultPassword and set the Value data to $userpassword
Add the user in this case "guest" to our guest group on the local machine.
Local Users and Groups


