Friday, September 12, 2025

Replacing a drive and repairing a storage spaces volume

When you have a drive fail in a storage spaces, changing out the drive isn't straight forward, however well worth the effort when you consider the advantages storage spaces has over regular RAID.  Specifically the lack of a an expensive disk controller, and tiered spaces with the use of HDDs and SSDs.


So in my case it is a 2U server with a RAID Controller set to JOBD, and I had a failure of a Seagate drive as shown in the picture above.  On the server we removed the bad physical drive, if on a raid controller prepare the drive, should be set to JOBD.  Formatting may be required.  As shown in image below, I added a Toshiba drive; and to replace it we need to the the following.


PS C:\> $PDToRemove = Get-PhysicalDisk -FriendlyName "$DISKNAME" 

In this case the drive's friendly name is "SEAGATE ST600MP0006" then we need to remove the disk with the following Powershell statement.

PS C:\> Remove-PhysicalDisk -PhysicalDisks $PDToRemove -StoragePoolFriendlyName "$PoolName"

(in this case SEAGATE ST600MP0006)


Once the old disk is removed we can run a repair with the following powershell statement

PS C:\>Repair-VirtualDisk -FriendlyName "$VIRTALDISK"


This will take some time to run, but it is much faster then repairing a RAID setup, taking about 20 minutes to repair the storage spaces mirror setup.  While the dive is being repaired you will see it in a InService status.


When storage spaces finishes the drive will show as being in good health.


Thursday, September 11, 2025

Troubleshooting Edifact Import Files on SirsiDynix Horizon ILS

Some libraries use edifact files for automating purchasing from different vendors.  In this case acquisition librarian uses an FTP client to download and load the edifact file into the ILS.  Errors can easily happen where you can then no longer access the invoice from the vendor and a new edifact file must be issued and imported into horizon.

What is an Edifact File?

The UN/EDIFACT Syntax Rules were approved as the ISO standard ISO 9735 by the International Standardization Organization.


The EDIFACT standard provides:

  • a set of syntax rules to structure data

  • an interactive exchange protocol (I-EDI)

  • standard messages which allow multi-country and multi-industry exchange


Read more about it here

Edifact File Sample

UNA:+.? '

UNB+UNOC:3+###:###+####:###+250903:1557+B000025704'

UNH+B000025707+INVOIC:D:###:UN:EAN008'

Header

BGM+380+#####+43'

DTM+137:20250903:102'

NAD+BY+####::###'

NAD+SU+#####::###'

NAD+SU+++Name.+Address .+City+Province+PostalCode+Country'

CUX+2:CAD:4'

Vendor Info

LIN+000001'

IMD+L+050+:::Library MARC - CUSTOM'

ALC+C++++ABK::28'

QTY+$$$$'

MOA+####'

RTE+Quantity:1.07'

RFF+LI:'

PO/Item Info

UNS+S'

CNT+2:8'

MOA+####'

TAX+7+GST'

MOA+#####'


Summary

UNT+69+B000025707'

UNZ+1+B000025704'

Footer


The UNB number the B number MUST match the B number in UNZ, also the UNH B number MUST match the UNZ B number.  These are unique identifiers for the invoice generated by the vendor.  If there is an issue with the import of an invoice such as cancelled items on the PO, or any other error you will need to get a new Edifact file from the vendor.


How to check the error on edifact files in Horizon


To check for errors on edifact imports (uploads) you need to view them in table Editor


Double click table editor to open up the search and type in edifact


Then select double click on “edifact exceptions” and scroll to the bottom for the most recent errors.  You will want to look for the errors highlighted in Green, not errors stating the edifact file has already been uploaded.


If you try import a file and it fails do the following:


  1. Ask the vendor for a new Edifact File with new header numbers.  (Once you try import it once it can not be imported again with the same header numbers)

  2. Check the PO in horizon, verify everything is ok and there is nothing cancelled, etc.

  3. Check for error codes in table editor using the edifact exceptions view

  4. Either fix the PO or remove the troublesome line in the edifact file using Notepad.

  5. Once the PO or the edifact file is fixed, reimport (upload) the file into horizon.


Additional Error info:


If you get an error like Process Invoice Error PO/Line, means there is a mismatch with the PO and the invoice, and the PO in Horizon needs to be fixed or an item in the edifact file needs to be removed shown in the example in orange.  Verify the PO in horizon before trying to re-import the edifact file in Horizon.   The PO either needs to be corrected or remove anything that is not in the PO in the edifact file.


Unfortunately you have to go back to the vendor and ask for a new edifact file because there was an error on import and a new header needs to be generated so the Unique identifier matches what the vendor gives for the import and once a file has been imported it can not be easily deleted in Horizon.


Wednesday, July 23, 2025

Meraki AP Management Changes

I work for a smallish organization and we have a network that is locked down that we use for managing devices, however we don't run a DHCP server on it.  The MR36 unlike the MR32 and MR33 requires a network with a DHCP server for internet access and management of the access points.  Trying to double up using an already established network you are using for wifi clients for example causes connectivity issues for the wifi clients.

In the past we would configure the meraki ap on a network with a DHCP server and change the VLAN and network settings on the AP to match the statically assigned ip we wanted for the device on our management network.  When we did that it worked just fine as shown below on an MR32.


However not so with the MR36, 
setting the VLAN's for the AP's worked the same but when I switched it back to the network without DHCP server the device became unavailable along with not routing traffic properly.  The AP goes offline.  Shown below VLAN X is a network where devices are statically assigned, and when the meraki switch has that VLAN setup for the AP the AP cannot connect, and the dashboard times out.

Switch Settings


Dashboard


But when I change the VLAN to one with a DHCP Server (VLAN A) the dashboard becomes responsive again.


To resolve the issue what I had to do was create a Management AP network for the Meraki AP's that has a DHCP Server.  So instead of using VLAN X I have it using VLAN Y for the native VLAN.   When I tried to use a network for double duty such as VLAN A, your wifi clients cannot connect and their mobile devices give a connection error.

On my firewall I created a new network (VLAN Y as described above) and I put the VLAN throughout where it is required, and will use that as the native VLAN and management network for the Meraki APs.

Wednesday, June 18, 2025

Error opening PDF's In Chrome with Adobe Acrobat: PDF edit, convert, sign tools enabled

If you start having trouble opening PDF's in chrome or edge you might need to check for the "Adobe Acrobat: PDF edit, convert, sign tools".  


If you disable or uninstall the extension in chrome you will be able to see the PDF again in chrome and/or edge.

To do that go to the Chrome Menu > Extensions > Manage Extensions


Then disable or remove the extension.


Monday, June 09, 2025

How to generate a QRCode for connecting to a wifi network

Here is how to generate a QRCode so people can access your (or a) wifi network.

Using a QRCode generator that can do plain text or allow the customization or the URL field where it will not put in https:// in front of the text like the QRCode generator in Adobe express does.  If the service your using puts in https:// in front of your SSID code it will fail to connect the mobile device to the network.

Adobe Express


Canva and other free qrcode generators will allow you to customize the URL field without it pre-propagating the URL with https:// or by allowing you to use the plan text field.

CANVA


QRCODE TEC-IT


Below is the code you need to use to generate the QRCode for allowing devices to connect to your wifi network.  Replace the <$SSID> and <$PASSWORD> with your ssid name and password and anyone should be able to connect but a quick caveat; you do have to make sure your wifi security is compatible, so if your using WPA3, you will have to make sure your using WPA3 and not WPA2.

WIFI:T:WPA2;S:<$SSID>;P:<$PASSWORD>;;

This allows you more flexibility in a more corporate or creative environment the using the "share" network that comes up on your phone. 

Thursday, May 01, 2025

Updating a SMTP Relay Server without less secure apps


Starting May 1, 2025, Google Workspace accounts no longer support less secure apps, third-party apps, or devices that ask you to sign in to your Google Account with your username and password. You must use OAuth to let these apps and devices access your account. 

Now there are a variety of ways to deal with this issue such as setting up a google SMTP Relay, which I did in 2017 and now google wants you to use oauth which means any google workspace account has to have 2FA enabled and you need to setup app passwords.


To generate an app password first enable 2FA if you have not.  Once that is setup and configured you can use the link below to create an app password for the SMTP Server.


https://myaccount.google.com/apppasswords


For the sake of this documentation let's say it is Account created in December 2023.  It is a 16 character password that you will need to copy and keep somewhere safe.  Let's say it is the password shown directly below.

YTLE PUYV LHMW QXBT

So in our relay server you want to find the auth file for the relay server, which if you followed my Tutorial Creating a GMAIL SMTP Relay Server Using Ubuntu On Hyper-V, is in 

/etc/mail/authinfo


Edit gmail-auth, and update the AuthInfo with the following:

AuthInfo:smtp-relay@gmail.com "U:$ComputerUsername" "I:$GoogleEmailAddress" "P:$PASSWORD"

and save the file.  ***NOTE *** There should be no spaces in the password.

Once done recompile sendmail using sudo sendmailconfig and you can test using

echo "subject: test email" | sendmail -v $emailAddress


That is it your done.  You now have an update SMTP Relay server that is in compliance with Google's new security policies.


Wednesday, April 02, 2025

Windows 11 Blocking mdnsNSP.dll with Local Security Authority

Local Security Authority (LSA) is a feature now automatically turned on starting with Windows 11 22H2 with new installs of the system.  LSA is a feature that is suppose to preview code injection that can compromise credentials.  The library mdnsNSP.dll is regarded as an untrusted software.


This library comes with software such as bonjour which is typically packaged with iTunes and some older printer drivers.

There are a couple of ways to deal with this issue the easiest is to remove the software in question, but on the other hand you can also disable LSA in a few ways.

Disable by using the registry

  1. Open the Registry Editor, or enter RegEdit.exe in the Run dialog, and then go to the HKEY_LOCAL_MACHINE\SYSTEM\CurrentControlSet\Control\Lsa registry key.

  2. Open the RunAsPPL value, and set its data value to 00000000. Or delete the RunAsPPL value.

  3. If the protected processes light (PPL) feature was enabled with a UEFI variable, use the Local Security Authority Protected Process Opt-out tool to remove the UEFI variable.

  4. Restart the computer.


Disable by using local policy on Windows 11 version 22H2 and later

  1. Open the Local Group Policy Editor by entering gpedit.msc in the Run dialog.

  2. Expand Computer Configuration > Administrative Templates > System > Local Security Authority.

  3. Open the Configures LSASS to run as a protected process policy.
  4. Set the policy to Enabled.

  5. Under Options, select Disabled.

  6. Select OK.

  7. Restart the computer.


Remove the LSA protection UEFI variable

You can use the Local Security Authority (LSA) Protected Process Opt-out tool from the Microsoft Download Center to delete the UEFI variable if the device is using Secure Boot.


The Download Center offers two files named LsaPplConfig.efi. The smaller file is for x86-based systems and the larger file is for x64-based systems.

Sources.

https://learn.microsoft.com/en-us/windows-server/security/credentials-protection-and-management/configuring-additional-lsa-protection

Sunday, March 30, 2025

Windows 11 auto login - Updated for 2024


Quick guide: Automatic login in Windows 10

  1. Open the Registry Editor using [Windows] + [R] and “regedit”.
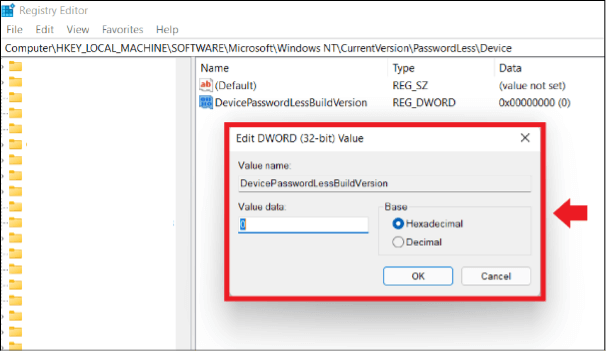
  2. Enter HKEY_LOCAL_MACHINE\SOFTWARE\Microsoft\WindowsNT\CurrentVersion\PasswordLess\Device.
  3. Double click on “DevicePasswordLessBuildVersion”.
  4. Set the value from “2” to “0”.
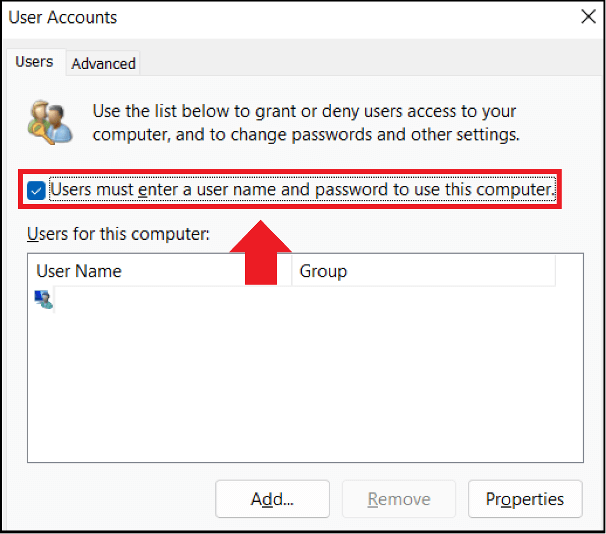
  5. Open User Accounts using [Windows] + [R] and the CMD command “netplwiz”.
  6. Uncheck the box beside “Users must enter a user name and password to use this computer”.

How to set up an automatic login in Windows 11

Follow these steps to set up an automatic login in Windows 11 and remove the password prompt. The steps to set up an automatic login in Windows 10 are identical.

Enable automatic login in Windows 11

Firstly, you must set up the automatic login feature.

Step 1: Open the “Run” dialog box by entering the shortcut [Windows] + [R] and enter the CMD command “regedit”. This will open your system’s Registry Editor.

 Note

Proceed with caution when making changes to the Registry Editor. Unintended changes may permanently alter the system and could permanently damage it in a worst-case scenario.

Step 2: Enter the path HKEY_LOCAL_MACHINE\SOFTWARE\Microsoft\WindowsNT\CurrentVersion\PasswordLess\Device.

Step 3: Double click on “DevicePasswordLessBuildVersion” and change the value from “2” to “0” in the Value data menu.

Disable the password prompt in Windows 11

You can disable the password prompt once you completed the following steps.

Step 1: Open the “Run” dialog box again with the shortcut [Windows] + [R] and enter “netplwiz”.

Step 2: The “User accounts” menu will open. Uncheck the box beside “Users must enter a user name and password to use this computer”.

Step 3: Enter the current password to confirm changes and click “OK”.

Automatic login after stand-by/energy-saving mode

It is even easier to disable the password prompt after waking the device from standby mode. This option is possible without changing anything in the Registry Editor.

Step 1: Open “Settings” with the shortcut [Windows] + [i].

Step 2: Go to the “Accounts” menu and select “Never” in “Login options”. The password prompt will not appear anymore after the device has been woken from power saving mode.


Computer\HKEY_LOCAL_MACHINE\SOFTWARE\Microsoft\Windows NT\CurrentVersion\Winlogon
Find the following entries we will need to edit them

AutoAdminLogon

DefaultPassword

DefaultUserName

if you don't have them we will need to make these entries and set the following values, these are all string entries and will need the following values


AutoAdminLogon and set the Value data to 1


DefaultUserName and set the Value data to $domainuser


DefaultPassword and set the Value data to $userpassword


Add the user in this case "guest" to our guest group on the local machine.

Local Users and Groups


Replacing a drive and repairing a storage spaces volume

When you have a drive fail in a storage spaces, changing out the drive isn't straight forward, however well worth the effort when you co...